Table of Contents
Advertisement
Quick Links
Advertisement
Table of Contents

Related Manuals for PeakTech 1650


Summary of Contents for PeakTech 1650
- Page 1 ® PeakTech 1650 Bedienungsanleitung / Operation manual / Mode d’emploi / Istruzioni per l'uso / Manual de instrucciones AC/DC True RMS Digital Zangenmessgerät / Digital Clamp Meter / Pince de mesure digitale / Apparecchio di misurazione a pinza digitale /...
-
Page 2: Safety Precautions
1. Safety Precautions This product complies with the requirements of the following European Community Directives: 2004/108/EC (Electromagnetic Compatibility) and 2006/95/EC (Low Voltage) as amended by 2004/22/EC (CE-Marking). Overvoltage category III 600V; pollution degree 2. CAT I: For signal level, telecommunication, electronic with small transient over voltage CAT II: For local level, appliances, main wall outlets, portable... - Page 3 Check test leads and probes for faulty insulation or bare wires before connection to the equipment. To avoid electric shock, do not operate this product in wet or damp conditions. Conduct measuring works only in dry clothing and rubber shoes, i. e. on isolating mats. Never touch the tips of the test leads or probe.
- Page 4 Cleaning the cabinet Clean only with a damp, soft cloth and a commercially available mild household cleanser. Ensure that no water gets inside the equipment to prevent possible shorts and damage to the equipment. 1.1. Safety information Caution! Refer to accompanying documents. Caution! Risk of electric shock.
-
Page 5: Specifications
3. Specifications Display 3 ¾-digits, 12 mm large LCD, maximum reading 3999 with function and units sign annunciators; 41 segment analogue bar graph Polarity indication Automatic, positive implied, negative indicated Overrange Indication "OL" is displayed Low battery Indication Battery symbol is displayed when the battery voltage drops below accurate operating level Display update Rate... - Page 6 3.1. Maximum input values Function Max. Input A AC, D CA 400 A V DC, V AC 600 V DC/AC Resistance, diode, continuity test, 250 V DC/AC frequency, work cycle, capacity Temperature (° C/° F) 250 V DC/AC 4. Specifications 4.1.
- Page 7 4.4. AC Current Range Resolution Accuracy 40 A 10 mA ± 2,5% rdg. + 8 dgt. 400 A 100 mA ± 2,8% rdg. + 5 dgt. Overload protection: 400 A Frequency range: 50/60 Hz 4.5. Resistance Range Resolution Accuracy 100 mΩ ±...
- Page 8 4.8. Temperature Range Resolution Accuracy -20 ... + 760° C 1° C ± 3,0% rdg. + 5° C - 4... +1400° F 1° F ± 3,0% rdg. + 9° C Overload protection: 250 V DC/AC 4.9. Continuity Audible Threshold Test current <0,5 mA <...
-
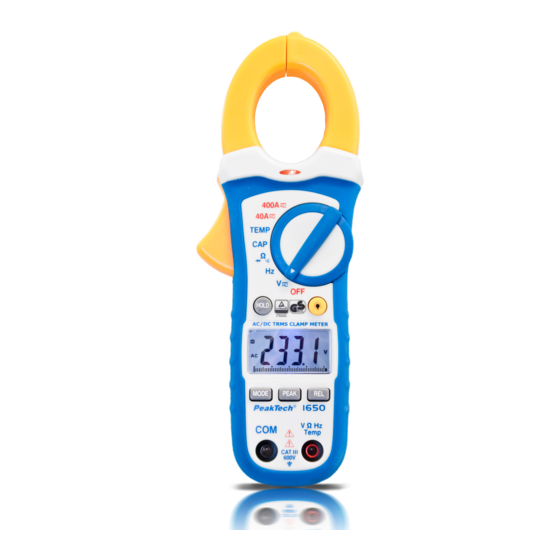
Page 9: Instrument Layout
5. Instrument Layout 1. Current Clamp 2. Clamp trigger 3. Rotary function switch 4. DATA-Hold 5. backlight 6. LCD-display 7. MODE-button 8. PEAK-Hold-button 9. REL/DCA-Zero-button 10. COM-input socket 11. V/Ω/Hz/Temp-input socket -27-... - Page 10 COM Terminal This is the negative (ground) input for all measurement modes except current. Connection is made to it using the black test leads. V/Hz/Ω Ω Ω Ω Input Terminal This is the positive input terminal for voltage, capacitance, frequency, ohms and diode measurements. Connection is made to it using the red test lead.
-
Page 11: How To Make Measurements
Peak Button This measurement function is used to measure the peak value of a signal. It is useable with AC current measurements. To use this function, select the function and range and press the peak hold switch. When this is done, the “P” will appear in the display. Next, by inputting a signal, the peak hold function operates. - Page 12 WARNING! To avoid possible electric shock, instrument damage and/or equipment damage, do not attempt to take any voltage measurements if the voltage is above 600 V AC/DC are the maximum voltages that this instrument is designed to measure. The “COM” terminal potential should not exceed 600 V measured to ground.
- Page 13 4. The most accurate reading will be obtained by keeping the conductor across centre of the transformer jaws. 5. The reading will be indicated on the display. 6. Reduce the range setting if too high until a satisfactory best resolution reading it obtained. 6.3.
- Page 14 The display value is the test lead resistance to be subtracted. 8. After completing measurement, disconnect the test leads. 6.4. Continuity testing CAUTION! Measurements must only be made with the circuit power OFF. 1. Select the Ω/ position by turning the rotary selector °...
- Page 15 6.6. Capacitance measurement CAUTION! Measurements must only be made with the circuit power OFF. WARNING! Capacitors can be carry very high voltages. Before measurement discharge the capacitor. To measure a charged capacitor could damage the clamp meter. 1. Turn off power to the device under test and discharge all capacitors.
- Page 16 6.7. Frequency measurements 1. Set the rotary selector switch to the Hz position. 2. Plug the black and red test leads into the COM and Hz input terminals respectively. 3. Determine that the amplitude level of the signal to be measured is not greater than the input voltage limit (250 V AC/DC).
-
Page 17: Replacing The Battery
7. Replacing the battery WARNING! To avoid electrical shock, disconnect the test leads and any input signals before replacing the battery. Replace only with same type of battery. This meter is powered by a NEDA type 1604 or equivalent 9 V- battery. -
Page 18: Maintenance
Please dispose of old batteries at a council collection point or return them to a local shop at no cost. The disposal in domestic refuse is strictly forbidden according to the Battery Regulations. You can return used batteries obtained from us at no charge at the address on the last side in this manual or by posting with sufficient stamps. - Page 19 We herewith confirm that the units are calibrated by the factory according to the specifications as per the technical specifications. We recommend to calibrate the unit again, after 1 year. ® © PeakTech 12/2012/Sch./Ba./Pt. -37-...
Need help?
Do you have a question about the 1650 and is the answer not in the manual?
Questions and answers