
Subscribe to Our Youtube Channel
Related Manuals for Apera SX811-SS


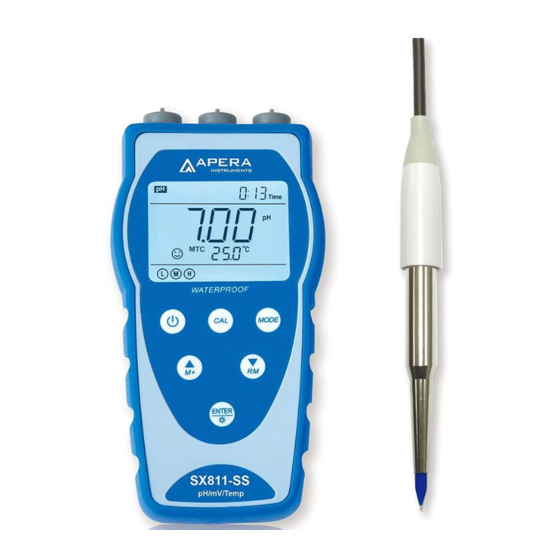
Summary of Contents for Apera SX811-SS
- Page 1 SX811-SS Portable pH Meter for Food Testing Instruction Manual APERA INSTRUMENTS, LLC www.aperainst.com V2.1...
-
Page 2: Table Of Contents
Brief Introduction ......................- 1 - Features ..........................- 1 - Features of the LabSen 753 Spear pH Electrode ..............- 1 - Proper use and maintenance of the LabSen 753 Electrode ............. - 1 - Technical Specifications....................- 2 - Instrument Technical Specs.................... -
Page 3: Brief Introduction
Brief Introduction Thank you for purchasing the Apera Instruments SX811-SS portable food pH meter. This device is an outstanding combination of advanced electrical, sensor technology and software design. The meter is equipped with LabSen753 spear pH electrode, suitable for testing meat, bread, fruit, and dairy products such as cheese, yogurt and other solid or semi-solid food sample’s pH value. -
Page 4: Technical Specifications
Technical Specifications 2.1 Instrument Technical Specs Technical Specs Range -2.00 to 19.99 pH Resolution 0.01/0.1 pH Accuracy ±0.01 pH ±1 digit Temperature 0 to 100 ˚C (Auto or Manual) Compensation Range -1999 mV - 0 - 1999 mV Resolution - 200 mV - 0 - 200 mV: 0.1 mV; Remaining: 1 mV Accuracy ±0.1% F.S ±1 digit Range... -
Page 5: Instrument Description
Instrument Description 3.1 LCD Display Diagram-1 (1) — Measurement mode icons (2) — Measurement value (3) — Timing storage icon. When this icon appears, the meter is in the automatic storage mode (4) — Date and time display value, and prompts of special display mode (5) —... -
Page 6: Keypad
3.2 Keypad Diagram-2 3.2.1. Keypad operations Short press ----- <1.5 seconds, Long press ----- >1.5 seconds. 3.2.2. Turn on the meter Press to turn on the meter: LCD full display → display the measurement mode (backlight for one minute). 3.2.3. Turn off the meter Only in the measurement mode, press to turn off the meter. -
Page 7: Display Mode
In pH measurement mode, press and hold this key to change the Long press resolution repeatedly: 0.01→ 0.1pH In the mode of manual temperature compensation (MTC), when press and hold this key, the temperature value flashes, then press this key to change the temperature value, and press to confirm ... -
Page 8: Ph Measurement
not work. Set time 0 from parameter P4.1 to exit from the automatic storage mode. 3.4.3 Recall stored data In the measurement mode, press key to recall the last stored measuring value. See Diagram – 7: display RM icon and storage serial number. Continue pressing key and key to recall successively the stored measuring... - Page 9 Table-2 pH standard buffer series Calibration icon NIST 1.68 or 4.00 pH 1.68 or 4.00 pH 1.68 or 4.01 pH 3-Point 7.00 pH 6.86 pH 6.86 pH calibration 10.01 pH 9.18 pH 9.18 pH 4.1.5 3-Point Calibration The meter can adopt 1 to 3 points’ calibration. The 1 point must be using 7.00 pH (or 6.86 pH) buffer solution, and then choose other buffers to do 2 point and 3...
- Page 10 4.1.7 Calibration reminder Preset the interval between calibrations (starting from the time when you set it), and then the meter will remind you to calibrate at the end of that interval. For detailes, please see P1.2 (6.3). When the preset time is reached, Er6 icon will be displayed at the lower right corner of the LCD (as showed in graph-8).
-
Page 11: Ph Calibration (Use 3-Point, Usa Standard As An Example)
4.2 pH Calibration (use 3-point, USA Standard as an example) 1) Press to enter calibration mode. CAL1 icon will flash in the upper right corner of the LCD. 7.00 pH will flash in the lower right corner of the LCD, reminding you to use pH 7.00 buffer to conduct 1 point of calibration. -
Page 12: Customized Calibration
6) During the calibration process, press key to exit from the calibration mode. The meter can perform one-point, two-point and three-point calibration. Calibration guide icons appear on LCD. 4.3 Customized Calibration (take 1.60pH and 6.50pH calibration solution as an example) 1) Select CUS from parameter P1.1 (please refer to Section 6.3 for customer-defined solution). - Page 13 Diagram – 12 Calibration and measurement process of pH meter Submerge the After the 1 point point Press key to electrode in pH7.00 calibration is done, Press to turn calibration enter into the solution, press press key to on the meter. calibration mode.
-
Page 14: Mv Measurement
pH electrode zero electric potential 1.Check whether pH buffer solution is correct. out of range(<-60mV or >60mV) 2. Check if electrode is damaged. pH electrode’s slope is out of range 3.The pH electrode is aged. Replace a new one. (<85% or >110%) Enter in pre-set due calibration to Press key to perform calibration or cancel due... -
Page 15: Parameter Setup
(b) For organic or lipid pollutant, clean the platinum surface with detergent, then wash it in distilled water, then submerge it in the soaking solution for 6 hours. (c) For heavily polluted platinum surface on which there is oxidation film, polish the platinum surface with toothpaste, then wash it in distilled water, then submerge it in the soaking solution for 6 hours. -
Page 16: Submenu Of Ph Parameter Setup (Press Or Key To Switch)
6.3 Submenu of pH parameter setup (press key to switch) P1.1. – Select pH standard solution (USA-NIST-CUS-CH) 1. In P1.0 mode, press to enter in P1.1 mode, refer to the left diagram. 2. When press key,USA flashes,then press key, NIST flashes,etc. When parameter flashes, press to make confirmation(USA –... -
Page 17: Submenu Of Basic Parameter Setup (Press Key Or Key To Switch)
6.4 Submenu of basic parameter setup (press key or key to switch) P4.1. – Adjust timing storage time 1. In mode P4.0, press key to enter in mode P4.1, refer to the left diagram: “00:”: hours (0-99), “:00”: minutes (0-59). 2. -
Page 18: Usb Communication
P4.7. – Adjust date 1. Press key, “Month” flashes, then press key, “Date” flashes, then press key, “Year” flashes. When the number flashes, press key or key to adjust date, then press key to confirm. Date display: Month - Date 2. -
Page 19: Load Software
1 — Meter serial number 2 — Stored value display area 3 — Keys Clear — press this key to clear the data Download — press this key to download the data from the meter to the computer, pH, mV, conductivity and dissolved oxygen are classified in the file. -
Page 20: Data Processing
APERA INSTRUMENTS, LLC, any malfunctioned or damaged product attributable to responsibility of APERA INSTRUMENTS, LLC for a period of two years from the delivery (a six-month limited warranty applies to probes). This warranty does not apply to defects resulting from actions such as misuse (violation of the instructions in this manual or operations in the manner not specified in this manual), improper maintenance, or unauthorized repairs. -
Page 21: Appendix
10 Appendix 10.1 Appendix I: Parameter setup and factory default setup Restore Modes Prompts Parameter setting items Description factory Abbreviation default setup - P1.1 Select pH buffer solution USA-NIST-CUS-CH P1.2 Set due calibration No-H00-D00 Check the date of the last -... -
Page 22: Appendix Ii: Abbreviation Glossary
10.2 Appendix II: Abbreviation glossary Code and Modes Prompts Description abbreviation P1.1 Standard buffer solution P1.2 Due for calibration P1.0 P1.3 P1.4 Distilled water Distilled water mixed with P1.5 ammonia P1.6 Factory default setting P4.1 P4.2 P4.3 Backlight P4.0 P4.4 Auto power-off Basic P4.5... -
Page 23: Recommended Ph Electrodes For Specific Applications
11 Recommended pH Electrodes for Specific Applications Application Ideal Apera pH Electrodes to Use with SX811-SS Meter Regular water solutions 201T-F, LabSen 213 Beverage, beer, or wine analysis LabSen 213 Cosmetics LabSen 851-1, (MP500 temp. probe required) Dairy products (milk, cream, yogurt, mayo, etc.) - Page 24 APERA INSTRUMENTS, LLC Address: 6656 Busch Blvd, Columbus Ohio 43229 Tel: 1-614-285-3080 Email: info@aperainst.com Website: www.aperainst.com - 22 -...
Need help?
Do you have a question about the SX811-SS and is the answer not in the manual?
Questions and answers