Sign In
Upload
Download
Table of Contents
Contents
Add to my manuals
Delete from my manuals
Share
URL of this page:
HTML Link:
Bookmark this page
Add
Manual will be automatically added to "My Manuals"
Print this page
×
Bookmark added
×
Added to my manuals
Manuals
Brands
TC Electronic Manuals
Processor
Finalizer 96K
User manual
TC Electronic Finalizer 96K User Manual
Studio mastering processor
Hide thumbs
1
2
Table Of Contents
3
4
5
6
7
8
9
10
11
12
13
14
15
16
17
18
19
20
21
22
23
24
25
26
27
28
29
30
31
32
33
34
35
36
37
38
39
40
41
42
43
44
45
46
47
48
49
50
51
52
53
54
55
56
page
of
56
Go
/
56
Contents
Table of Contents
Troubleshooting
Bookmarks
Table of Contents
Table of Contents
Welcome
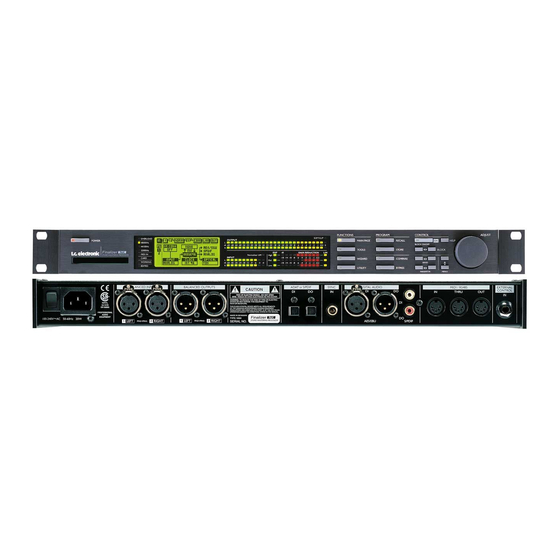
Front Panel
Rear Panel
Signal Flow Diagram
Finalizer Setup
Recall
Store
Input
Inserts
Digital Radiance Generator
Stereo Adjust
Dynamic EQ
External Insert
MS Encoding/Decoding
Spectral Stereo Image
Normalizer
Expander
Compressor
The Compressor
Limiter
Output
Level
Dither
Fade
Flow
Peak-Hold Meter
Phase Meter
Calibration Tone
Digital I/O
Wizard
Compare
Utility
MIDI out
Memory Backup
Reset Page
Technical Specifications - PLUS
Technical Specifications - 96
MIDI-Implementation Chart
MIDI-Continuous Controllers
Self Test
Appendix
Glossary
Tutorial
Troubleshooting
Soldering Instructions
Note
Preset List
Optional Master Fader
Advertisement
Quick Links
1
Table of Contents
2
Front Panel
3
Rear Panel
4
Finalizer Setup
Download this manual
USER'S MANUAL
STUDIO MASTERING PROCESSOR
Table of
Contents
Previous
Page
Next
Page
1
2
3
4
5
Advertisement
Table of Contents
Need help?
Do you have a question about the Finalizer 96K and is the answer not in the manual?
Ask a question
Questions and answers
Related Manuals for TC Electronic Finalizer 96K
Processor TC Electronic Finalizer User Manual
Studio mastering processor (46 pages)
Processor TC Electronic Finalizer plus User Manual
Studio mastering processor (56 pages)
Processor TC Electronic DBMAX-V 2.90 User Manual
V 2.90 digital broadcast maximizer broadcast series (61 pages)
Processor TC Electronic C300 User Manual
Dual stereo gate & compressor (23 pages)
This manual is also suitable for:
Finalizer plus
Table of Contents
Save PDF
Print
Rename the bookmark
Delete bookmark?
Delete from my manuals?
Login
Sign In
OR
Sign in with Facebook
Sign in with Google
Upload manual
Upload from disk
Upload from URL


Need help?
Do you have a question about the Finalizer 96K and is the answer not in the manual?
Questions and answers