Table of Contents
Advertisement
www.flashbike.io
Model: FLASHV1
FCC ID: 2AMLO-FLASH1
This device complies with Part 15 of the FCC Rules.
Operation is subject to the following two conditions:
1) this device may not cause harmful interference, and
2) this device must accept any interference received,
including interference that may cause undesired operation.
This equipment should be operated with minimum distance
of 20cm between the radiator and the human body.
READ THIS MANUAL FIRST
IMPORTANT
BEFORE YOU START TO RIDE YOUR BIKE
Advertisement
Table of Contents

Summary of Contents for Flash FLASHV1
- Page 1 Model: FLASHV1 FCC ID: 2AMLO-FLASH1 This device complies with Part 15 of the FCC Rules. Operation is subject to the following two conditions: 1) this device may not cause harmful interference, and 2) this device must accept any interference received, including interference that may cause undesired operation.
-
Page 2: Table Of Contents
Contents Learn About Flash 01-02 Read Me First Assembling Flash 04-05 Completing Account Setup 06-07 Riding Flash 08-11 Limited Warranty 12-13 Bicycle Owner's Manual 14-56 Frequently Asked Questions... -
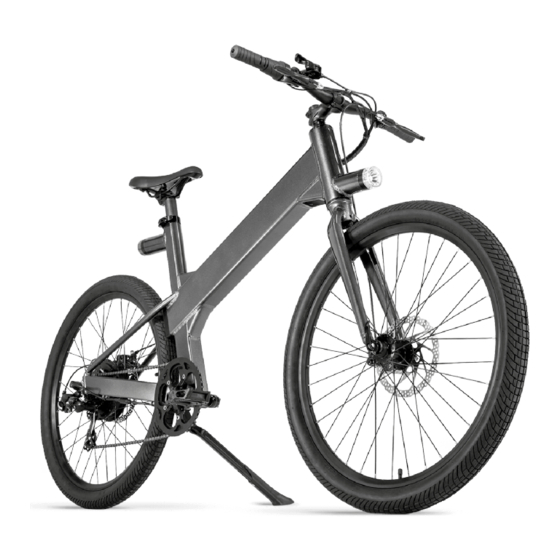
Page 3: Learn About Flash
Learn About Flash Turn signals Lights Stem Handlebar Horn Pedal assist Shifters Touchscreen (TFT) Saddle Brakes Seat post quick release Front LED Headlight Rear LED brake light Front disc brake Rear disc brake Front wheel Charge port Quick release Rear wheel... - Page 4 Learn About Flash 7-Speed Shifter Front Brake Lever Rear Brake Lever Throttle Horn Pedal Assist Level Headlight Left Turn Signal Right Turn Signal...
-
Page 5: Read Me First
Read Me First We have provided YouTube videos at http://support.flashbike.io with detailed instructions on how to setup your Flash with the free Flash smartphone App. Unwrapping the bike Download the Flash APP • Ask a friend to help remove the bike from the box. -
Page 6: Assembling Flash
Assembling Flash We have provided YouTube videos at http://support.flashbike.io with detailed instructions on how to assemble your bike. Written instructions are below. How to assemble the bike 3. Assemble the handlebar on the stem using a provided 4mm allen key. Remove the (4x) 4mm screws from the 1. - Page 7 6. Assemble the clear front reflector on the front of the 4. Assemble and center the stem so the handlebar is per pendicularly aligned with the front wheel. Tighten the handlebar and the red reflector on the seatpost facing (2x) 5mm hex screws on the stem to 8Nm - 9Nm of the rear.
-
Page 8: Completing Account Setup
APP, you will be asked to register and create a profile with your email address. You can register your Flash during the registration process. 3. Pairing your bike with your Flash APP on your smartphone 1. Make sure to turn on your Bluetooth under your smartphone’s settings. - Page 9 4. First charge the battery in your Flash You must first connect the battery charger to a 110V wall outlet and then to the charge port found on the underside of your main tube of the bike. Remove the rubber flap to insert the charger plug to the charge port.
-
Page 10: Riding Flash
Once your bike is fully charged tap the touchscreen with the bike with your APP. Please contact Flash support if your finger to turn on the TFT screen. The Flash logo will ap- you encounter any issues. pear on the screen. Note: make sure the bike is fully charged and the charger plug is removed from the bike’s charge port. - Page 11 bike with your APP in this mode. This will turn on the front headlight. To turn off the main headlight hold down the headlight button for 2-3 sec- How to Disarm the bike onds. To disarm the bike touch the screen twice until you see the 6 3.
- Page 12 How to select the Pedal Assist Level (PAS) Throttle on Demand 1. First turn your bike to the On state. To use the throttle make sure your bike is in the On state and 2. Press the + button on the left side of your handlebar to PAS is between 1-4.
- Page 13 Managing the Battery the battery needs to be charged. It is recommended to store your bike in a dry location within the follow- • It is recommended to always charge your battery after ing temperatures: 41F to 95F (5C to 35C) at 65 relative each ride.
-
Page 14: Limited Warranty
Limited Warranty LIMITED WARRANTY A bicycle must be registered with Flash within 30 days of purchase or this warranty is void KPZ, Inc., DBA (“Flash”) provides the following warranty against defects in materials and workmanship: This warranty, or any implied warranty, does not cover... - Page 15 Some states or countries do not allow exclusions of inciden- tal or consequential damages, so the above exclusion may not apply to you. Any claim against this warranty must be made through Flash. To initiate a warranty claim please contact Flash at support@flashbike.io.
-
Page 16: Bicycle Owner's Manual
Bicycle Owner’s Manual IMPORTANT: NOTE: This manual is not intended as a comprehensive use, service, repair or maintenance manual. Please see your This manual contains important safety, performance and dealer for all service, repairs or maintenance. Your dealer service information. Read it before you take the first ride on may also be able to refer you to classes, clinics or books on your new bicycle, and keep it for reference. - Page 17 GENERAL WARNING serious damage to the bicycle or the voiding of your war- ranty. Like any sport, bicycling involves risk of injury and damage. By choosing to ride a bicycle, you assume the responsibility Many of the Warnings and Cautions say “you may lose con- for that risk, so you need to know —...
- Page 18 bicycle and traffic laws, but also the common sense rules of 1. First safe and responsible bicycling. As a parent, you should read NOTE: We strongly urge you to read this Manual in its en- this manual, as well as review its warnings and the bicycle’s tirety before your first ride.
- Page 19 Can you comfortably operate the brakes? If not, you skills. Follow the pedal manufacturer’s instructions for may be able to adjust their angle and reach. See Section use, adjustment and care. 3.D and 3.E 5. Do you have “toe overlap”? On smaller framed bicycles 6.
- Page 20 fastener requires a calibrated torque wrench. A professional Tires & Wheels: Make sure tires are correctly inflated. Check bicycle mechanic with a torque wrench should torque the by putting one hand on the saddle, one on the intersection fasteners on you bicycle. If you choose to work on your own of the handlebars and stem, then bouncing your weight on bicycle, you must use a torque wrench and the correct tight- the bike while looking at tire deflection.
- Page 21 the wheel rim. Wheel retention system: Make sure the front and rear wheels are correctly secured. WARNING: Bicycle wheel rims are subject to wear. Ask seatpost: If your seatpost has an over-center cam action your dealer about wheel rim wear. Some wheel rims have a fastener for easy height adjustment, check that it is properly rim wear indicator which becomes visible as the rim’s brak- adjusted and in the locked position.
- Page 22 VERY IMPORTANT SAFETY NOTE: immediately after having moved the shifter. This could jam Please also read and become thoroughly familiar with the the chain and cause serious damage to the bicycle. important information on the lifespan of your bicycle and its components in Appendix B.
- Page 23 2. Safety 2. Always do the Mechanical Safety Check (Section 1.C) before you get on a Bike. A. The Basics 3. Be thoroughly familiar with the controls of your bicycle: WARNING: The area in which you ride may require specific brakes (Section 4.C.);...
- Page 24 6. Don’t jump with your bike. Jumping a bike, particularly a • Potholes, sewer grates, railroad tracks, expansion BMX or mountain bike, can be fun; but it can put huge joints, road or sidewalk construction, debris and and unpredictable stress on the bicycle and its compo- other obstructions that could cause you to swerve nents.
- Page 25 child carrier or a child-carrying trailer. C. Off Road Safety 10. Never carry anything which obstructs your vision or your We recommend that children not ride on rough terrain unless complete control of the bicycle, or which could become they are accompanied by an adult. entangled in the moving parts of the bicycle.
- Page 26 don’t endanger you. brakes (as well as the brakes of other vehicles sharing the 6. Be prepared. If something goes wrong while you’re rid- road) is dramatically reduced and your tires don’t grip nearly ing off-road, help may not be close. as well.
- Page 27 up and reflect car lights and street lights in a way that may If you choose to ride under conditions of poor visibility, help you to be seen and recognized as a moving bicyclist. check and be sure you comply with all local laws about night riding, and take the following strongly recommended a CAUTION: Check reflectors and their mounting brackets ditional precautions:...
- Page 28 • Avoid road hazards. When riding fast down hill, you can reach speeds achieved • If possible, ride on familiar routes. by motorcycles, and therefore face similar hazards and risks. Have your bicycle and equipment carefully inspected If riding in traffic: by a qualified mechanic and be sure it is in perfect condi- •...
- Page 29 WARNING: Bicycles and bicycle parts have limitations with G. Changing Components or Adding Accessories regard to strength and integrity, and this type of riding can There are many components and accessories available to exceed those limitations. enhance the comfort, performance and appearance of your bicycle.
- Page 30 3. Fit only on paved surfaces and never take off-road should give you a minimum standover height clearance of two inches (5 NOTE: Correct fit is an essential element of bicycling cm). A bike that you’ll ride on unpaved surfaces should give safety, performance and comfort.
- Page 31 B. Saddle position • re-tighten the seatpost clamp to the recommend- edtorque. Correct saddle adjustment is an important factor in getting • Once the saddle is at the correct height, make sure the most performance and comfort from your bicycle. If the that the seatpost does not project from the frame saddle position is not comfortable for you, see your dealer.
- Page 32 3. Saddle angle adjustment. Most people prefer a horizontal Note: If your bicycle is equipped with a suspension seat- saddle; but some riders like the saddle nose angled up post, the suspension mechanism may require periodic or down just a little. Your dealer can adjust saddle angle service or maintenance.
- Page 33 adjusted for your body and riding style, will be comfortable. self, as it requires special knowledge. WARNING: Some people have claimed that extended rid- WARNING: On some bicycles, changing the stem or stem ing with a saddle which is incorrectly adjusted or which height can affect the tension of the front brake cable, lock- does not support your pelvic area correctly can cause ing the front brake or creating excess cable slack which...
- Page 34 WARNING: An insufficiently tightened stem clamp bolt, WARNING: The shorter the brake lever reach, the more criti- handlebar clamp bolt or bar end extension clamping bolt cal it is to have correctly adjusted brakes, so that full braking may compromise steering action, which could cause you power can be applied within available brake lever travel.
- Page 35 4. Tech It is very important that you understand the type of wheel securing method on your bicycle, that you know how to It’s important to your safety, performance and enjoyment to secure the wheels correctly, and that you know how to apply understand how things work on your bicycle.
- Page 36 1. Secondary Retention Devices 2. Wheels with cam action systems Most bicycles have front forks which utilize a secondary There are currently two types of over-center cam wheel re- wheel retention device to reduce the risk of the wheel tention mechanisms: the traditional over-center cam and the disengaging from the fork if the wheel is incorrectly secured.
- Page 37 3. Removing and Installing wheels b. Installing a disk brake Front Wheel CAUTION: If your bike has a disc brake, exercise care in CAUTION: If your bike is equipped with a front disk brake, be touching the rotor or caliper. Disc rotors have sharp edges, careful not to damage the disk, caliper or brake pads when and both rotor and caliper can get very hot during use.
- Page 38 lever; turn the tension adjusting nut clockwise a quarter turn; d. Installing a disk brake or rim brake Rear Wheel then try again. CAUTION: If your bike is equipped with a rear disk brake, be (3) Spin the wheel to make sure that it is centered in the careful not to damage the disk, caliper or brake pads when frame and clears the brake pads;...
- Page 39 ers to the torque specifications in Appendix C or the hub B. Seatpost cam action clamp manufacturer’s instructions. Some bikes are equipped with a cam action seatpost binder. NOTE: If, on a traditional cam action system, the lever cannot The seatpost cam action binder works exactly like the tradi- be pushed all the way to a position parallel to the seat stay tional wheel cam action fastener.
- Page 40 turning it counterclockwise while keeping the cam lever from C. Brakes rotating reduces clamping force. Less than half a turn of the There are three general types of bicycle brakes: rim brakes, tension adjusting nut can make the difference between safe which operate by squeezing the wheel rim between two and unsafe clamping force.
- Page 41 A modulator makes the initial brake lever force more engages. Now do the same with the other brake lever. gentle, progressively increasing force until full force is achieved. If your bike is equipped with a brake force Make sure that your hands can reach and squeeze the brake modulator, take extra care in becoming familiar with its levers comfortably.
- Page 42 think you’ll generate appropriate braking force, squeeze the. Two keys to effective speed control and safe stopping are lever, progressively increasing the braking force. If you feel controlling wheel lockup and weight transfer. This weight the wheel begin to lock up, release pressure just a little to transfer is even more pronounced if your bike has a front keep the wheel rotating just short of lockup.
- Page 43 • one, two or three front sprockets called chainrings The larger sprockets produce lower gear ratios. Using them • a drive chain requires less pedaling effort, but takes you a shorter dis- tance with each pedal crank revolution. Moving the chain a.
- Page 44 for quick acceleration but easy enough to let you start from prevent the inside pedal from striking the ground in a a stop without wobbling — and experiment with upshifting turn. and downshifting to get a feel for the different gears. At first, WARNING: Toe Overlap could cause you to lose con- practice shifting where there are no obstacles, hazards or trol and fall.
- Page 45 positions the ball of the foot over the pedal spindle, 4. Clipless pedals (sometimes called “step-in pedals”) are which gives maximum pedaling power. The toe strap, another means to keep feet securely in the correct posi- when tightened, keeps the foot engaged throughout tion for maximum pedaling efficiency.
- Page 46 when braking, the front of a suspended bike dips. You tire. The part of this information which is most important could lose control and fall if you do not have experience to you is Tire Pressure. with this system. WARNING: Never inflate a tire beyond the maximum WARNING: Not all bicycles can be safely retrofitted with pressure marked on the tire’s sidewall.
- Page 47 bottom of the recommended pressure range, give the 2. Tires Valves best performance on smooth, slick terrain such as hard- There are primarily two kinds of bicycle tube valves: The packed clay, and on deep, loose surfaces such as deep, Schraeder Valve and the Presta Valve.
- Page 48 fitting. Close the valve after inflation. To let air out of maintenance requirements. a Presta valve, open up the valve stem lock nut and dpress the valve stem. WARNING: Many bicycle service and repair tasks require special knowledge and tools. Do not begin any adjustments WARNING: We highly recommend that you carry a spare or service on your bicycle until you have learned from your inner tube when you ride your bike.
- Page 49 parts, such as inner tubes, light bulbs, etc. it would be appro- perform yourself. All other service, maintenance and repair priate for you to have once you have learned how to replace should be per formed in a properly equipped facility by a such parts when they require replacement.
- Page 50 3. After every long or hard ride: If the bike has been ex • Take a look at the brake pads. Starting to look worn or posed to water or grit; or at least every 100 miles: Clean the not hitting the wheel rim squarely? Time to have the bike and lightly lubricate the chain’s rollers with a good qual dealer adjust or replace them.
- Page 51 Appendix A Industry usage conditions are generalized and evolving. Consult yourdealer about how you intend to use your bike. Intended use of your bicycle WARNING: Understand your bike and its intended use. High-Performance Road Choosing the wrong bicycle for your purpose can be hazard CONDITION 1 ous.
- Page 52 General Purpose Riding Appendix B CONDITION 2 The lifespan of your bike and its components Bikes designed for riding Condition 1, plus smooth gravel Nothing Lasts Forever, Including Your Bike. roads and improved trails with moderate grades where the When the useful life of your bike or its components is tires do not lose ground contact.
- Page 53 A. Understanding metals choose lightweight, high performance equipment, be Steel is the traditional material for building bicycle frames. It sure to have it inspected frequently. You should have has good characteristics, but in high performance bicycles, your bicycle and its components checked periodically steel has been largely replaced by aluminum and some tita by your dealer for indicators of stress and/or potential nium.
- Page 54 of the common bicycle frame building materials steel is the bike, the steel fork may be severely bent and the frame most ductile, titanium less ductile, followed by aluminum. undamaged. Aluminum is less ductile than steel, but you can expect the fork and frame to be bent or buckled. Hit harder Metals vary in density.
- Page 55 Fatigue is the term used to describe accumulated damage to sold today. So we all make a tradeoff: the wonderful, light a part caused by repeated loading. To cause fatigue dam weight performance we want requires that we inspect the age, the load the part receives must be great enough.
- Page 56 SIMPLE RULE 3 : Inspect and investigate any staining to In most cases a fatigue crack is not a defect. It is a sign that see if it is associated with a crack. the part has been worn out, a sign the part has reached the end of its useful life.
- Page 57 • Higher body weight C. Understanding components • Stronger, more fit, more aggressive rider It is often necessary to remove and disassemble compo • Corrosive environment (wet, salt air, winter road salt, ac- nents in order to properly and carefully inspect them. This is cumulated sweat) a job for a professional bicycle mechanic with the special •...
- Page 58 This means that they have met test criteria and have rea Appendix C sonable fatigue life. It does not mean that the original com Fastener Torque Specifications ponents will last forever. They won’t. Correct tightening torque of threaded fasteners is very important to yours safety.
-
Page 59: Frequently Asked Questions
Frequently Asked Questions Please visit the Flash Help Center http://support.flashbike.io for the most recent frequently asked questions, how to videos and popular articles. - Page 60 Flash is trademark of KPZ, Inc. Copyright 2017 Version 1.0...
Need help?
Do you have a question about the FLASHV1 and is the answer not in the manual?
Questions and answers