Advertisement
Quick Links
Tstat Series
TSTAT7 USER GUIDE
CONTENTS
Descriptions.............................................2
Scheduling............................................................12
Technical Data.........................................2
Mounting Installations.............................3
Wiring/Equipment....................................7
Operational Fonctions.............................8
Operation.................................................9
Adjustable set-points..............................10
Clock Programming................................11
- 1 -
Advertisement

Summary of Contents for Bravo Controls TSTAT7
-
Page 1: Table Of Contents
Tstat Series TSTAT7 USER GUIDE CONTENTS Descriptions..........2 Scheduling............12 Technical Data.........2 Mounting Installations......3 Wiring/Equipment........7 Operational Fonctions......8 Operation..........9 Adjustable set-points......10 Clock Programming........11 - 1 -... -
Page 2: Descriptions
Tstat Series Descriptions This full-featured CPU based thermostat is designed for small cooling and heating air handling systems in residential and commercial facilities. The unit provides features which eclipse standard mechanical thermostats at a price that fits conventional HVAC projects. Tight control of 0.5°C provides comfortable indoor environment with its built in sensor, which is located in the controller and it will not be affected by the temperature of the wall on which it is mounted on.It is possible to connect an external sensor for monitoring the temperature of different locations. -
Page 3: Mounting Installations
There are two parts to the TSTAT7 product, one being the back plate that gets mounted onto the desired surface and the other being the front cover. - Page 4 Tstat Series 1)Removing the TSTAT7 back plate from the front cover you must do the following steps: a)Unfasten the screw that is located at the bottom of the back plate that holds the back plate with the front cover. b)Hold the back plate and gentle remove it from the front cover, allowing for the top of the backplate to be dislodged from the plastic clippings that are located at the top.Pushing the plastic...
- Page 5 (Side note: When picking front panel back up make sure to check that all components inside were not damaged) 2)Mounting the TSTAT7 back plate securely to desired surface: a)Have the removed back plate in hand; knock out the center of the back plate. You can use the butt end of the screw driver to do this.
- Page 6 TSTAT7 directly over the mounting connectors and begin to push gently. The two plas- tic clippings located at the top of the front cover should fit together smoothly with the plastic slots on the back plate.
-
Page 7: Wiring/Equipment
Tstat Series f)Now the front cover and the back plate should be firmly placed together with terminal connections and plastic clippings in place. Re-fasten the screw that was taken out originally;securing the back plate to the front cover. Wiring/Equipment For proper safety all wiring and controllers should be installed separately to avoid accidently contact with one another. - Page 8 Tstat Series Operational Functions - 8 -...
-
Page 9: Operation
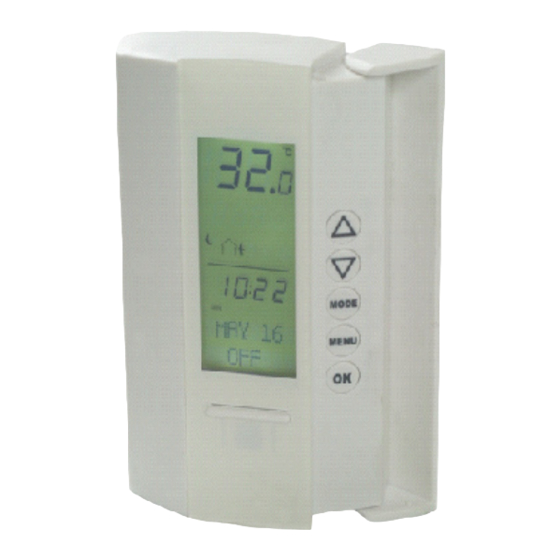
Tstat Series Operation Item Description Actual Temperature Display The thermostat displays the current temperature as sensed by the internal temperature sensor. Setpoint Display The current Heat or Cool setpoint is displayed. The setpoint may be set by using the Modbus system or by pressing the Up/Down buttons. -
Page 10: Operational Fonctions
LED panel will display the current set-point, until the tempera- ture in the room reaches the desired set-point (warmer/cooler) of the occupant. Operational Fonctions There are six buttons that operate the TSTAT7 Buttons Functions... -
Page 11: Clock Programming
Tstat Series Clock Programming Press twice the “MENU” button until you see the words “MAIN MENU CLOCK” on the screen and press “OK”.This menu allows the user to review and adjust the controller’s real time clock parameters. Display format of time, day of week, month, day and year are based upon the controller setup. - Page 12 Tstat Series Scheduling - 12 -...
- Page 13 Tstat Series Register of Tstat7 - 13 -...
- Page 14 Tstat Series - 14 -...
- Page 15 Tstat Series - 15 -...
- Page 16 Tstat Series - 16 -...
- Page 17 Tstat Series - 17 -...
- Page 18 Tstat Series - 18 -...
- Page 19 Tstat Series - 19 -...
- Page 20 Tstat Series - 20 -...
- Page 21 Tstat Series - 21 -...
- Page 22 Tstat Series - 22 -...
- Page 23 Tstat Series - 23 -...
Need help?
Do you have a question about the TSTAT7 and is the answer not in the manual?
Questions and answers