
Summary of Contents for NavTool C7 CORVETTE
- Page 1 C7 CORVETTE INSTALLATION MANUAL PLEASE REVIEW THIS INSTALLATION MANUAL CAREFULLY BEFORE BEGINNING ANY WORK Tech Support: 877-NAV-TOOL WWW.NAVTOOL.COM...
-
Page 2: Table Of Contents
Interference with certain safety systems could cause harm to persons as well. If you have any questions in this regard please call the NavTool Help line at 1-877-628-8665 and for ordering questions call NavTool at 1-877-628-8665. -
Page 3: Precautions
Using protective blankets to cover front seats, interior of the vehicle and center console. Always install a fuse 6-12 inches away from NavTool interface, 5 amp fuse should be used. Always secure interface with Velcro or double side tape to prevent rattling of the interface. -
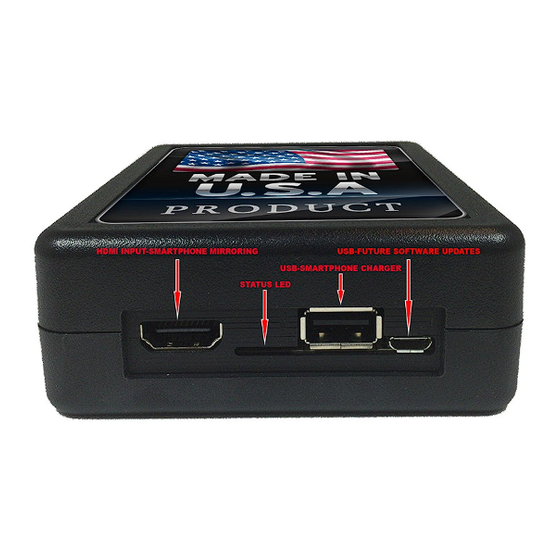
Page 4: Description
USB charger port: provides 2 amp power output. Plug and Play Harness: DVI Input: HMI Cable. DVI Output: HMI Cable. Plug and Play Harness: 100% plug and play harness for power and Data for NavTool. -
Page 5: Wiring Connections
• If you use wire-tap connectors such as T-Taps, avoid using them. These connectors are inferior in quality and should be avoided. INSTALLATION LOCATION: C7 Corvette plug and play harness should be installed directly at the HMI module located in the drivers kick panel. See page 8. Pic 1 VIDEO LINE POWER &... - Page 6 Step 5: Connect C7 CORVETTE harness to the C7 CORVETTE video interface. Step 6: Disconnect BLUE connector from the HMI module. Step 7: Insert BLUE male connector of the C7 CORVETTE plug ‐and‐play harness into the HMI module. Step 8: Insert previously disconnected factory BLUE male connector into the BLUE female connector of the C7 CORVETTE plug‐and‐play harness.
- Page 7 HMI MODULE DRIVERS KICK PANEL Video 1 Video 2 Video 3 NavTool Corvette C7 Video Interface Video 4 Made In USA FACTORY CABLE PREVIOUSLY PLUGGED INTO HMI——> <—— FACTORY CABLE PREVIOUSLY PLUGGED INTO HMI...
- Page 8 Pic 2...
-
Page 9: Feature Programming
After installation is complete go to your start menu locate folder with NavTool online updater and run the program. We have built in NavTool Team Viewer feature and live chat for tech support in case you have any question during update and require immediate support. -
Page 10: Installers Info
Back button operation: When you first start your vehicle, the color/ navigation screen will display factory image. Press and hold the back button for 3 seconds to activate/deactivate the interface. Rotate menu wheel to the right or left to cycle between HDMI, Video 1, Video 2, Video 3, Video 4 inputs. -
Page 11: Quick Start Guide
15 mph. DISCLAIMER: WARNING!!! WARNING!!! NavTool is designed to be used only when the vehicle is immobilized. The driver is responsible for maintaining full attention while operating a motor vehicle. The removal or bypassing of safety features in NavTool products will result in termi- nation of warranty. - Page 12 FOR INFORMATION ON THIS AND OTHER NavTool SOLUTIONS PLEASE VISIT WWW.NavTool.COM NavTool Video Integration Solutions WWW.NavTool .COM...
Need help?
Do you have a question about the C7 CORVETTE and is the answer not in the manual?
Questions and answers