Table of Contents
Advertisement
Advertisement
Table of Contents

Related Manuals for Crosley CR1206A


Summary of Contents for Crosley CR1206A
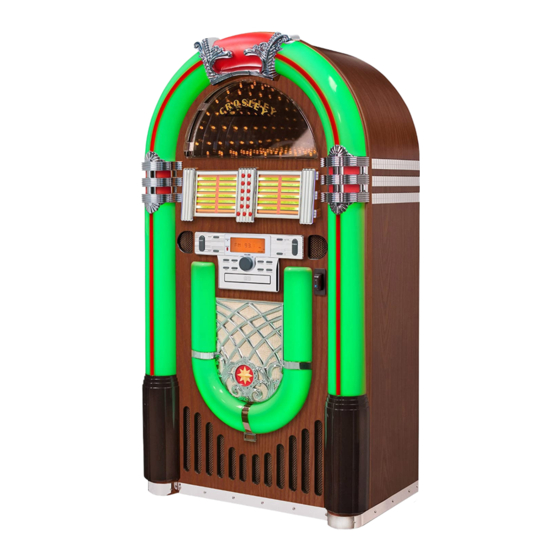
- Page 1 CR1206A Tablet Jukebox Instruction Manual www.crosleyradio.com...
- Page 2 IMPORTANT SAFETY INSTRUCTION PLEASE READ CAREFULLY ALL THE FOLLOWING IMPORTANT SAFEGUARDS THAT ARE APPLICABLE TO YOUR EQUIPMENT 1. Read Instructions - All the safety and operating instructions should be read before the product is operated. . Retain instructions - The safety and operating instructions should be retained for future reference. 3.
- Page 3 WARNING: TO PREVENT FIRE OR SHOCK HAZARD, DO NOT EXPOSE THIS APPLIANCE TO RAIN OR MOISTURE. DO NOT REMOVE COVER. PILOT LAMPS SOLDERED IN PLACE. NO USER SERVICEABLE PARTS INSIDE. REFER SERVICING TO QUALIFIED SERVICE PERSONNEL. CAUTION RISK OF ELECTRIC SHOCK DO NOT OPEN CAUTION: TO REDUCE The lighting flash with...
-
Page 4: Table Of Contents
Welcome Table of Contents Thank you for purchasing the the Crosley Full Size Control Locators Tablet Jukebox (CR1206A). Before operating this unit,please read this manual thoroughly and retain Unit Controls........ 4 it for future reference. Remote Controls......5 Lighting remote control....6... -
Page 5: Control Locators Unit Controls
Control Locators VOLUME DOWN VOLUME UP TUNNEL LED LIGHT WORD LED LIGHT TWEETER TWEETER DOCK SPEAKER SPEAKER PRESET – VOLUME UP/DOWN FUNCTION POWER LIGHT STAND BY KNOB DISPLAY INDICATOR SENSOR PRESET + PROGRAM PLAY/PAUSE UP/ F.F. STOP/BAND TIMER CD OPEN/CLOSE DOWN / F.R. - Page 6 Control Locators EXTERNAL ANTENNA STAGE LIGHTING SWITCH (RUN/STOP) BATTERY BACKUP 300ohm ANT. AUX IN JACK EXTERNAL SPEAKER JACK DC IN JACK SPEAKER INT./EXT./MIX. SWITCH POWER / STAND BY CD OPEN / CLOSE OPEN/ MUTE CLOSE MUTE PRESET + SLEEP SLEEP VOLUME + PRESET PRESET -...
-
Page 7: Lighting Remote Control
Control Locators (2) LIGHTING REMOTE CONTROL Brightness-(8 in all) Play/Pause Brightness+(8 in all) green blue white light green dark blue FLASH orange 7- colour fast colour change Static cyan brown dark yellow STROBE colour fade in & out - adjustable light blue Pink yellow... -
Page 8: Unpacking
Basic Operation ANTENNA UNPACKING 1 Remove packing materials from unit. Antenna: for FM reception, the unit is provided Note: Save all packing materials with a FM WIRE ANTENNA , move the wire until 2 Remote control is located in the outside of the the reception is clear and with no interferences. -
Page 9: Basic Operation
Basic Operation BASIC OPERATION SETTING THE TIMER Function select The unit can be used as an alarm clock, whereby the selected source (CD, TUNER, USB, SD CARD 1 Press FUNCTION / to select among: OR PHONO) to start playback at a preset time. Make sure the clock is set before using the timer. -
Page 10: Sleep
Basic Operation SLEEP MUTE You can set a certain period of time after which the You can temporarily switch off the sound without set will switch to standby. switching off the unit. On the remote control, press SLEEP / repeatedly 1 Press MUTE / on the remote control to switch to select the desired time period options (in minutes):... -
Page 11: Radio Operation
Basic Operation RADIO OPERATION AM/FM Tuning To listen to a preset station 1 Press the FUNCTION / to set the unit to Press PRESET + / or PRESET – / once or TUNER mode. more until the desired preset station in displayed. Automatic programming radio stations Automatic 2 Press STOP/BAND / repeatedly to select... -
Page 12: Cd Operation
CD Operation PROGRAMMING TRACKS CD PLAYER Playing a CD You may store up to 20 tracks in the desired sequence. 1 Press the FUNCTION / to set the unit to CD mode. 1 In the stop position, press PROGRAM / start programming. -
Page 13: Using The Auxiliary Function
USING THE AUXILIARY FUNCTION BT Dock The function select The Bluetooth receiver is packed separately to the main Jukebox housing. To set up the Bluetooth 1 Press POWER / button to no the unit. receiver and connect to your Bluetooth enabled 2 Press the function switch to the AUX1 mode. -
Page 14: General
General OPTIONAL EXTERNAL SPEAKERS TROUBLESHOOTING There is no power 1 With your new radio, you have the option of Make sure radio is plugged in correctly. adding external speakers. Look at the STAND BY INDICATOR and check 2 The speaker jacks for external speakers are to see if it is red. -
Page 15: Warranty
This warranty is not transferable. If the product is determined to be defective during the warranty period, the unit will be repaired or replaced at Crosley Radio’s sole discretion. This warranty covers manufacturing defects and normal consumer use and... - Page 16 910-122021-0010-200...
Need help?
Do you have a question about the CR1206A and is the answer not in the manual?
Questions and answers