Table of Contents
Advertisement
Quick Links
Advertisement
Table of Contents

Subscribe to Our Youtube Channel
Related Manuals for suprema FaceStation


Summary of Contents for suprema FaceStation
- Page 1 FaceStation User Manual Version V1.3 www.supremainc.com...
-
Page 2: Important Safety Information
Usage y Do not disassemble, repair or reconstruct the device. Contact your nearest Suprema dealer for technical support. Usage y Do not obstruct or place wet objects near/on the vent. y Do not apply heavy pressure to or use sharp objects with the touchscreen LCD. -
Page 3: Table Of Contents
Contents 1 Getting Started ..........6 Power Connection .............18 Wireless LAN Connection ..........18 Features ................7 Ethernet Connections ............19 Components ..............8 Connecting with a PC ..............19 Optional Accessories ................. 9 Connecting with Hub ............... 19 Product Description ............10 RS485 Connections ............20 Dimensions ...............12 Connecting with a PC ...............20 Connecting with Secure I/O ...............20... - Page 4 Contents 4 Device Configuration ........26 Checking Device Information ............38 Checking Memory Status ..............38 FaceStation Menu Tree ............ 27 TouchScreen Calibration ..............39 Network Settings ............. 28 Device Reset ..................39 Setting TCP/IP .................28 Factory Default .................39 Setting Server ..................29 Camera ..................39 Setting Serial Communication ............29...
- Page 5 Contents 5 Device Operation ........... 42 Using Time and Attendance .............53 Checking Time and Attendance ............54 Basic Screen Views ............43 Viewing Logs ..............54 Face Authentication Screen ..............43 Log List ..................54 Home Screen ..................43 Log Search ..................55 Device Status Screen ...............44 Delete All Logs ................55 User Management .............
-
Page 6: Getting Started
1 Getting Started Features Components Product Description Dimensions... -
Page 7: Features
By combining state-of-the-art technology with Suprema's proprietary algorithms, FaceStation provides querying speeds of up to 1:1000 Next Generation Face matches per second. Using twin camera technology FaceStation is able to store both facial stamps using a visual camera as well as complex Recognition Technology facial templates using the IR camera. -
Page 8: Components
Getting Started omponents Wall Mounting Bracket (1) Software CD (1) FaceStation Wall Mount Screws (4) PVC Anchors (4) Ferrite Core (1) Power Cable (1) RS232 Cable (1) Relay Cable (2) RS485 Cable (2) Wiegand Cable (1) Switch Cable (1) Video Phone Cable (1) -
Page 9: Optional Accessories
Getting Started ptional Accessories Power Adapter Secure I/O RF Card Plastic Stand PIN 6 : GND (Black) PIN 5 : Door Open (Orange) PIN 4 : Video Signal (White) PIN 3 : Power (Yellow) PIN 2 : GND (Blue) PIN 1 : Voice Signal (Red) Wireless Access Point Mifare reader/writer Video phone... -
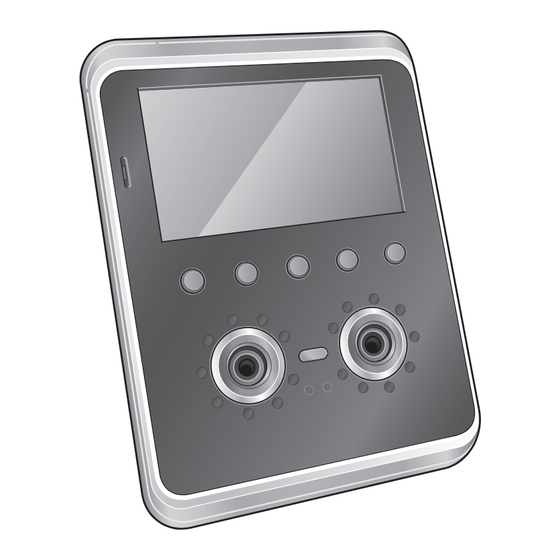
Page 10: Product Description
Getting Started roduct Description Used to display the device operating status and LCD Touchscreen device operation. Call Button Used to place a call on the interphone. Front Light LED Used as a general lighting. Infrared (IR) LED Used as an IR light. Camera Detects and captures a face image. - Page 11 Getting Started Rear and Bottom USB Wireless LAN Port Used for the wireless LAN module. Termination Switch Enables RS485 termination. PWR Connectors Connects to the 2-pin power cable. RS232 Connectors Connects to the 3-pin RS232 cable. RS485 Connectors Connects to the 4-pin RS485 cable. Wiegand Connectors Connects to the 5-pin Wiegand cable.
-
Page 12: Dimensions
Getting Started imensions Wall Bracket FaceStation... -
Page 13: Installation
2 Installation Installation Precautions Basic Installation... -
Page 14: Installation Precautions
Installation nstallation Precautions FaceStation is a state-of-the-art face recognition terminal using Suprema’s advanced adaptive IR illumination technology. Please pay care attention to the precautions and instructions to maximize its performance. Installation Location Recommended Installation Height y Optimal Installation Height: 120cm (Ideal for user height’s between 155cm - 205cm) -
Page 15: Basic Installation
Installation asic Installation As FaceStation two built-in cameras for face recognition, the correct installation height is extremely important to maximize the performance of the device. Select the optimal installation height for all users. Installation Place the bracket on the desired location. -
Page 16: Connections
3 Connections Cable Specifications Relay Connections Power Connection Input Connection Wireless LAN Connection Wiegand Connections Ethernet Connections Mini USB Connection RS485 Connections USB Connection RS232 Connection Analogue Video Phone Connection... -
Page 17: Cable Specifications
Connections able Specifications Wiegand Cable ower Cable Name Cable Type Color Name Cable Type Color DATA0 GREEN POW + AWG24 DATA1 WHITE POW - BLACK AWG26 BLACK SHIELD GND GRAY S232 Cable nalogue Video Phone Cable Name Cable Type Color RS232 RX GREEN Name... -
Page 18: Power Connection
• Compatibility issues may cause connection difficulties with some wireless access point brands. • Use a 12VDC ±10%, 1500 mA, IEC/EN 60950-1 certified power adapter. • It is recommended not to share FaceStation's power with other devices such as SecureI/O and/or locks. -
Page 19: Ethernet Connections
Hub FaceStation can communicate with a PC through a direct connection using an Ethernet FaceStation can be connected to a network using a regular Ethernet hub or PoE hub. cable. PoE (Power over Ethernet): Power is provided through the Ethernet connection by an IEEE802.3af compliant PSE (Power Sourcing Equipment). -
Page 20: Rs485 Connections
Connections onnecting with Secure I/O S485 Connections FaceStation can communicate with a PC, Secure I/O, or other devices via an RS485 Master RS485 CH1 connection. PIN3: RS-GND(Black) PIN2: RS485-TRX-(Yellow) PIN1: RS485-TRX+(Blue) onnecting with a PC 4 5 6 Slave PIN6: RS485 TRX+(Blue) -
Page 21: Rs232 Connection
• If GND is not connected, the RS485 chip may malfunction. PIN3: RS232-RX (Green) • RS485 communication can support 2 host device and up to 7 slave devices. • A maximum of 4 Secure I/O can be connected to one FaceStation. -
Page 22: Relay Connections
Connections onnecting with Automatic Doors elay Connections onnecting with a Fail Safe Lock PIN3: N/C(Normal Close: Orange) PIN2: Common(Blue) PIN1: N/O(Normal Open: White) PIN3: N/C(Normal Close: Orange) PIN2: Common(Blue) Deadbolt or PIN1: N/O(Normal Open: White) Door strike Power supply Deadbolt or RTE Switch Door strike Power supply... -
Page 23: Input Connection
Connections nput Connection iegand Connections onnecting a Wiegand Input PIN3: Wiegand GND (Black) PIN2: Wiegand DATA1 (White) PIN1: Wiegand DATA0 (Green) PIN8: Shield GND (Gray) PIN7: Switch GND (Black) PIN6: Switch Input3 (Orange) Cable Shield Cable Shield PIN5: Switch Input2 (White) Cable Shield (Optional) (Optional) -
Page 24: Connecting A Wiegand Output
Connections onnecting a Wiegand Output ini USB Connection FaceStation can communicate with a PC via the mini USB port. PIN3: Wiegand GND (Black) PIN2: Wiegand DATA1 (White) PIN1: Wiegand DATA0 (Green) Cable Shield (Optional) Access Controller Wiegand Output.Data1 Wiegand Output.Data0... -
Page 25: Usb Connection
Connections SB Connection nalogue Video Phone Connection The USB port can be used to upload/download data to/from a USB memory device. PIN 6 : GND (Black) PIN 5 : Door Open (Orange) PIN 4 : Video Signal (White) PIN 3 : Power (Yellow) PIN 2 : GND (Blue) PIN 1 : Voice Signal (Red) Note... -
Page 26: Device Configuration
4 Device Configuration FaceStation Menu Tree Network Settings Operation Mode Settings Device Settings Display and Sound Settings... -
Page 27: Facestation Menu Tree
Device Configuration aceStation Menu Tree 1. User Enroll User 3. Mode Face Face 4. Device Face Security Level 5. Display Theme Edit User Auth Face+Pin Enrollment Background Search Mode T&A Key > Face Sensitivity Voice Instruction User Capacity Info T&A Key > Face+PIN Enable SubImage Menu Timeout Delete All Users... -
Page 28: Network Settings
Device Configuration etting TCP/IP etwork Settings Setup the TCP/IP network settings of the device. Setup various communication interfaces with the device. Go to Menu > Network > TCP/IP. Set the options. Go to Menu > Network. LAN Type Select the net type and press OK. Navigate to the desired interface. -
Page 29: Setting Server
Device Configuration etting Server etting Serial Communication Setup the TCP/IP settings of the server to be connected with the device. Setup the serial network settings of the device. Go to Menu > Network > Serial. Go to Menu > Network >... -
Page 30: Setting Usb
Device Configuration etting USB sing USB Memory Device Contains various options associated with the USB memory device. (Only available if USB Memory is enabled) Go to Menu > Network > USB. Set the options. Go to Menu > Network > Memory. -
Page 31: Setting Wlan (Only For Wireless Models)
Device Configuration etting WLAN (Only for wireless models) peration Mode Settings Setup one of the four WLAN network presets to communicate with BioStar. The preset details can be configured via BioStar. Setup the various authentication modes, operation modes, and/or time & attendance triggers for the device. -
Page 32: Face Authentication Mode
Device Configuration ace Authentication Mode ard Authentication Mode Go to Menu > Mode > Face Auth Mode. Go to Menu > Mode > Card Auth Mode. Select a desired option. Select a desired option. Face Authenticates with a face only. Card Only Authenticates with a card only. -
Page 33: Id Authentication Mode
Device Configuration D Authentication Mode etting General Operational Parameters Go to Menu > Mode > Operation. Go to Menu > Mode > ID Auth Mode. Check, or set the options and press OK. Select a desired option. Face Detection Check to use Face Detection. On face authentication, ID + Pin Authenticates with both ID and pin number. -
Page 34: Time And Attendance Mode
Device Configuration ime and Attendance Mode evice Settings Sets system related features of the device. Go to Menu > Mode > T&A > T&A. Set the T&A options. Go to Menu > Device. Disabled Disables the T&A buttons. The Home menu and CALL button remain active. -
Page 35: Setting Face Authentication Settings
Device Configuration etting Face Authentication Settings Note • Increasing the security level will indirectly increase the FRR (False Rejection Rate), the probably that the system will reject access for an authorized user, because stricter authentication protocols will reject more inconsistencies. •... -
Page 36: Setting Interphone
Device Configuration etting Interphone T&A Event: Triggers the relay when a time and attendance authentication Enables the device to act as an interphone. occurs. Authentication Triggers the relay only when both + T&A Event general authentication and time & attendance authentication are set to trigger the relay. - Page 37 Device Configuration VoIP Setting Set the desired VoIP settings for the IP Interphone. BS VideoPhone Set the desired BioStar VideoPhone settings. Setting Mode Select either single or extension mode and press OK. VoIP Enter the VoIP IP address and press OK. Server IP Enter a pin number for the BioStar VideoPhone and press OK.
-
Page 38: Setting Time
Device Configuration etting Time hecking Device Information Sets the date/time options for the device. Displays information such as the model name, device ID, hardware version, firmware version, kernel version, MAC address and more. Go to Menu > Device > Device Info. -
Page 39: Touchscreen Calibration
Device Configuration ouchScreen Calibration evice Reset Recalibrates the touchscreen to coordinate the point of contact with the user interface. Go to Menu > Device > Reset. Go to Menu > Device > Touch Calibration. Press to restart the device. Press the center of each point until the completion message appears. Press to return to the previous screen. -
Page 40: Display And Sound Settings
Device Configuration heme isplay and Sound Settings Sets the graphical theme of the device. Select among Red, Blue, Black, Rainbow, and Custom, and press OK. ackground Sets the background of the device. Select among Logo, Notice, Slide Show, and PDF, and press OK. Note •... -
Page 41: Backlight Timeout
Device Configuration acklight Timeout Sets the amount of idle time required before turning off the LCD. Select among Infinite, sec, sec, sec, sec, sec, and sec, and press OK. olume Sets the volume output of the device. Select among 0, 10, 20, 30, 40, 50, 60, 70, 80, 90, and 100, and press OK. anguage Sets the displayed language on the device. -
Page 42: Device Operation
5 Device Operation Basic Screen Views User Management Authentication Modes Viewing Logs... -
Page 43: Basic Screen Views
Device Operation ome Screen asic Screen Views The following screen is the default home screen. ace Authentication Screen The following screen is displayed during face authentication. Status Button Click to display the status of the device. Home Goes to the Home screen. Click to select up to 12 time &... -
Page 44: Device Status Screen
Device Operation evice Status Screen Note When the face recognition and all connection status are successfully set, a screen as shown above is displayed. Displays the connection status with a host when in Serial RS485 slave mode. Displays the connection status with a PC through PC Connection Ethernet or WLAN. -
Page 45: User Management
Device Operation ser Management ser Registration Press User ID to enter the user ID and press OK. After the device installation, register the administrator before use . Press Name, and enter a name press OK. Check the “Administrator” option within the enroll user window to create an administrator. The administrator can register and delete users and set preferences. - Page 46 Device Operation 2) Move your head up and down. 3) Move your face back and forth.
- Page 47 Device Operation 4) Move your face right and left. 6) Press Face to enroll another version of the individual's face. Press Card to enter the ID and press OK. Press to enter the pin number and press OK. Check Administrator to register as the administrator.
-
Page 48: Modifying User Information
Device Operation odifying User Information Precautions for Registration • If there is no progress in registration, slightly move your face. Use the following steps to modify the information of a registered user. • It is recommended to register your face at the installation site. •... -
Page 49: Deleting A User
Home screen without saving the changes. Note • The user ID cannot be modified. eleting a User Use the following steps to remove user(s) from the FaceStation's database. Go to Menu > User >... -
Page 50: Deleting All Users
Press to cancel the deletion. Note • FaceStation can store up to 10,000 users (1:1). Note • When a user is deleted while not saved on the BioStar software database, the user cannot be restored. earching for a User Use the following steps to search for a registered user. -
Page 51: Authentication Modes
Modes The follow screen will be displayed upon a successful authentication. FaceStation supports the face, card (RFID), and ID (PIN) authentication. The authentication mode operates according to the set timezone, and each authentication timezone does not overlap. Up to 128 timezones for setting authentication mode can be set on BioStar PC software. -
Page 52: Face Authentication Modes
Device Operation ace Authentication Modes ard Authentication Modes Face Card Only Scan the face. Enter the card ID by placing the card on the device. Face + Pin Card + Pin Scan the face. Enter the card ID by placing the card on the device. Enter the pin number and press OK. -
Page 53: Id Authentication Modes
Device Operation D Authentication Modes sing Time and Attendance ID + Pin Press one of the T&A keys (F1 ~ F4) or click the T&A button and select an event Enter the ID and press OK. on screen. Enter the pin number and press OK. ID + Face Enter the ID and press OK. -
Page 54: Checking Time And Attendance
Device Operation hecking Time and Attendance iewing Logs A general user can view their access and attendance records. View, search, or delete all logs. Press Menu. Go to Menu > Log. Successfully authenticate a general user. Select the desired option. Press to go to the previous screen or to go to the Home screen. -
Page 55: Log Search
> > Search. Note Set the search filters and press OK. • FaceStation can store up to 1,000,000 logs and 5000 image logs. Press to display the search results. Press to go to the previous screen or to go to the Home screen. -
Page 56: Appendix
Appendix Specifications Troubleshooting FCC Rules Device Font License Quality Assurance Index... -
Page 57: Specifications
TCP/IP, RS485(2ch), RS232, USB, Wiegand, WiFi Switch VIL(V) Input Power 12VDC, PoE (Power over Ethernet) Pullup Resistor 4.7K FaceStation 132 x 165 x 60 mm (W x H x D) General Dimensions Voltage 24 VDC Wall Bracket 97 x 107.8 mm (screw joint included) -
Page 58: Troubleshooting
This equipment has been tested and found to comply with the limit of a Class B digital device, pursuant to Part 15 of the FCC Rules. These limits are designed to provide reasonable Please contact your local dealer/distributor for support or contact Suprema at protection against harmful interference in a residential installation. - Page 59 Appendix PREAMBLE 1) Neither the Font Software nor any of its individual components, in Original or Modified Versions, may be sold by itself. The goals of the Open Font License (OFL) are to stimulate worldwide development of collaborative font projects, to support the font creation efforts of academic and linguistic 2) Original or Modified Versions of the Font Software may be bundled, redistributed and/or communities, and to provide a free and open framework in which fonts may be shared and sold with any software, provided that each copy contains the above copyright notice...
-
Page 60: Quality Assurance
Suprema warrants the performance of the product specified in the specifications within license is granted only for products covered by Suprema's Terms and Conditions of Sale. No the limitations set forth for a warranty period of one year from the date of delivery to the purchaser. -
Page 61: Index
Face Authentication Procedure 51 Power Connection 18 Face Authentication Screen 43 BS VideoPhone Setting 37 Product Description 10 FaceStation Menu Tree 27 Time and Attendance Mode 34 Product Specifications 57 Factory Default 39 TouchScreen Calibration 39 Card Authentication Modes 52... - Page 62 Suprema Inc. 16F Parkview Tower, 6 Jeongja, Bundang, Seongnam, Gyeonggi, 463-863 Korea Tel: +82-31-783-4502 | Fax: +82-31-783-4503 Email: sales@supremainc.com | Homepage: www.supremainc.com...
Need help?
Do you have a question about the FaceStation and is the answer not in the manual?
Questions and answers