
Subscribe to Our Youtube Channel
Related Manuals for Extech Instruments LT40


Summary of Contents for Extech Instruments LT40
- Page 1 USER MANUAL White LED Light Meter Model LT40 Additional User Manual Translations available at www.extech.com ...
- Page 2 Congratulations on your purchase of the Extech LT40 LED Light Meter that measures light intensity from white LED light sources. The LT40 can also measure light from fluorescent, metal halide, high‐ pressure sodium, and incandescent sources, for reference only (unspecified accuracy). The LT40 can measure light up to 40,000 Fc (400,000 Lux). This instrument is shipped fully tested and calibrated and, with proper use, will provide years of reliable service. Please visit our website ...
-
Page 3: Meter Description
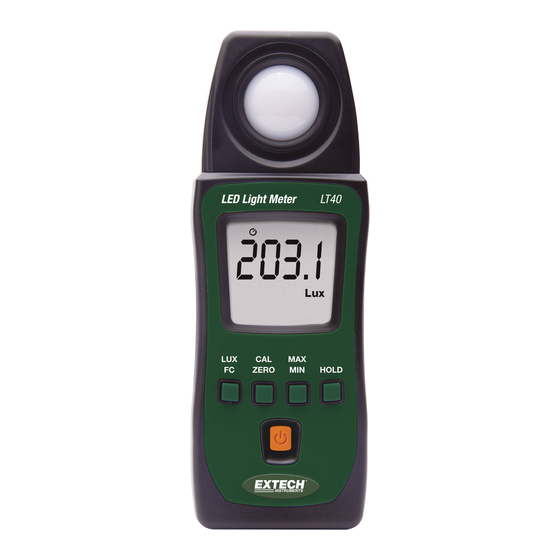
Meter Description Photo detector (remove protective cover to expose sensor) Display (LCD) Control push‐buttons Power Button: ON/OFF Battery compartment and tripod mount are located on rear of instrument Push‐Button Description Lux/Fc units selector Zero Calibration button Maximum/Average/Minimum memory button Data hold button Operation Power ON/OFF Long press the Power button to power the meter. To power the meter OFF, short press the Power button. Taking Measurements 1. Switch the meter ON and remove the sensor’s protective cover to expose the light sensor dome. The display should switch ON; if not, check that batteries are installed and fresh. 2. The meter measures the intensity of the light (illuminance) that strikes the sensor dome in foot‐candles and Lux units (1 fc = 10.76 lux), displaying this measured value on its LCD. 3. Position the meter and light source so that the light strikes the sensor dome straight on (perpendicular) with as little an angle as possible. 4. The meter’s display can show a value up to 9999. However, for readings that represent measurements higher than this, the meter uses x10 or x100 feature. For example, to represent a measurement of 11,000 fc the meter will display 1100 with the x10 indicator. LT40-en-GB_V3.0 10/17... -
Page 4: Max/Min Button
The meter can record the maximum, minimum, and average readings as described below: 1. Short press the “MAX/MIN” button and the meter will begin to track the maximum/average/minimum measurements; the “MAX” icon will display at the top of the LCD window indicating that the meter is now showing the maximum reading. The reading will not change until a higher reading is registered. 2. Press the “MAX/MIN” button again to switch from “MAX” to “AVG”, where the meter will show the average measurement value. The “AVG” icon will be displayed above the displayed value. 3. Press the “MAX/MIN” button again to change the mode from “AVG” to “MIN”, where the meter will show the minimum value measured. The “MIN” icon will be displayed. 4. Press the “MAX/MIN” button again to switch from “MIN” back to “MAX”. 5. To exit this mode, hold the “MAX/MIN” button for at least 2 seconds. The MAX/AVG/MIN icons should all be switched OFF when the unit returns to the normal operating mode. HOLD Button Press the HOLD button to freeze the current reading on the LCD. Press the HOLD button again to release the reading. In the Data Hold mode, HOLD is displayed on the LCD. Zero Calibration Procedure 1. Ensure that the protective cap is attached to the light sensor. 2. Power the meter and the LCD should display ‘0’. 3. Short press the “CAL ZERO” button to perform the zero adjustment (CAL will appear on the display). 4. The CAL display will switch off when the calibration has been completed. 5. If the protective cap is not covering the sensor when the Zero calibration is started the LCD display will read CAP. In this case, please cover the sensor with the cap and restart this procedure. LT40-en-GB_V3.0 10/17... -
Page 5: Battery Replacement And Maintenance
When the meter is not in use, please keep the protective cap in place over the light sensor. This will prolong the life of the sensor. When the meter is to be stored for long periods, please remove the batteries and store them separately. Batteries can leak and cause damage to the meter’s components. Avoid areas of high temperature and humidity when using this instrument. Battery Replacement and Maintenance Cleaning and storage 1. The white plastic sensor dome should be cleaned with a damp cloth when necessary. Use only a mild soap if needed. Do not use solvents, abrasives, or harsh detergents to clean the dome. 2. Store the meter in an area with moderate temperature and relative humidity. Battery Replacement When the battery power decreases to a critical level, the low battery symbol “ ”will appear on the LCD. Replace the 2 x 1.5V AAA batteries located in the rear battery compartment. 1. Press and hold the battery compartment lock button (see diagram). 2. Slide the battery compartment cover off in the direction of the arrow. Install two (2) 1.5V ‘AAA’ batteries observing correct polarity and close the battery compartment. Ensure that the compartment cover is securely fastened before using the meter. Never dispose of used batteries or rechargeable batteries in household waste. As consumers, users are legally required to take used batteries to appropriate collection sites, the retail store where the batteries were purchased, or wherever batteries are sold. Disposal: Do not dispose of this instrument in household waste. The user is obligated to take end‐of‐life devices to a designated collection point for the disposal of electrical and electronic equipment. LT40-en-GB_V3.0 10/17... -
Page 6: Specifications
±25% General Specifications Sampling rate 2.5 times per second (digital display) Photo detector Silicon photo‐diode with cosine correction Display 4 ‐digit LCD (maximum display: 9999) with low battery icon, measurement overload, and other function indicators Auto Range M eter automatically ranges the display Operating conditions Temperature: 5 to 40 C (41 to 104 F); Humidity: < 80% RH Storage conditions Temperature: ‐10 to 60 C (14 to 140 F); Humidity: < 70% RH Low battery indication appears on the LCD when battery voltage falls critically low LED Type White LED light Power supply 2 x 1.5V ‘AAA’ batteries Battery life Approximately 200 hours Auto Power OFF Meter switches OFF after 12 minutes of inactivity Dimensions 133 x 48 x 23 mm (5.2 x 1.9 x 0.9”) Weight 250 g. (8.8 oz.) including batteries LT40-en-GB_V3.0 10/17... - Page 7 150‐200 15‐20 Waiting Room 500‐750 50‐75 Elevator 200‐750 20‐75 Medical Exam Room 750‐1,500 75‐150 Show Window, 750‐1,500 75‐150 Operating Room Packing Table 1,500‐3,000 150‐300 Storefront, Show Window 5,000‐10,000 500‐1000 Eye Inspection Copyright © 2013‐2017 FLIR Systems, Inc. All rights reserved including the right of reproduction in whole or in part in any form ISO‐9001 Certified www.extech.com LT40-en-GB_V3.0 10/17...
Need help?
Do you have a question about the LT40 and is the answer not in the manual?
Questions and answers