Table of Contents
Advertisement
Quick Links
Advertisement
Table of Contents

Related Manuals for Geemarc clearsound amplicall 20


Summary of Contents for Geemarc clearsound amplicall 20
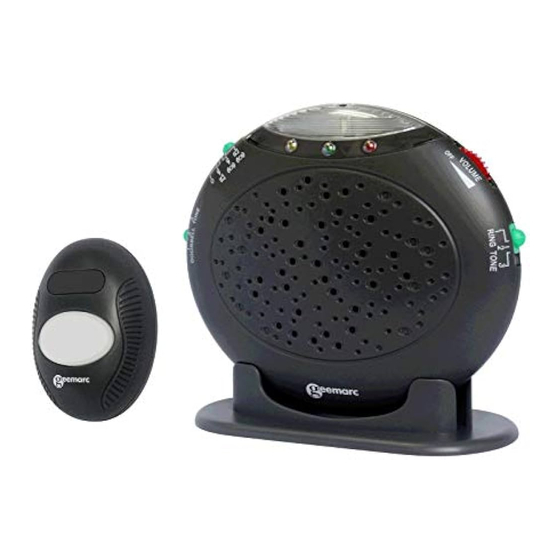
- Page 2 DESCRIPTION Description Low battery indicator (Green LED) Strobe flasher Red LED OrangeLED Volume control Alarm mode switch Tone control Doorbell tone control Speaker Table mounting FRONT batteries compartment (4 X AA) Wall mounting screw holes REAR Shaker jack Adaptor jack Modular Modular jack PTT line or (option)
-
Page 3: Installation
INSTALLATION Installation (See drawing) 230V AC adaptor UK plug Option: Shaker (ref.:SHAKCL_BLK) Telephone plug Door Bell button Door Bell (Amplicall 1 Amplicall 2\Amplicall 3) 1 - Insert the 4 x AA battery in the compartment . 2 - Connect the RJ11 to RJ11 cable between the Amplicall and phone 3 - Connect one end of the telephone line cord to the unit and the other end to a wall socket. -
Page 4: Important Safety Instructions
INSTALLATION Electrical connection : The apparatus is designed to operate from a 230V 50Hz supply only. (Classified as «hazardous voltage» according to EN60950 standard). The apparatus does not incorporate an integral power on/off switch. To disconnect the power, either switch off supply at the mains power socket or unplug the AC adaptor. - Page 5 INSTALLATION Setting up Door bell 1. The Door Bell can be take with the people who need the assistance. 2. The door bell can be fixed on the wall or door surround, drill two holes horizontally, 15mm apart, put the supplied anchor into the two holes, hang the door bell on to the two anchors and then instert and tighten screws, and then stick the blank sticker on the two holes.
-
Page 6: Wall Mounting
INSTALLATION Setting UP Indoor unit Wall Mounting 1. Drill two holes horizontally, 96mm apart, and leave the screws protruding from the wall by 5mm. 2. Hang the base on to the two screws and pull the base down to lock it on Table Mounting If you want to mount the unit on the table, only put it into the base cradle, and then place the base cradle on the... - Page 7 INSTALLATION Tone Control Switch (3 Positions) Set the tone of the alarm sound. Door Bell Tone Control The three position switch allows you to set a different tone when the door bell rings. Change the Battery of Indoor unit The unit requires 4×AA batteries 1.
- Page 8 INSTALLATION Note: Do not use a rechargeable battery. Do not put the used battery into the household rubbish, pay attention to battery regulations regarding battery disposal. The Pairing Procedure: 1. Press and hold the Pairing/Test button until the unit makes a beep sound, release the Pairing/Test button, then the 1 LED lights to enter pairing mode.
-
Page 9: Operation
INSTALLATION (the other 2 LED light), then press and hold the Pairing/Test button until the 1 LED goes off, beeps to confirm. The 1 remote is now un-registered. 3. If user wants to keep the 1 remote but un-register the 2 remote, when the 1 LED flashes, press the Pairing/Test button again, the 2... -
Page 10: Troubleshooting
INSTALLATION Trouble shooting Symptom Solution No incoming call, it 1) Check if the batteries rings automatically or contact well. rings continuously; the 2) Check if the power shaker vibrates adaptor connects automatically or normally. continuously; the 3) Turn off the power camera LED flashes switch for 10 minutes automatically. - Page 11 INSTALLATION When it is connected to 1) Check if it is connected the power adaptor or it to the shaker correctly. has been installed 4 2) Check if the shaker batteries, bell rings socket has been normally, or camera damaged. LED blinks normally, 3) Check if the alarm when there is an...
-
Page 12: Regulatory Compliance
REGULATORY COMPLIANCE - This equipment complies with Part 68 of the FCC rules and the requirements adopted by the ACTA. On the bottom of this equipment is a label that contains, among other information, a product identifier in the format US:AAAEQ##TXXXX. - Page 13 REGULATORY COMPLIANCE company will notify the customer as soon as possible. Also, you will be advised of your rights to file a complaint with the FCC if you believe it is necessary. - The telephone company may make changes in its facilities, equipment, operation or procedures that could affect the operation of the equipment.
- Page 14 REGULATORY COMPLIANCE accordance with the instructions, may cause harmful interference to radio communications. However, there is no guarantee that interference will not occur in a particular installation. If this equipment does cause harmful interference to radio or television reception, which can be determined by turning the equipment off and on, the user is encouraged to try to correct the interference by one or more of the following measures:...
-
Page 15: Garantie
GARANTIE GARANTIE From the moment your Geemarc product is purchased, Geemarc guarantee it for the period of one year. During this time, all repairs or replacements (at our option) are free of charge. Should you experience a problem then contact our helpline or visit our website at www.geemarc.com. - Page 16 - Or, hand the old product to the retailer. If you purchase a new one, they should accept it. Thus if you respect these instructions you ensure human health and environmental protection. For product support and help visit our website at www.geemarc.com Telephone 01707 384438 Or fax 01707 832529...
Need help?
Do you have a question about the clearsound amplicall 20 and is the answer not in the manual?
Questions and answers