Canon PowerShot G10 Service Manual
Hide thumbs
Also See for PowerShot G10:
- User manual (308 pages) ,
- Software user's manual (49 pages) ,
- Software starter manual (83 pages)
Table of Contents
Advertisement
Quick Links
Download this manual
See also:
User Manual
Advertisement
Chapters
Table of Contents

Related Manuals for Canon PowerShot G10


Summary of Contents for Canon PowerShot G10
- Page 2 Copyright: All copyrights in the content of this Service Manual are owned or controlled by Canon Inc. You are not permitted to copy,reproduce,download,modify,adapt or translate in any way the content of this Service Manual for any purpose other than the purpose contemplated herein without prior...
-
Page 3: Table Of Contents
CONTENTS 1. Overview Summary of Main Features ..........................1 Comparison of Main Features ........................5 2. Exterior Exterior Photos .............................6 6-view Diagram ............................7 Nomenclature..............................8 3. Specifications Product Specifications ..........................9 System Diagram ............................20 Shooting/Setting Features List........................21 Direct Print ..............................22 3-4-1 Print Features of Direct Print ......................22 3-4-2 The Connection between Digital Cameras and Printers ...............24 Playback Compatibility ..........................25... -
Page 4: Overview
1. Overview As the successor model to the PowerShot G series PowerShot G9, which was Canon's ultimate compact digital camera, the PowerShot G10 incorporates a new 14.7-mega- pixel CCD, the new DIGIC 4 processor, and the long-anticipated wide-angle 28 mm 5x zoom lens for securing perfection in every detail as the flagship model. - Page 5 • Face Detect AE also evaluates the brightness of faces in the scene when evaluating exposure • Face Detect WB evaluates the color of the faces in the scene when adjusting the white balance • Face Detect FE controls the flash output for optimum face brightness during flash photography •...
- Page 6 Resume Playback starts playback from last viewed image (still image) or frame (movie) Automatic image rotation is linked to the camera's orientation (Intelligent Orientation Sensor) Printing Features Both PictBridge and Canon Direct Print supported Print Order is available by pressing the Print/Share button...
- Page 7 Others Large size (3.0-inch type) LCD monitor with high-resolution (approx. 461,000 dots) and wide viewing angle (Pure Color LCD II) • High contrast and faithful color reproduction • Finished with the multiple coatings to prevent smudging, scratching, or reflection of light Sound recorder capable of up to two hours of audio recording •...
-
Page 8: Comparison Of Main Features
SD memory card, SDHC memory card, MultiMediaCard, MMCplus card, HC MMCplus card File Format Design rule for camera file system, DPOF (Version 1.1) compliant Still Images Exif 2.2 (JPEG), RAW (CR2 (Canon original)) MOV (Image data: H.264, Audio data: Linear PCM AVI (Image data: Motion JPEG, Audio data: WAVE Data Type... -
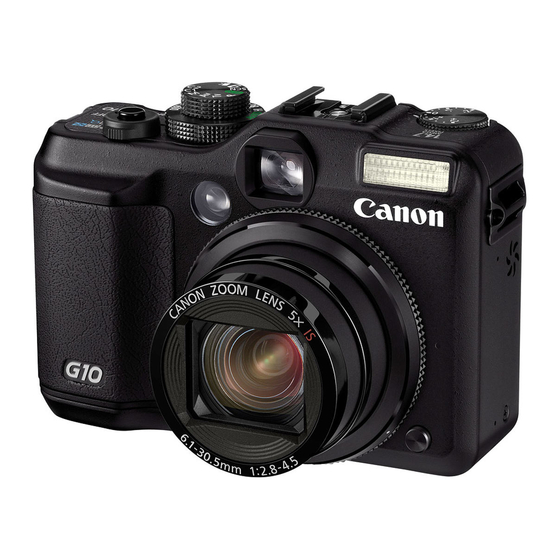
Page 9: Exterior
2. Exterior 2-1 Exterior Photos 580EX II TC-DC58D... -
Page 10: 6-View Diagram
2-2 6-view Diagram Unit : mm (inch) Nominal Dimensions 109.1 (4.30... -
Page 11: Nomenclature
2-3 Nomenclature... -
Page 12: Specifications
3. Specifications 3-1 Product Specifications Note: Description of the "Product Specifications" refers to "CIPA DCG-002-2007 Specification Guideline for Digital Cameras". The measured data with no annotation is measured under normal temperature. Imaging Processor DIGIC 4 Image Sensor Type Camera Effective Pixels Approx. - Page 13 Optical Viewfinder Type Real-image zoom viewfinder Picture Coverage Approx. 77% (representative value) • An eclipse of the viewfinder may occur depending on lens zoom position. Eyepoint 15 mm (0.59 in.) Dioptric Adjustment –3.0 – +1.0 m (dpt) Electronic Viewfinder Not available LCD Monitor Type TFT color (Pure Color LCD II)
- Page 14 Exposure Control Metering System Evaluative , Center-weighted average, Spot Facial brightness is also evaluated in Face Detect AF. Fixed to center or linked to the AF frame. Manual Exposure Available • Level indicator display available. AE Lock Available • Shooting standby only in movie mode. i-Contrast Available Exposure Compensation...
- Page 15 Available Second-curtain Synchro Available Safety FE Available <External> Recommended Flash and Canon Speedlite 220EX, 430EX II, 580EX II accessory Transmitter ST-E2 Attachment Method Hot shoe Control Method Mutual communications through Sync. contact Flash Synchro Shutter Speeds 1/250 sec. (Maximum synchronized speed)
- Page 16 Digital Zoom Zoom Magnification Approx. 4.0x, up to approx. 20x in combination with the optical zoom • In still image mode, digital zoom is not available for the mode set to RAW or Widescreen. Focal Length 28 (W) – 560 (T) mm (35mm film equivalent) (Optical x Digital) Zoom Position 6.4x, 8.5x, 11x, 14x, 17x, 20x...
- Page 17 Night Display Available Shooting Interval LCD Monitor Shooting Interval Approx. 1.9 sec. Approx. 2.3 sec. • Under the conditions where the flash does not fire automatically. Continuous Shooting Mode Selection Continuous shooting, continuous shooting AF, continuous shooting LV • Smooth continuous shooting not available on RAW mode. Speed Continuous shooting: Approx.
- Page 18 Folder Settings Management Capacity Max. 900 • Up to 2,000 files can be stored per folder. Customization Create New Folder (on next shooting), Auto Create Off, or user-specified time per day, month, day of the week. <Still Images> Color Space Standard (sRGB) Compression Superfine, fine, normal...
- Page 19 <Audio> Recording Time Sound Memos Up to 1 minute recording length per image Sound Recorder Up to 2 hours recording length per clip 11.025 kHz 22.050 kHz 44.100 kHz Data size (KB/sec.) 2 GB 25 hrs. 22 min. 35 sec. 12 hrs.
- Page 20 Unwanted portions can be deleted (See Erasing Modes.) Editing Unit 1-sec. increments Printing Specifications Direct Print PictBridge, Canon Direct Print, Bubble Jet Direct DPOF (Version 1.1) Print Specification Select images & quantity for printing , Select range, Select by date, Select by category, Select by folder, Select all images •...
- Page 21 2: Canon original images and sounds (Cannot be customized) 3: Customizable by the user The simulated shutter sound of Canon F1 is registered to the 1st option and Canon T90 is registered to the 2nd option as a factory default.
- Page 22 Duration Approx. 3 weeks (after the sub-battery is fully charged and the main battery is removed.) Battery Capacity Number of Images Shot CIPA Standard compliant Canon Standard (LCD monitor On) (LCD monitor Off) Approx. 400 shots Approx. 1000 shots Playback Time Approx.
-
Page 23: System Diagram
Compact Photo AVC-DC300* Printers* Battery Pack (SELPHY series) NB-7L* (With Terminal Cover) USB Card Reader Video IN Terminal Canon Digital Camera Battery Charger Bubble Jet Printers* Solution Disk CB-2LZ/CB-2LZE* (inkjet printer series) Audio IN Terminal TV/Video Soft Case AC Adapter Kit ACK-DC50... -
Page 24: Shooting/Setting Features List
3-3 Shooting/Setting Features List [How to read symbols in the table] : Setting available or the optimum value is automatically set by the camera. *1 : Set to the optimum value depending on each shooting mode. As a rule, with the "Stitch Assist", only the first image is available. *2 : Fixed to ISO 3200. -
Page 25: Direct Print
The product name of the camera and the printer that has been described in the table is Japanese names. However, the product not sold in Japan has described an overseas name. Canon Direct Print features [NOTE] 1 to 99 copies can be set per image. - Page 26 • Printing with Canon Bubble Jet Printers (inkjet printer series/SELPHY DS series) The product name of the camera and the printer that has been described in the table is Japanese names. However, the product not sold in Japan has described an overseas name.
-
Page 27: The Connection Between Digital Cameras And Printers
3-4-2 The Connection between Digital Cameras and Printers The connection between Canon digital cameras (PowerShot series and IXY series) and printers shows in Table 1. Canon Direct Print / Bubble Jet Direct / Canon Direct Print / Canon Direct Print... -
Page 28: Playback Compatibility
3-5 Playback Compatibility 3-5-1 Still Images Cameras for playback (except SLR cameras) SD/SDHC/MMC SD/MMC/SDHC/ CF card SD/MMC (MMCplus: TX1 MMCplus/ only) HC MMCplus ID 400/320/300a/300/200a/ PS G3/G2/G1 PS Pro1 ID 500/450 ID 30 ID 600/55/50/ ID 800 IS/700/80/ ID 1000/900 IS/ PS G10 200, IXY DIGITAL 40/30a/L... -
Page 29: Movies
3-5-2 Movies Cameras for playback SD/SDHC/MMC SD/MMC/SDHC/MMCplus/ CFcard SD/MMC (MMCplus: TX1 only) HC MMCplus IXY DIGITAL PS G2/G1 ID 300a/300/ PS Pro1/G6/G5/G3 ID 600/ ID 800 IS/700/80/ PS S3 IS ID 1000/ ID 90/10 ID 810 ID 2000 IS/910 IS/ PS G10 200a/200 S1 IS... -
Page 30: List Of Accessory And Its Compatibility
3-6 List of Accessory and Its Compatibility 3-6-1 Camera PowerShot G Series, S Series, SX*(**) Series, Pro Series SX10 IS G9 S5 IS S1 IS Pro1 PS G5 S3 IS PS G3 90 IS S2 IS <Battery> NB-2L/2LH BP-511/511A BP-512/514 NB4-100/NB4-200 NB4-300 NB-7L... - Page 31 SX10 IS G9 S5 IS S1 IS Pro1 PS G5 S3 IS PS G3 90 IS S2 IS RAK-DC1 RAK-DC2 <Speedlite> 220EX O (S5 IS) 380EX 420EX 430EX(áU) O (S5 IS) 550EX 580EX O (S5 IS) 580EX II (MR-14EX) O (S5 IS) (MT-24EX) O (S5 IS) HF-DC1...
-
Page 32: Accessory Specifications
4 Accessory Specifications 4-1 New Accessories 4-1-1 Waterproof Case WP-DC28 • Specifications Maximum Depth 40 m (130 ft.) (Meets JIS Protection class 8) Waterproofing Seal, O-ring, etc. Polycarbonate (body, etc.), ABS (controls), clear plate glass Main Materials (employed materials) (lens window), acrylic (diffusion plate), stainless steel (springs, etc.), EPDM (seal), etc. - Page 33 • Exterior Unit: mm (inch) 116.6 (4.59) 150.0 (5.91)
-
Page 34: Ac Adapter Kit Ack-Dc50
4-1-2 AC Adapter Kit ACK-DC50 • Compact Power Adapter CA-PS700 100 – 240 V AC (50/60 Hz) Rated Input 35 VA (100 V) – 45 VA (240 V) 0.38 A (100 V) – 0.2 A (240 V) Rated Output DC 7.4 V, 2.0 A Operating Temperatures 0 –... -
Page 35: Conversion Lens Adapter La-Dc58K
4-1-5 Conversion Lens Adapter LA-DC58K Unit: mm (inch) Camera mount Bayonet type Thread Diameter 58 mm φ63.8* x 51.6* mm Max. Diameter x Length (φ2.51 x 2.03 in.) Weight Approx. 30 g (1.06 oz.) 4-1-6 Tele-converter TC-DC58D Unit: mm (inch) Magnification 1.4x Lens Construction... -
Page 36: Technical Description
Copyright: All copyrights in the content of this Service Manual are owned or controlled by Canon Inc. You are not permitted to copy,reproduce,download,modify,adapt or translate in any way the content of this Service Manual for any purpose other than the purpose contemplated herein without prior... - Page 37 CONTENTS 1. Functions of each unit MAIN PCB ASS’Y ............................1 JOG DIAL UNIT............................1 TOP COVER UNIT (TOP FPC ASS’Y)......................1 FLASH UNIT (ST PCB ASS’Y)........................1 BATTERY FPC ASS’Y ..........................1 2. Troubleshooting When an Error Code is Displayed ........................2 When a Problem Occurs ..........................3 FUSE ................................4 2.3.1 DIAGRAM ............................4...
-
Page 38: Functions Of Each Unit
1. Functions of each unit 1.1 MAIN PCB ASS’Y 1) Driving the CCD Sensor. 2) Conversion of the image signal from the analog signal to the digital signal. 3) Controlling the power supply and the system by DIGIC IV. (Refer to Sections 2.1 and 2.2.) 4) Image processing, and reading and writing the image signal to and from the Memory card using DIGIC IV. -
Page 39: Troubleshooting
2. Troubleshooting 2.1 When an Error Code is Displayed [Remedy] • Check for any abnormalities in the mounting of probable faulty parts or connector connections referring to the table below. • Try replacing probable faulty parts referring to the below. [NOTE] •... -
Page 40: When A Problem Occurs
2.2 When a Problem Occurs [Remedy] • Check for any abnormalities in the mounting of probable faulty parts or connector connections referring to the table below. • Try replacing probable faulty parts referring to the table below. [NOTE] • Adjustments must be performed after the part has been replaced. For details, see the “Adjustments” chapter. Problem (when an error code is not displayed) Defect position Reference... -
Page 41: Fuse
2.3 FUSE 2.3.1 DIAGRAM BATTERY BOX UNIT BATTERY FPC ASS'Y FU402 BATTERY for MAIN PCB ASS'Y BATT VBATT VBATT TERMINAL FU401 for ST FPC ASS'Y VBATT This product uses two fuses. 2.3.2 List of Fuses FUSE PARTS NO. Mounted board Remarks FU401 VD7-2241-251... - Page 42 Copyright: All copyrights in the content of this Service Manual are owned or controlled by Canon Inc. You are not permitted to copy, reproduce, download, modify, adapt or translate in any way the content of this Service Manual for any purpose other than the purpose contemplated herein without prior written consent of Canon Inc.
- Page 43 CONTENTS 1. Before Starting the Repair Work ------------------------------------------------------------------------------------------------- 1 1.1 Precautions on Flash High Voltage Circuit -------------------------------------------------------------------------------- 1 1.2 List of Tools ------------------------------------------------------------------------------------------------------------------- 1 1.3 List of Supplies ---------------------------------------------------------------------------------------------------------------- 1 1.4 Connectors for FPC Board --------------------------------------------------------------------------------------------------- 2 2. Disassembly ------------------------------------------------------------------------------------------------------------------------- 3 2.1 Procedure ----------------------------------------------------------------------------------------------------------------------- 3 2.2 BAYONET CAP -------------------------------------------------------------------------------------------------------------- 4 2.3 STRAP HOLDER UNIT ----------------------------------------------------------------------------------------------------- 5...
-
Page 44: Before Starting The Repair Work
1. Before Starting the Repair Work Be sure to read the following precautions before starting the repair work. Precautions on Flash High Voltage Circuit When separating the FRONT ST CHASSIS. be sure to discharge the MAIN CAPACITOR. * Discharging resistor: 1 kΩ, approx. 5 W. (See Fig.1) CAUTION: Because this is a high-voltage circuit, be careful to avoid electric shock and short-circuits with other components. -
Page 45: Connectors For Fpc Board
1.4 Connectors for FPC Board This product uses six types of connectors for the FPC board. The contact-piece 1 Type A should face upward Connected state Unconnected state The contact-piece 2 Type B should face downward Unconnected state Connected state 3 Type C Connected state Unconnected state... -
Page 46: Disassembly
2. Disassembly 2.1 Procedure The following flowchart shows the disassembly procedure for PowerShot G10. Reverse the disassembly procedure to reassemble it. ∗ The pages to refer to are shown in parentheses ( ). : MAIN FLOW START : SUB FLOW : MAIN UNIT 2.2 BAYONET CAP... -
Page 47: Bayonet Cap
BAYONET CAP (1) Rotate the BAYONET CAP in the direction of the arrow while pressing the BAYONET LOCK BUTTON, and then remove it. (1) BAYONET LOCK BUTTON BAYONET CAP... - Page 48 STRAP BASE (1) Remove two screws ( a × 2) and remove the STRAP BASE. (1) STRAP BASE (1) - a CD4-2984-000 3.5mm BLACK M1.7...
-
Page 49: Rear Cover Section
REAR COVER SECTION (1) Remove five screws ( a × 3, b × 2). (2) Remove the REAR COVER SECTION. (1) - (2) REAR COVER SECTION (1) - (1) - (1) - CD4-2984-000 CD4-2983-000 3.5mm 4.5mm BLACK BLACK M1.7 M1.7 (SELF TAP) -
Page 50: Rear Cover Unit, Lcd Window
REAR COVER UNIT, LCD WINDOW (1) Separate the LCD WINDOW from the REAR COVER UNIT. REAR COVER UNIT LCD WINDOW... -
Page 51: Front Cover Unit
FRONT COVER UNIT (1) Raise the bottom of the FRONT COVER UNIT, and remove the three claws. (2) Remove the FRONT COVER UNIT. Claws FRONT COVER UNIT MAIN BODY Remove Cross section view (the claw of FRONT COVER UNIT) (2) FRONT COVER UNIT... -
Page 52: Battery Cover Shaft, Battery Cover Unit
BATTERY COVER SHAFT, BATTERY COVER UNIT (1) Open the BATTERY COVER UNIT. (2) Using a pair of tweezers or similar tool, remove the BATTERY COVER SHAFT in the direc- tion of the arrow. (3) Remove the BATTERY COVER UNIT. <Note on Reassembling> Install the BATTERY COVER UNIT as shown in the figure. -
Page 53: Bayonet Unit, Bayonet Tape
BAYONET UNIT, BAYONET TAPE (1) Remove four screws ( c × 3, d × 1). (2) Push the plate in the direction of the arrow. (3) Disengage the two dowels, and remove the BAYONET UNIT. (4) Remove the BAYONET TAPE. <Note on Disassembling>... -
Page 54: Jack Cover Unit
JACK COVER UNIT (1) Remove the screw ( e × 1). (2) Open the JACK COVER. (3) Remove the screw ( e × 1). (4) Disengage two dowels, and remove the JACK COVER UNIT in the direction of the arrow. (2) JACK COVER (4) Dowels (3) - e... -
Page 55: Jog Dial Unit
2.10 JOG DIAL UNIT (1) Remove two screws ( c × 1, f × 1). (2) Disengage the two connectors. (3) Disengage the two dowels, and remove the JOG DIAL UNIT. XA1-7170-257 CD3-3325-000 2.5mm 2.5mm SILVER SILVER M1.7 M1.7 (1) - c (1) - f Dowels Connectors... -
Page 56: Top Cover Unit
2.11 TOP COVER UNIT (1) Remove four screws ( c × 4). (2) Disconnect the connector. (3) Disengage the two dowels, and remove the TOP COVER UNIT. <Note on Disassembling> Do not pull the lead wires of the connector, because they can break easily. Grasp the connector with a pair of tweezers, and disconnect it. -
Page 57: Plate Spring
2.12 PLATE SPRING (1) Using a pair of tweezers or similar tool, remove the PLATE SPRING. <Note on Disassembling> The DIABOND is applied on the PLATE SPRING. Moistening those areas with ethyl alcohol helps to remove the PLATE SPRING. <Note on Reassembling> Apply the DIABOND No.1663G to the positions shown in the figure. -
Page 58: Accessory Shoe
2.13 ACCESSORY SHOE (1) Remove four screws ( g × 4). (2) Disengage the dowel, and remove the ACCESSORY SHOE. <Note on Reassembling> After tightening the screws ( g × 4), apply the THREE BOND 1401C to positions shown in the figure. (2) ACCESSORY SHOE (1) - g Note on Reassembling... -
Page 59: Finder Dial Unit
2.14 FINDER DIAL UNIT (Procedure for Disassembling) (1) Remove the screw ( h × 1). (2) Disengage the two dowels, and remove the FINDER DIAL UNIT. (Procedure for Reassembling) (1) Set the dial position of the FINDER DIAL UNIT by aligning the dowel with the notch. (2) Engage two dowels and check each dowel is in the correct position. -
Page 60: Lcd Unit Section
2.15 LCD UNIT SECTION (1) Remove two screws ( c × 1, i × 1). (2) Disconnect the two connectors. (3) Disengage the dowel, and remove the LCD UNIT SECTION. <Note on Reassembling> Be careful not to forget to engage the dowel. Make sure to handle the flexible board with a pair of tweezers only at the area circled in the diagram, because it is thin and easy to damage. -
Page 61: Lcd Unit, Operation Plate
2.16 LCD UNIT, OPERATION PLATE (1) Disengage the two dowels. (2) Undo the two linked portions, and separate the LCD UNIT from the OPERATION PLATE. <Note on Reassembling> Route the flexible board as shown in the figure. (2) OPERATION PLATE Note on Reassembling (2) LCD UNIT (1) Dowels... -
Page 62: Main Pcb Ass'y
2.17 MAIN PCB ASS’Y (1) Disconnect the connector. (2) Disconnect the two connectors. (3) Remove two screws ( i × 1, j × 1). (4) Disengage the two dowels, and disconnect the connector. Then remove the MAIN PCB ASS’Y. <Note on Reassembling> Be careful not to catch the flexible board under the MAIN PCB ASS’Y. -
Page 63: Corner Spacer
2.18 CORNER SPACER (1) Remove the CORNER SPACER. <Note on Reassembling> Align two dowels and install the CORNER SPACER. (1) CORNER SPACER Note on Reassembling CORNER SPACER Dowels... -
Page 64: Battery Block
2.19 BATTERY BLOCK (1) Disconnect the connector. (2) Remove five screws ( d × 1, f × 4). (3) Disengage the two dowels, and remove the BATTERY BLOCK. <Note on Disassembling> Be careful not to get caught on the flexible boards. (2) - (2) - Connector... -
Page 65: Main Chassis Unit
2.20 MAIN CHASSIS UNIT (1) Remove two screws ( h × 2). (2) Disengage the two dowels, and remove the MAIN CHASSIS UNIT. (2) MAIN CHASSIS UNIT CD3-2936-000 (1) - h 2.5mm (2) Dowels SILVER M1.7 (NK GRIP) -
Page 66: Gyro Fpc Ass'y
2.21 GYRO FPC ASS’Y (1) Remove two screws ( k × 2). (2) Disengage the four dowels, and remove the two GYRO PLATEs. (3) Disengage the two dowels, and remove the GYRO FPC ASS’Y. <Note on Reassembling> Install the GYRO FPC ASS’Y as shown in the figure. GYRO FPC ASS'Y (1) - k... -
Page 67: Lithium <2Nd> Battery Ms614Se/Sii, Bateery Box Unit
2.22 LITHIUM <2ND> BATTERY MS614SE/SII, BATTERY BOX UNIT (1) Separate the LITHIUM <2ND> BATTERY MS614SE/SII from the BATTERY BOX UNIT. <Note on Reassembling> Make sure that the positive (+) and negative (-) poles face in the right direction. BATTERY BOX UNIT Note on Reassembling Make sure that the positive (+) and negative (-) poles face in... -
Page 68: Battery Fpc Ass'y
2.23 BATTERY FPC ASS’Y (1) Remove the screw ( k × 1). (2) Disengage the three dowels, and peel off the BATTERY FPC ASS’Y. <Note on Disassembling> The adhesion of the DOUBLE-SIDED TAPE used to attach the BATTERY FPC ASS’Y is very strong. Therefore, when peeling the BATTERY FPC ASS’Y, do it very carefully so that the flexible board is not ripped. -
Page 69: Flash Unit
2.24 FLASH UNIT (1) Remove two screws ( d × 2). (2) Disengage the four dowels, and remove the FLASH UNIT. (1) - ✖ (1) - ✖ XA4-9170-357 3.5mm SILVER M1.7 (SELF TAP) Dowel (2) Dowel ✤ FLASH UNIT Dowels... - Page 70 <Note on Reassembling> (1) Be careful not to cut the flexible board. (2) Engage the two dowels, and install the flexible board as shown in the figure. Note on Reassembling (1) Note on Reassembling (2) Flexible board Flexible board Dowels...
-
Page 71: Front St Chassis
2.25 FRONT ST CHASSIS (1) Remove two screws ( d × 2). (2) Disengage the three dowels. (3) Rotate the FRONT ST CHASSIS in the direction of the arrow A, and remove it in the direction of the arrow B. Dowels (1) - (1) -... - Page 72 Note: After separating the FRONT ST CHASSIS, discharge the MAIN CAPACITOR. (Because this is a high-voltage circuit, be careful to avoid electric shock and short-circuits with other components.) <Note on Reassembling> Fold the flexible board and install it as shown in the figure. Note (Discharge) Note on Reassembling Bend on this line...
-
Page 73: Finder Unit, Optical Unit
2.26 FINDER UNIT, OPTICAL UNIT (1) Disengage the two dowels, and remove the portion A. (2) Remove three screws ( l × 3). (3) Disengage the two dowels, and separate the FINDER UNIT from the OPTICAL UNIT. <Note on Reassembling> Apply voltage (DC 2.0V) across the motor terminal to drive the motor until the motor stops and the barrel goes back to the retracted position, and then install the FINDER UNIT to the OPTICAL UNIT. -
Page 74: Front Cap, Front Cap Tape
2.27 FRONT CAP, FRONT CAP TAPE (1) Apply the voltage (DC 2.0V) across the motor terminal to drive the motor until the motor stops and the barrel comes fully out. (2) Remove the FRONT CAP which is attached to the FRONT CAP TAPE. <Note on Disassembling>... -
Page 75: Barrier Cap
2.28 BARRIER CAP (1) Disengage the two dowels one by one, and raise the BARRIER CAP. (2) Rotate the BARRIER CAP in the direction of the arrow A, and remove it. (2) BARRIER CAP Dowels BARRIER CAP... - Page 76 2.29 BARRIER PLATE 1 (1) Remove the BARRIER PLATE 1 (2 pieces). <Note on Reassembling> Install the BARRIER PLATE 1 (2 pieces) so that the BARRIER PLATE 3 (2 pieces) is aligned with the positions shown in the figure. BARRIER PLATE 1 BARRIER PLATE 1 Note on Reassembling BARRIER PLATE 1...
-
Page 77: Barrier Plate 3, Barrier Plate Spring
2.30 BARRIER PLATE 3, BARRIER PLATE SPRING 2 (1) Remove the BARRIER PLATE 3 and BARRIER PLATE SPRING 2 together as an assembled unit. (2) Separate the BARRIER PLATE SPRING 2 from the BARRIER PLATE 3. <Note on Reassembling> Install he BARRIER PLATE 3 and BARRIER PLATE SPRING 2 as shown in the figure. BARRIER PLATE SPRING 2 BARRIER PLATE 3,... -
Page 78: Barrier Plate 2, Barrier Plate Spring
2.31 BARRIER PLATE 2, BARRIER PLATE SPRING 1 1 Procedure for Disassembling (1) Remove the BARRIER PLATE 2 (2 pieces). (2) Rotate the IRING BARRIER in the direction of the arrow slightly and remove the BARRIER PLATE SPRING 1 (2 pieces). BARRIER PLATE 2 BARRIER PLATE 2 IRING BARRIER... -
Page 79: Iring Barrier
2 Procedure for Reassembling (1) Install the BARRIER PLATE SPRING 1 to the BARRIER PLATE 2. (2) Install the BARRIER PLATE SPRING 1 and BARRIER PLATE 2 together as an assembled unit to the OPTICAL UNIT. (3) Hook the other side of the BARRIER PLATE SPRING 1 to the projection of the IRING BARRIER. - Page 80 2.32 IRING BARRIER (1) Rotate the IRING BARRIER in the direction of the arrow. (2) Remove the IRING BARRIER. <Note on Reassembling> Install the IRING BARRIER as shown in the figure. IRING BARRIER IRING BARRIER Note on Reassembling IRING BARRIER...
-
Page 81: Gear 2, Gear 3, Gear 4, Gear 5-(1)
2.33 GEAR 2, GEAR 3, GEAR 4, GEAR 5 - (1) (1) Apply the voltage (DC2.0V) across the motor terminal to drive the motor until the motor stops and the barrel comes fully out. (2) Disengage the three dowels, and disconnect the three connectors. (3) Disengage the five dowels, and remove the flexible boards. -
Page 82: Gear 2, Gear 3, Gear 4, Gear 5-(2)
2.34 GEAR 2, GEAR 3, GEAR 4, GEAR 5 - (2) (1) Remove four screws ( m × 4). (2) Separate the FRONT UNIT from the REAR UNIT. <Note on Disassembling> Be careful not to cut the flexible boards. (1) - XA4-5140-457 4.5mm SILVER... - Page 83 2.35 GEAR 2, GEAR 3, GEAR 4, GEAR 5-(3) (1) Remove GEAR 3. (2) Remove GEAR 2. (3) Remove GEAR 4. (4) Remove GEAR 5. <Note on Reassembling> When assembling, install GEAR 5, GEAR 4, GEAR 2 and GEAR 3 in that order. The four GEARs constitute a set of GEARs.
-
Page 84: Screw List
2.36 Screw List CD4-2984-000 CD4-2983-000 CD4-2985-000 XA1-7170-257 XA4-9170-357 2.5mm 2.5mm 3.5mm 3.5mm 4.5mm BLACK SILVER BLACK BLACK SILVER M1.7 M1.7 M1.7 M1.7 M1.7 (SELF TAP) (SELF TAP) CD3-3325-000 XA1-3170-407 CD3-2936-000 XA1-7170-357 XA4-5170-307 2.5mm 2.5mm 3.5mm 3.0mm 4.0mm SILVER SILVER SILVER SILVER SILVER M1.7... - Page 85 Copyright: All copyrights in the content of this Service Manual are owned or controlled by Canon Inc. You are not permitted to copy,reproduce,download,modify,adapt or translate in any way the content of this Service Manual for any purpose other than the purpose contemplated herein without prior...
- Page 86 1 Replacement Parts and Adjustment Items ......................1 2 Adjustment Tools..............................2 3 Before Starting Electrical Adjustments ........................3 Removing the Security Lock ........................3 USB Driver Installation ..........................3 Canon DCP Connect Installation........................3 DC Runtime Installation ..........................3 Adjustment Software Installation .........................3 Preparation..............................4 Starting up the Adjustment Software......................4 Menu Window ..............................5...
-
Page 87: Replacement Parts And Adjustment Items
1. Replacement Parts and Adjustment Items PowerShot G10 requires electrical adjustments when certain parts are replaced. The table below indicates the adjustments required for the respective part replacements. For all other parts not listed below, no electrical adjustments are necessary after replacement. -
Page 88: Adjustment Tools
DC Security Tool Download (common to all models) DC Runtime Download (common to all models) Canon DCP Connect Download (common to all models) Download TWAIN Driver 2008 2H (common to products launched in 2H 2008) Enclosed in ... -
Page 89: Before Starting Electrical Adjustments
• Windows XP..None (“This Adjustment Software” is impossible when the RS-232C TWAIN driver is used.) 3.3 Canon DCP Connect Installation After downloading and extracting Adjustment Software, double-click Setup.exe (\Canon DCP Connect\Setup.exe) to install it. 3.4 DC Runtime Installation 1. After downloading and extracting DC Runtime, double-click Setup.exe to install it. -
Page 90: Preparation
3.6 Preparation Before starting up the Adjustment Software, follow the preparatory steps below: 1. Obtain all the tools necessary for the adjustment. 2. For the IS 1 Adjustment jot down the data written on the Optical Unit Flex. You will need it later. 3. -
Page 91: Menu Window
Start-up of Camera Watch This camera requires Camera Watch for the communication with PC. Start up Camera Watch by selecting Start > Program > Canon Utilities > Camera DCP connect > Camera Watch. Mode change <Mode Change> This camera uses normally PTP for communication with PC. Because calibration and adjustment become impos- sible depending on the condition of PTP, select the DCP of the PTP before starting calibration and adjustment. -
Page 92: Calibration
4. Calibration 4.1 Calibration Tools Used • Personal Computer • Brightness Box • Light-Shielding Cloth • Color Viewer (5500 °K) (500 × 500 or larger) • SERVICE MANUAL • ADJUSTMENT SOFTWARE • Color Bar Chart • Reference Camera • Compact Power Adapter CA-PS700 •... - Page 93 1. Set the Filter of the Brightness Box, and place the camera so that the lens is set against the light Brightness source surface of the Brightness Box. 2. Cover the camera with a light-shielding cloth so CAMERA that no light enters the camera except from the BODY Brightness Box.
- Page 94 1. Remove the two W-10 Filters. Brightness 2. Attach the C-12 and FL-W Filter between the Lens and the Brightness Box. Place the camera C-12 Filter so that the lens is set against the light source FL-W Filter surface of the Brightness Box. 3.
- Page 95 Check “Save as the Reference”, and click the “OK” button to store the data. When the message on the right appears, click the “FINISH” button. (This ends the “Calibration”.)
-
Page 96: Adjustment Procedure
5. Adjustment Procedure 5.1 IS 1 Adjustment 5.1.1 Auto Adjustment Tools Used • Personal Computer • COLLIMATER IS AUTO • SERVICE MANUAL ADJUSTMENT • ADJUSTMENT SOFTWARE • Compact Power Adapter CA-PS700 • AC Cable • DC Coupler DR-50 • INTERFACE CABLE IFC-400PCU Click the “IS 1”... - Page 97 When the message on the right appears, click the “FINISH” button. (This ends the IS 1 adjustment.)
-
Page 98: Manual Adjustment
5.1.2 Manual Adjustment Tools Used • Personal Computer • IS Chart (1) • SERVICE MANUAL • Tripod • ADJUSTMENT SOFTWARE • Compact Power Adapter CA-PS700 • AC Cable • DC Coupler DR-50 • INTERFACE CABLE IFC-400PCU Click the “IS 1” button. When the message on the right appears, click the “MANUAL”... - Page 99 1. Set the IS Chart (1) 177.3cm away from the IS Chart (1) front of the camera finder. Adjust the position of the camera so that the center of the IS Chart (1) is displayed in the center of the LCD. 177.3cm 2.
- Page 100 If the center of the chart is roughly in the middle of the 2 markings, click the “OK” button. Otherwise, change the value of “Pitch Offset”, click the “ADJUST” button and redo the adjustment. * This step sets the tentative offset value in order to perform the Pitch Gain adjustment.
- Page 101 If the center of the chart is roughly in the middle of the 2 markings, click the “OK” button. Otherwise, change the value of “Yaw Offset”, click the “ADJUST” button and redo the adjustment. * This step sets the tentative offset value in order to perform the Yaw Gain adjustment.
- Page 102 If the distance between the 2 markings is 6 scales on the chart, click the “OK” button. Otherwise, change the value of “Pitch Gain” until the distance between the 2 markings becomes 6 scales on chart, click the “ADJUST” button and repeat the steps 13 to 15.
- Page 103 If the distance between the 2 markings is 6 scales on the chart, click the “OK” button. Otherwise, change the value of “Yaw Gain” until the distance between the 2 markings becomes 6 scales on chart, click the “ADJUST” button and repeat the steps 17 to 19.
- Page 104 If the center of the chart is roughly in the middle of the 2 markings, click the “OK” button. Otherwise, change the value of “Pitch Offset”, click the “ADJUST” button and redo the adjustment. When the message on the right appears, click the “ADJUST”...
- Page 105 If the center of the chart is roughly in the middle of the 2 markings, click the “OK” button. Otherwise, change the value of “Yaw Offset”, click the “ADJUST” button and redo the adjustment. When the message on the right appears, click the “FINISH”...
-
Page 106: Is 2 Adjustment
5.2 IS 2 Adjustment Tools Used • Personal Computer • SERVICE MANUAL • ADJUSTMENT SOFTWARE • Compact Power Adapter CA-PS700 • AC Cable • DC Coupler DR-50 • INTERFACE CABLE IFC-400PCU Click the “IS 2” button. When the message on the right appears, click the “ADJUST”... -
Page 107: Optical Unit Adjustment
5.3 Optical Unit Adjustment Tools Used • Personal Computer • AF Chart (1) • SERVICE MANUAL • Infinity Collimator • ADJUSTMENT SOFTWARE • Tripod • Compact Power Adapter CA-PS700 • AC Cable • DC Coupler DR-50 • INTERFACE CABLE IFC-400PCU Click the “Optical Unit”... - Page 108 1. Place the camera at the infinity collimator. 2. Adjust the position of the camera finely so that Infinity the center of the chart is aligned with the center Collimator of the LCD screen. 3. Click the “ADJUST” button. CAMERA BODY Power Source...
-
Page 109: Ccd Adjustment
5.4 CCD Adjustment Tools Used • Personal Computer • Brightness Box • SERVICE MANUAL • Light-Shielding Cloth • ADJUSTMENT SOFTWARE • Compact Power Adapter CA-PS700 • AC Cable • DC Coupler DR-50 • INTERFACE CABLE IFC-400PCU Click the “CCD” button. When the message on the right appears, go to 3. - Page 110 1. When the message on the right appears, Set the Brightness Box to the value displayed on the message. 2. Click the “ADJUST” button. 1. When the message on the right appears, Set the Brightness Box to the value displayed on the message.
- Page 111 When the message on the right appears, go to 9. 1. Cover the camera with the Light-Shielding Cloth so that the no light reasons the CCD. 2. Click the “ADJUST” button. CAMERA BODY Light Shielding Cloth Power Source Personal Computer When the message on the right appears, click the “FINISH”...
-
Page 112: Pixel Dot Adjustment
5.5 Pixel Dot Adjustment Tools Used • Personal Computer • Brightness Box • SERVICE MANUAL • Light-Shielding Cloth • ADJUSTMENT SOFTWARE • Compact Power Adapter CA-PS700 • AC Cable • DC Coupler DR-50 • INTERFACE CABLE IFC-400PCU Click the “Pixel Dot” button. When the message on the right appears, go to 3. - Page 113 When the message on the right appears, go to 5. 1. Cover the camera with the Light-Shielding Cloth so that the no light reasons the CCD. 2. Click the “ADJUST” button. CAMERA BODY Light Shielding Cloth Power Source Personal Computer When the message on the right appears, click the “FINISH”...
-
Page 114: Shading Adjustment
5.6 Shading Adjustment Tools Used • Personal Computer • Brightness Box • SERVICE MANUAL • Light-Shielding Cloth • ADJUSTMENT SOFTWARE • Compact Power Adapter CA-PS700 • AC Cable • DC Coupler DR-50 • INTERFACE CABLE IFC-400PCU Click the “Shading” button. When the message on the right appears, go to 3. - Page 115 When the message on the right appears, click the “FINISH” button. (This ends the “Shading” Adjustment.)
-
Page 116: Imaging Process Adjustment
5.7 Imaging Process Adjustment Tools Used • Personal Computer • Brightness Box • SERVICE MANUAL • W-10 Filter (2pcs.) • ADJUSTMENT SOFTWARE • C-12 Filter • Compact Power Adapter CA-PS700 • FL-W Filter • AC Cable • Light-Shielding Cloth • DC Coupler DR-50 •... - Page 117 When the message on the right appears, go to 5. 1. Attach the two W-10 Filters between the Lens Brightness and the Brightness Box. Place the camera so that the lens is set against W-10 Filter the light source surface of the Brightness Box. 2.
- Page 118 When the message on the right appears, click the “FINISH” button. (This ends the “Imaging Process” Adjustment.)
-
Page 119: Color Adjustment
5.8 Color Adjustment Tools Used • Color Viewer (5500 °K) • Color AdjustmentPersonal Computer • SERVICE MANUAL • Color Bar Chart • ADJUSTMENT SOFTWARE • ND-4 Filter • Compact Power Adapter CA-PS700 • AC Cable • DC Coupler DR-50 • INTERFACE CABLE IFC-400PCU Click the “Color”... - Page 120 1. Shift a frame on the displayed screen with a mouse to choose a color of color bar. 2. Click the “Sampling” button. Measure the yellow and red colors, and if they are both within the specifications, click the “OK” button, and then proceed to step 7.
-
Page 121: Lcd Adjustment
5.9 LCD Adjustment Tools Used • Personal Computer • Reference Camera • SERVICE MANUAL • DIGITAL CAMERA SolutionDisk • ADJUSTMENT SOFTWARE • Compact Power Adapter CA-PS700 • AC Cable • DC Coupler DR-50 • INTERFACE CABLE IFC-400PCU Preparation 1. Insert the blank Memory Card into the reference camera. 2. -
Page 122: Flash Adjustment
5.10 Flash Adjustment Tools Used • Personal Computer • 18% Gray Chart • SERVICE MANUAL • Tripod • ADJUSTMENT SOFTWARE • Compact Power Adapter CA-PS700 • AC Cable • DC Coupler DR-50 • INTERFACE CABLE IFC-400PCU Click the “Flash” button. When the message on the right appears, go to 3. - Page 123 When the message on the right appears, click the “FINISH” button. (This ends the “Flash” Adjustment.)
-
Page 124: Checking Of Sound Recording/Output
5.11 Checking of sound recording/output It is not required to adjust the recording/output (volume etc.) of sound. Check the camera if the sound is recorded/ play-backed properly. - Page 125 Copyright: All copyrights in the content of this Service Manual are owned or controlled by Canon Inc. You are not permitted to copy,reproduce,download,modify,adapt or translate in any way the content of this Service Manual for any purpose other than the purpose contemplated herein without prior...
- Page 126 CONTENTS 1. INTERCONNECTION DIAGRAM 2. PCB DIAGRAMS MAIN PCB ASS’Y (Primary Side) MAIN PCB ASS’Y (Secondary Side) ST FPC ASS’Y (Primary Side) OPT FPC ASS’Y (Primary Side) AF FPC ASS’Y (Primary Side) SH FPC ASS’Y (Primary Side) IS FPC ASS’Y (Primary Side) GY FPC ASS’Y (Primary Side) DIAC FPC ASS’Y (Primary Side) 2.10 RLS FPC ASS’Y (Primary Side)
-
Page 127: Interconnection Diagram
IC2001 Direct Solder IC2004 IC1007 CN1002 IC500 Metal contact (Pins' face down) Metal contact (Pins' face up) MEMORY CARD IC1006 CONNECTOR SW1001 Metal contact Metal contact CARD/BATTERY Cover open Detect SW MEMORY CARD © 01 OCTOBER, 2008 CANON INC., 2008... -
Page 128: Pcb Diagrams
C652 C1036 C1056 R1042 L663 C1999 IC1003 R1110 L661 C1037 L662 RA1011 C673 C1040 R1022 RA1010 Q1001 SR1001 R1018 R1015 FP1003 CN1002 FP1002 CP1008 FP1001 CP1006 R1016 CP1005 CP1015 CP1007 CP1004 C1038 C1041 © CANON INC., 2008 02 OCTOBER, 2008... -
Page 129: Main Pcb Ass'y (Secondary Side)
R2034 C513 C2005 C2010 R2035 IC2001 R2033 CP2003 C514 R513 CP2004 C510 CP2005 C2011 R2004 IC500 R2005 C2012 CP2010 C502 C506 C503 CP2001 CP2002 C507 C512 Q503 R511 ZNR501 SW1001 R514 R515 CP500 © CANON INC., 2008 02 OCTOBER, 2008... -
Page 130: St Fpc Ass'y (Primary Side)
NOTE: Q 5 6 0 R 5 6 0 F P 5 6 0 NOTE: The ST FPC PCB ASS'Y (Secondary Side) is intentionally omitted because of no parts mounted on this side. © CANON INC., 2008 02 OCTOBER, 2008... -
Page 131: Opt Fpc Ass'y (Primary Side)
2.4 OPT FPC ASS’Y (Primary Side) CN3501 LED3503 NOTE: NOTE: The OPT FPC ASS'Y (Secondary Side) is intentionally omitted because of no parts mounted on this side. CN3505 CN3506 © CANON INC., 2008 02 OCTOBER, 2008... -
Page 132: Af Fpc Ass'y (Primary Side)
2.5 AF FPC ASS’Y (Primary Side) NOTE: NOTE: The AF FPC ASS'Y (Secondary Side) is intentionally omitted because of no parts mounted on this side. © CANON INC., 2008 02 OCTOBER, 2008... -
Page 133: Sh Fpc Ass'y (Primary Side)
2.6 SH FPC ASS’Y (Primary Side) T H 3 6 0 1 NOTE: NOTE: The SH FPC ASS'Y (Secondary Side) is intentionally omitted because of no parts mounted on this side. © CANON INC., 2008 02 OCTOBER, 2008... -
Page 134: Is Fpc Ass'y (Primary Side)
2.7 IS FPC ASS’Y (Primary Side) IC3802 NOTE: NOTE: The IS FPC ASS'Y (Secondary Side) is intentionally omitted because of no parts mounted on this side. © CANON INC., 2008 02 OCTOBER, 2008... -
Page 135: Gy Fpc Ass'y (Primary Side)
2.8 GY FPC ASS’Y (Primary Side) C3902 SR3902 NOTE: NOTE: The GY FPC ASS'Y (Secondary Side) is intentionally omitted because of no parts mounted on this side. © CANON INC., 2008 02 OCTOBER, 2008... -
Page 136: Diac Fpc Ass'y (Primary Side)
D 3 0 1 D 3 0 2 L E D 3 0 1 NOTE: NOTE: The DIAC FPC ASS'Y (Secondary Side) is intentionally omitted because of no parts mounted on this side. © CANON INC., 2008 02 OCTOBER, 2008... -
Page 137: Rls Fpc Ass'y (Primary Side)
R 2 0 1 Z N R 2 0 7 Q 2 0 1 R202 NOTE: NOTE: The RLS FPC ASS'Y (Secondary Side) is intentionally omitted because of no parts mounted on this side. © CANON INC., 2008 02 OCTOBER, 2008... -
Page 138: Batt Fpc Ass'y (Primary Side)
2.11 BATT FPC ASS’Y (Primary Side) CN403 FU401 NOTE: NOTE: The BATT FPC ASS'Y (Secondary Side) is intentionally omitted because of no parts mounted on this side. © CANON INC., 2008 02 OCTOBER, 2008... - Page 139 4.Trademarks: Canon inc.'s trademark,logo,product names,service marks and those trademark,logos,product names,service marks licensed to Canon inc.by any of its affiliate or subsidiary are registered or unregistered marks of Canon inc.or such affiliate or subsidiary in Japan and/or other countries. Adobe,the Adobe logo, Acrobat,the Acrobat logo and Reader are either registered trademarks or trademarks of Adobe Systems Incorporated in the United States of America and/or other countries.
Need help?
Do you have a question about the PowerShot G10 and is the answer not in the manual?
Questions and answers