
Related Manuals for ETEKCITY BH9938U-5-2


Summary of Contents for ETEKCITY BH9938U-5-2
- Page 1 Zap 5LX-S Model No.: BH9938U-5-2 Questions or Concerns? (855) 686-3835 support@etekcity.com...
- Page 2 Thank You. Thank you for purchasing the Zap 5LX-S Remote Outlet Switch by Etekcity. We are dedicated to providing our customers with quality products for building a better living. Should you have any questions or concerns about using your new product, feel free to reach out to our helpful customer support team at (855) 686-3835 or by email at support@etekcity.com.
-
Page 3: Table Of Contents
Table of Contents Safety Information Function Diagram Operation Re-programming an Outlet Resetting an Outlet Specifications Troubleshooting Warranty Customer Support... -
Page 4: Safety Information
Safety Information IMPORTANT: Please read, understand, and comply with all of the instructions provided in this manual before using this device. Failure to comply with the instructions given in this manual and/or using the device in ways other than the ones mentioned herein may result in physical harm and/or damage to the device. - Page 5 • DO NOT use appliances such as refrigerators, air conditioning units, and washing machines with the outlets. Such appliances exceed the maximum load current of 10A (1200W). • Keep out of reach of children. • The outlets are best used in areas with proper air circulation. •...
-
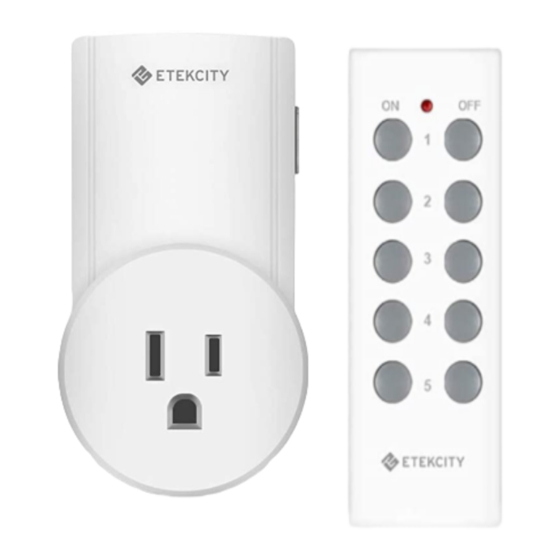
Page 6: Function Diagram
Function Diagram Outlet Power / Program Button Outlet Indicator Light Remote Control On Buttons Off Buttons Outlet Number... -
Page 8: Operation
Plug each outlet into a powered socket. Operation The outlets are pre-programmed for immediate use, but the configuration can be customized to meet your needs. Install one 12V/23A battery to each remote control. - Page 9 Plug an appliance into each Press the ‘ON’ or ‘OFF’ button outlet. Keep the appliance for the corresponding number switch to ‘ON’ in order to on remote. The indicator light allow the outlet to control the on the corresponding outlet device.
-
Page 10: Re-Programming An Outlet
Re-programming an Outlet Press and hold programming button until indicator light starts to blink. Unplug device from outlet. Program Button... - Page 11 Release program button, press Pairing is successful when the "ON" or "OFF" button for the indicator light stops blinking. desired number on the remote NOTE: You may repeat the re-programming steps to assign up to 10 outlets to a single number to simultaneously control multiple devices with a single click.
-
Page 12: Resetting An Outlet
Resetting an Outlet Remove the outlet from the power socket. To remove an outlet from all remote control pairings: Unplug any devices connected to the remote outlet. - Page 13 Press and hold the program Hold the program button for button. approximately 5 seconds Plug outlet back into power until the LED indicator socket while continuing to begins to flash hold program button. Program reset will be Program complete when the indicator Button light stops blinking.
-
Page 14: Specifications
Specifications Voltage: 120V ~ 60 Hz Maximum Current: Maximum Power: 1200W Transmission Frequency: 433.92 MHz Remote Battery Power: 12V (23A) Remote Control Range: 100 feet (30 meters)* Operating Temperature: 32°~95°F (0°~35°C) Storage Temperature: -4°~167°F (-4°~75°C) Package Contents *NOTE: The wireless range may be shortened by other electronic devices, appliances, walls, and other 5 x Remote Outlet Switch... -
Page 15: Troubleshooting
Troubleshooting Issue Solution Outlet is Replace the remote batteries with new 12V 23A batteries. Low unresponsive battery power may decrease readable wireless remote range. to remote Make sure the outlet and device are properly connected commands. and powered on. Make sure that the outlet is placed in an area with proper air circulation without overheating. -
Page 16: Warranty
TERMS & POLICY intended for. There are no warranties other than the warranties expressly set Etekcity warrants all products to be forth with each product. of the highest quality in material, craftsmanship and service for a This warranty is non-transferrable. - Page 17 Etekcity and its subsidiaries assume Should your product prove defective no liability for damage caused by the within the specified warranty period, use of the product other than for its please return the defective unit in its intended use or as instructed above original packaging with (1) an original and in the user manual.
- Page 18 To receive a valid warranty ID number, sign into your Etekcity customer account at www.etekcity.com (If you ordered your product through Amazon, Ebay or Walmart, create an account at www.etekcity.com in order to retrieve your warranty ID). At the top of the warranty page, type in your order number located in your order invoice to retrieve your warranty ID number.
-
Page 19: Customer Support
Should you encounter any issues or have any questions regarding your new product, feel free to contact our helpful Customer Support Team. Your satisfaction is ours! CUSTOMER SUPPORT SUPPORT HOURS Etekcity Corporation Monday - Friday: 9:00 am - 5:00 1202 N Miller St. Suite A pm PST Anaheim, CA 92806... - Page 20 Scan here and join the community! http://www.etekcity.com...
Need help?
Do you have a question about the BH9938U-5-2 and is the answer not in the manual?
Questions and answers
what battery is used in remote
The ETEKCITY BH9938U-5-2 remote uses a 12V 23A battery.
This answer is automatically generated