
Related Manuals for Daiwa TANACOM 500


Summary of Contents for Daiwa TANACOM 500
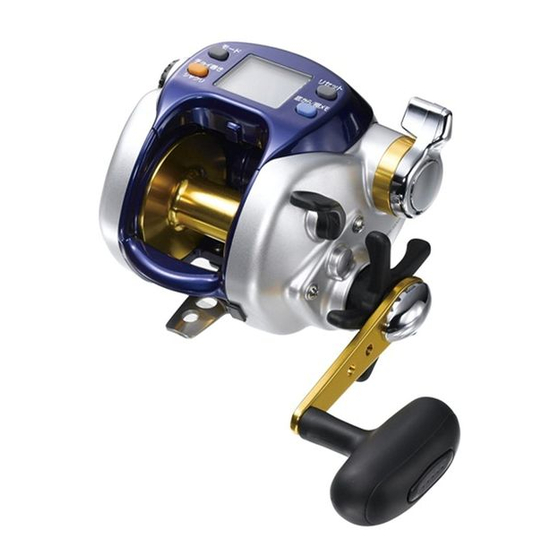
- Page 1 OPERATING MANUAL Thank you for purchasing a TANACOM 500. To take full advantage of the reels many useful functions, please read this manual carefully before using. Retain this manual for future reference. Reference Reference...
-
Page 2: Table Of Contents
Index Caution 9. Chumming timer 28,29 Precautions Chumming timer 28,29 Chumming timer winding Power source 10. Display recalibration How to connect the reel to the power source Display revision About the power source Battery indicator Useful functions Various alarms Using the Reel Display light About the counter display Breaker display... -
Page 3: Caution
Caution Precautions 1. Be careful to keep fingers clear of the levelwind mechanism. It can pinch your fingers and cause injuries. 1. If your sinker or lure is caught on the bottom, cut your line rather than jerk the rod to free it. -
Page 4: Power Source
Power source How to connect the reel to the power source 1.Attach the cord clips to the battery. Red covered clip is the plus (+), and the black covered clip is the minus (-). 2.Insert the connector into the reel. After this, the display appears as below. -
Page 5: Using The Reel
Using the Reel 1. Do not jerk your rod to free a lure or sinker stuck on the bottom. Pull the line taught with a gloved hand and cut it. 2. After maintenance, be sure to loosen the drag and store the reel in a dry place. -
Page 6: Maintenance
Maintenance About maintenance This is a washable reel. Wash away salt residue and grit after fishing. Maintenance procedure 1. Wash the reel with a dish washing detergent and a soft sponge. Do not use solvents. Do not use soap or other detergents. Other soaps or solutions may damage the reel both externally and internally. -
Page 7: Maintenance
Maintenance Handling and maintenance of the power cord Follow the restrictions below to avoid cord problems. Do not cut or connect your cord by yourself as it can cause unintended problems. Do not hang the reel Do not wind the power by the power cord. -
Page 8: Names Of The Buttons And The Display
Names of the buttons and the display MODE BUTTON RESET BUTTON MEMO BUTTON PICKUP BUTTON Mode display Depth counter Inverse counter (winding speed display) Drift/Jigging display Chumming timer (Power indicator, time to wind up, timer display) -
Page 9: Names Of The Buttons And The Display
Names of the buttons and the display MODE BUTTON Press the MODE BUTTON to scroll through the adjustment displays for each reel function. - Use the Power Lever to adjust numeric values. - Pressing the MODE BUTTON sets the numeric values you have adjusted. - Depress and hold the MODE BUTTON to return to the depth display. -
Page 10: Names And Functions Of Each Part
Names and functions of each part Free spool adjustment strong weak Power lever tighten loosen Waterproof drag Clutch Levelwind Enclosed items Power cord Levelwind threader Reel bag Warning rist... -
Page 11: Names And Functions Of Each Part
Names and functions of each part Free spool adjustment - It adjusts brake tension on the spool to prevent backlash or line slack caused by dropping the line with hook and sinker. Power lever - You can freely adjust winding power, or winding speed, from zero(ON/OFF) to maximum, by 32 steps, by using the lever. -
Page 12: Line Data Input
Line data input (Designated input) Designated input is a convenient procedure to input a line when you wind our TANA SENSOR BRIGHT. All you have to do is only inputting data. Note that this procedure is available only for the following cases. - Page 13 (m) No.5 No.4 No.6 No.5 No.6 No.7 No.8 No.8 No.10 No.10 *In TANACOM 500, the data of TANA SENSOR BRIGHT No.6-300 m is ready by default. When using that model, you don’t have to input data.
- Page 14 Line data input (When line length is known) This procedure is convenient if you have already known the length of a line you are going to reel. When you use a line other than our TANA SENSOR BRIGHT, operate this procedure. 1.
- Page 15 Line data input (When line length is known) 7. When you finish winding, return the lever to the OFF position (the alarm sounds). -Do not enwind the line completely. Return to the power lever to the OFF position just before the end, and wind the remaining line manually. Otherwise, the counter error may occur.
- Page 16 Line data input (With backing line) Note that a 100 m or longer line of which length is known is necessary. 1. Supply power to the reel, get down the power lever to the MAX position, and wind up the backing line appropriately. Backing line *For winding, be sure to use the line stopper pin to prevent line slippage on the spool surface.
-
Page 17: Line Data Input
Line data input (With backing line) 5. As checking the line color, wind up the line by 50 m. Press RESET BUTTON for at least 2 seconds. (The number indicated at the bottom changes from “50” to “100”.) 6. Similarly, wind up the remaining 50 m, and press RESET BUTTON for at least 2 seconds. -
Page 18: Functional Setting Operation
Functional setting operation (1. Mode setting display) How to set the many functions available - There are various convenient functions prepared in the mode. - Operate the power lever on the setting screen, select ON or OFF of a value and function, and press MODE BUTTON to call the next screen. - Page 19 Functional setting operation (1. Mode setting display) MODE MODE BUTTON BUTTON MODE (Jigging time length) (Waiting time for jigging) BUTTON Total winding distance (km) MODE MODE Total hours of fishing (H) BUTTON BUTTON MODE BUTTON (Line feeding) (Chumming timer) (Fishing record) Depth counter Press RESET BUTTON...
-
Page 20: Before You Begin Fishing
Functional setting operation (2. Before you begin fishing) Surface depth setting Before you begin fishing, make sure the counter is set to zero at the waterʼs surface. This is extremely important to ensure accurate fishing depth readings. 1 . Connect the reel to the battery, put the line through all the guides, and prepare your terminal rig. -
Page 21: Auto Stop Function
Functional setting operation (3. Auto stop function) Auto stop setting The Auto stop depth may be set to meet your own specific needs. - Auto stop adjusts to operate at depths from 1 m to 5 m (in 10 cm increments). - It prevents accidentally winding swivels, terminal rigs etc. -
Page 22: Line Feeding Function
Functional setting operation (4. Line feeding function) Line feeding function The line feeding function lets our line with the motor assisting the spool. -The line feeding mechanism begins to work at a depth of 2.5 m below the pre-set auto stop depth. -If the clutch becomes ON while the reel is furnishing line, the spool begins to rotate to avoid line slack. -
Page 23: Pickup Speed Setting
Functional setting operation (5. Pickup speed setting) Pickup speed preference 1. Press MODE BUTTON. If the display is at display, then move the power lever or press RESET BUTTON to show the display shown on the right. 2. Press MODE BUTTON again. -
Page 24: Inverse Counter
Functional setting operation (6. Inverse counter) Inverse counter Two counters are better than one. This reel has counters from both the surface and from the bottom. The default inverse counter setting is OFF. To turn it ON, see page 16. In the following example, intended fishing range is 94 m, which is 6 m from the bottom. -
Page 25: Drift Mode
Functional setting operation (7. Drift mode ) How to use Drift mode 1. Turn on MODE BUTTON and display the screen. Drift 2. Turn on Drift by operating the power lever. Power lever Drift/Bite alarm When the reel detects movement faster than the set sensitivity level, the Bite alarm sounds to let you know a fish bites the hook. -
Page 26: Drift Mode
Functional setting operation (7. Drift mode ) Sensitivity adjustment for Drift/Bite alarm -In order to adapt to change caused by the current speed and wave size, you can adjust sensitivity of the Drift/Bite alarm. 5. Press MODE BUTTON to switch the current screen to the next one. -
Page 27: Jigging
Functional setting operation (8. Jigging) Jigging Jigging function is a convenient function. After setting your preferences, pressing the PICKUP BUTTON starts the function. Speed of the jigging can be adjusted with the power lever. 1. Press the MODE BUTTON to show pickup / jigging display. (When jigging is chosen, the pickup function cannot be used.) (Jig/pickup) 2. -
Page 28: Jigging Master
Functional setting operation (8. Jigging) Jigging master You can choose the jigging pattern, range, waiting time and length you require. -Pressing the PICKUP BUTTON, starts jigging, with the display showing the indicator. (Pressing the button once more cease jigging.) The power lever controls jigging speed. -Shifting of jigging speed is done easily with the lever control. -
Page 29: Jigging
Functional setting operation (8. Jigging) 3. Waiting time You can choose the waiting time between jigs. The interval time is set in seconds. Example) Three-step jigging Three-step jigging (Preference setting) 5 seconds interval time Interval time (5sec) Three-step jigging Interval time (5sec) (Shown is the interval time set to 5 sec) -
Page 30: Chumming Timer
Functional setting operation (9.Chumming timer) Chumming timer The display indicates precisely how many minutes (seconds) passed after a tackle is dropped. It is very helpful to make a base fishing action. -The display indicates how many minutes (seconds) passed after you start dropping a tackle. You can roughly estimate when you should let out chum or collect the tackle. -
Page 31: Chumming Timer
Functional setting operation (9. Chumming timer) 1. Press MODE BUTTON to display the setting screen. Even a beginner can handle a professional fishing action. Just set waiting time, and the reel is automati- (Timer setting cally activated for winding. You can fish more screen) effectively and easily. -
Page 32: Functional Setting Operation
Functional setting operation (10. Display recalibration) Display revision You can recalibrate the counter should it not indicate an accurate depth compared to depth markings on your line. Example right is the case in which, though the counter shows 103 m, color markings on the line indicate 100 m. 1. -
Page 33: Useful Functions
Useful functions Various alarms Many kinds of information are indicated by audible alarms. Power lever alarm - Placing the Power lever at MAX or OFF positions evokes an alarm. Auto stop alarm - While winding up, starting 6 m below the auto stop depth, an alarm beeps at two meter intervals. Upon reaching the auto stop depth, a long alarm sounds. -
Page 34: Reel Specifications
Reel Specifications Reel Specification list Product name TANACOM 500 Gear ratio(manual winding) 2.8 : 1 Weight 750 g / 26.4 oz Max Drag power 10 kg/22 lb Line Capacity PE(BRIGHT) NYLON MONOFILAMENT PE4 (46 lb)-470 m (510 yds) 5 (20 lb)-420 m (450 yds) -
Page 35: Parts List
Parts List TANACOM 500 TANACOM 500 Parts No, Parts Name Parts No, Parts Name Parts No, Parts Name SIDE PLATE(L) BEARING PACKING 6G632205 6B738001 6F659601 LEAF SPRING GEAR COLLAR 6E033201 6G087501 6F659701 SCREW RETAINER BEARING 6E489609 63208702 6F659801 WASHER LEVEL WIND AS... -
Page 36: Trouble Shooting
Trouble shooting Ref. Symptom Possible causes To do page It is a normal function to avoid over The counter displays winding. Press RESET BUTTON 19,20 continue winding. Motor does not Pull the lever to OFF and then move respond to the Did not pull the lever to OFF forward again to start winding. - Page 37 82194 Groebenzell GERMANY 08142-5005-0 TEL NO. http://www.daiwa-cormoran.info/ Web Address COMPANY COMPANY Daiwa Corporation Daiwa Australia Pty. Ltd NAME NAME 11137 Warland Drive Unit K, 134 – 140 Old Pittwater Cypress, CA 90630 ADDRESS ADDRESS Brookvale NSW 2100 +61 (02) 8644 8644 +1-(562) 375-6800 TEL NO.
Need help?
Do you have a question about the TANACOM 500 and is the answer not in the manual?
Questions and answers