Hach SL1000 Basic User Manual
Portable parallel
Hide thumbs
Also See for SL1000:
- User manual (480 pages) ,
- Basic user manual (160 pages) ,
- Basic user manual (186 pages)
Table of Contents
Advertisement
Advertisement
Table of Contents

Related Manuals for Hach SL1000


Summary of Contents for Hach SL1000
- Page 1 DOC022.97.80457 SL1000 08/2014, Edition 1 Basic User Manual...
-
Page 2: Table Of Contents
Table of contents Specifications on page 3 Startup on page 10 Maintenance on page 16 General information on page 3 Standard operation Troubleshooting on page 18 on page 10 Installation on page 6 Calibration on page 14 Replacement parts and accessories on page 21 User interface and navigation Data log... -
Page 3: Safety Information
Revised editions are found on the manufacturer’s website. Patents associated with this product, if any, may be found at: www.hach.com/patentlabel. Safety information N O T I C E... -
Page 4: Product Overview
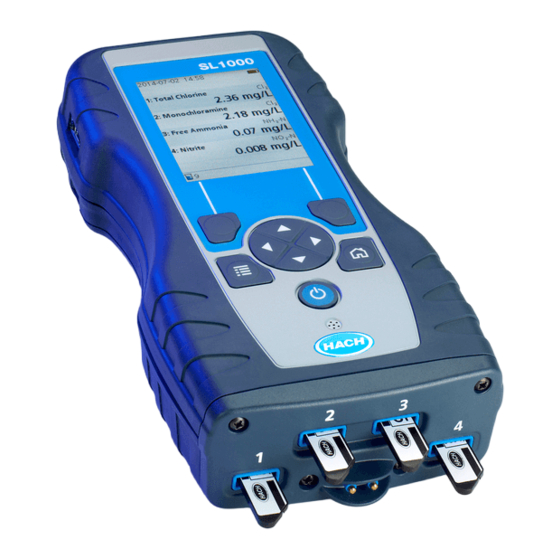
4. Reposition the receiving antenna for the device receiving the interference. 5. Try combinations of the above. Product overview The SL1000 portable parallel analyzer measures a maximum of six parameters at the same time in ® drinking water and other clean water applications. The meter uses Chemkeys and digital ™... -
Page 5: Installation
Figure 1 Product overview 1 Mini USB port 5 Display 2 Probe connector port caps 6 Keypad 3 Probe connection ports 7 Chemkey slots 4 Power access port 8 Sample detector Product components Make sure that all components have been received. Refer to the supplied packaging guide. If any items are missing or damaged, contact the manufacturer or a sales representative immediately. - Page 6 Install the battery W A R N I N G Fire and explosion hazard. This equipment contains a high energy lithium battery which can ignite and cause fire or explosion, even without power. To maintain the safety provided by the instrument enclosure, the instrument enclosure covers must be installed and secured with the supplied hardware.
-
Page 7: User Interface And Navigation
• The instrument can be operated while the battery charges. • External power supply substitution is not permitted. Use only the external power supply specified in the list of parts and accessories for the instrument. Refer to Replacement parts and accessories on page 21. - Page 8 Figure 5 Measurement screen (lower part) 1 Probe icon, port number, parameter or probe name 8 Active arrow keys 2 Calibration status icon (calibration correct) 9 Site ID icon and site name 3 Secondary measurement value (user-selected 10 Routes icon (shows when routes is set to on) parameter) 4 Tertiary measurement value (user-selected 11 Options (contextual: Details, exit, cancel, select,...
- Page 9 Startup Set the power to on Push the POWER key to set the meter to on or off. If the meter does not power on, make sure that the battery is correctly installed. Change the language Select the display language when the meter is set to on for the first time. Change the language from the Settings menu.
- Page 10 "tool.htm" to set up the routes. Refer to the manufacturer's website for more information. Notes Record special information and add this information to an event log. Refer to http://ppa.hach.com/setup/ for more information. Complete Chemkey measurements N O T I C E Do not start a new Chemkey measurement when other Chemkey measurements are not yet completed.
- Page 11 Figure 7 Chemkey sample measurement Connect a probe N O T I C E Do not discard the probe connector port caps. Make sure that the probe connector port caps are installed when no probe is connected. Make sure that the display shows the current time and date and then plug the probe into the meter. Refer to Figure Note: The time stamp for a probe is set when the probe is first connected to the meter.
- Page 12 Figure 8 Probe connections Complete probe measurements Do the procedure that follows to complete a measurement with probe(s). Refer to Figure 9. Multiple Chemkey measurements can be completed at the same time. Refer to Complete Chemkey measurements on page 11. 1.
-
Page 13: Calibration
Figure 9 Sample measurement Calibration C A U T I O N Chemical exposure hazard. Obey laboratory safety procedures and wear all of the personal protective equipment appropriate to the chemicals that are handled. Refer to the current safety data sheets (MSDS/SDS) for safety protocols. -
Page 14: Data Log
5. Complete the instructions shown on the display to calibrate the Chemkey. 6. If necessary, do a verification. Refer to Chemkey verification on page 15. Probe verification 1. Push Main Menu>Verification to start a verification. 2. Select the applicable device. 3. - Page 15 Excel spreadsheet. 1. Set the meter power to on. 2. Connect the meter with the USB cable to the computer. The meter shows as a drive "Hach Portable Parallel Analysis" on the computer. 3. Open the "DataTemplate" folder from the drive.
-
Page 16: Clean Spills
C A U T I O N Chemical exposure hazard. Dispose of chemicals and wastes in accordance with local, regional and national regulations. Clean spills C A U T I O N Chemical exposure hazard. Dispose of chemicals and wastes in accordance with local, regional and national regulations. -
Page 17: Troubleshooting
Troubleshooting Error/Warning Possible cause Solution Barcode read error Chemkey does not operate • Put the Chemkey into the slot again. Please reinsert correctly. Chemkey not installed • Use a new Chemkey. Chemkey(s) correctly. • Clean the barcode window. Refer to Figure 12 on page 20. - Page 18 Error/Warning Possible cause Solution Low Light. Clean Chemkey does not operate • Put the Chemkey into the slot in one push. Chemkey slot. correctly. Chemkey not installed • Use a new Chemkey. correctly. • Clean the Chemkey slot. Refer to Figure 12 on page 20.
- Page 19 Figure 11 Clean sample detector, light shield and access cover 1 Sample detector 3 Optics access cover 2 Light shield Figure 12 Clean trays and Chemkey slots 1 Tray 3 Barcode window 2 Optical window 4 Chemkey slot Do a diagnostic check The diagnostic menu shows the information about the current versions of the meter and the option to format the memory card.
- Page 20 1. Push Main Menu>Diagnostics. 2. Select an option. Option Description Disk Space Show the disk space for the user memory and for the internal memory. Config Versions Show the configuration versions of the meter settings. Method Versions Show the method versions of the meter. Format Memory Erase all meter data.
- Page 21 22 English...
- Page 22 Tel. +49 (0) 2 11 52 88-320 SWITZERLAND Fax (970) 669-2932 Fax +49 (0) 2 11 52 88-210 Tel. +41 22 594 6400 orders@hach.com info@hach-lange.de Fax +41 22 594 6499 www.hach.com www.hach-lange.de © Hach Company/Hach Lange GmbH, 2014. All rights reserved. Printed in U.S.A.
Need help?
Do you have a question about the SL1000 and is the answer not in the manual?
Questions and answers