Table of Contents
Advertisement
Advertisement
Table of Contents

Related Manuals for Innova 3351


Summary of Contents for Innova 3351
-
Page 2: Table Of Contents
Table of Contents Paragraph Page No. SAFETY GUIDELINES ......................1 VEHICLE SERVICE MANUALS ....................2 GENERAL INFORMATION ...................... 3 ENGINE TIMING AND TUNE-UPS ................... 3 ABOUT THE TIMING LIGHT..................... 3 USING YOUR TIMING LIGHT ....................5 BEFORE YOU BEGIN....................... 5 ENGINE PREPARATION BEFORE TIMING ................ -
Page 3: Safety Guidelines
Safety Guidelines SAFETY EQUIPMENT Never smoke while working on your car. Gasoline vapor is highly flammable, and the Fire Extinguisher gas formed in a charging battery is explosive. Keep a fire extinguisher suitable for BATTERY gasoline/chemical/electrical fires on hand whenever working on a vehicle. Do not lay tools or equipment on the battery. -
Page 4: Vehicle Service Manuals
Vehicle Service Manuals Contact your local car dealership, auto parts store, bookstore or public library for availability of service manuals for your vehicle. The following companies publish valuable repair manuals. Write to them for availability and prices. Be sure to include the make, model and year of your vehicle. FACTORY SOURCES Ford/GM/Chrysler/Honda/Isuzu/Hyundai/ Subaru Service Manuals... -
Page 5: General Information
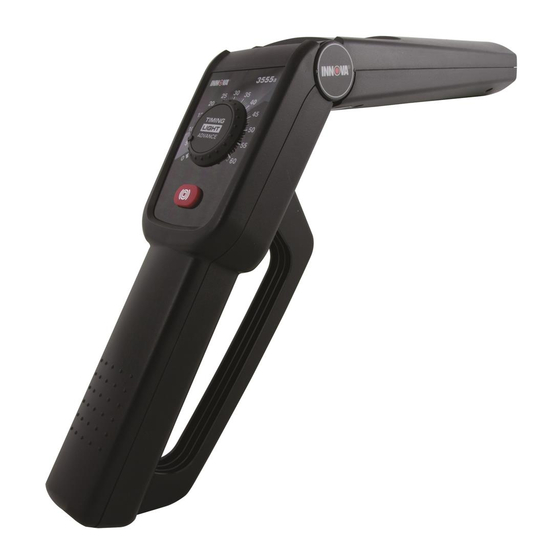
General Information ENGINE TIMING AND TUNE-UPS NOTE Some DIS systems are not adjustable. Proper ignition timing is critical in order to Consult your vehicle's service manual for achieve peak engine performance and to ensure maximum fuel economy. An ignition procedures and specifications before at- system timing check is critical during any tune- tempting to time vehicles with DIS systems. - Page 6 General Information ■ Xenon Bulb — Used to illuminate timing Black Battery Clip — Connects to marks for checking timing. battery negative (-) terminal or bare metal chassis ground. Swiveling Head — Contains the xenon ■ Inductive Pickup Clip — Clamps bulb.
-
Page 7: Using Your Timing Light
Using Your Timing Light BEFORE YOU BEGIN Fig. 4 Typical Timing Marks Make a thorough check before starting any test procedure and fix any known mechanical 14 BTDC problems before performing any test. Loose or damaged hoses, wiring, or electrical connectors 0 10 20 30 0 TDC are often responsible for poor engine performance. -
Page 8: Initial (Base) Timing Check
Using Your Timing Light DO NOT ALLOW THE INDUCTIVE described in ENGINE PREPARATION PICKUP CLIP TO CONTACT THE BEFORE TIMING. EXHAUST MANIFOLD OR OTHER Start and run the engine until it reaches its ENGINE PARTS. These parts become normal operating temperature. EXTREMELY hot while the engine is Adjust the engine's idle speed, if running, and will damage the inductive... -
Page 9: Timing Adjustment
Using Your Timing Light Checking Mechanical/Centrifugal Timing NOTE Advance If the Timing Light fails to operate or Rotate the Advance Control Knob operates erratically, refer to TROUBLE- counterclockwise to the "0" degree SHOOTING to determine the most likely position. cause of the problem. While performing an INITIAL (BASE) TIMING CHECK as previously described, TIMING ADJUSTMENT... - Page 10 Using Your Timing Light Note the degrees advance indicated by Using the vacuum pump, apply the the Advance Control Knob's calibrated manufacturer's specified amount of dial, and compare this value with the vacuum to the distributor's vacuum port. manufacturer's specification for mech- Aim the timing light at the timing marks anical or centrifugal timing advance for the and rotate the Advance Control Knob...
-
Page 11: Troubleshooting
Troubleshooting ■ If the timing light fails to operate or operates Connect the inductive pickup clip to erratically, make the following checks: another spark plug cable, and press the On/Off switch. Make sure the battery clips are firmly ■ If the timing light flashes, service the connected to the battery terminals. -
Page 12: Care And Maintenance
Care and Maintenance CLEANING THE INDUCTIVE Fig. 8. Cleaning the Inductive Pickup Clip PICKUP CLIP Dirt or grease on the inside surfaces of the inductive pickup clip can result in erratic flashing or poor operation of the timing light. Periodically clean the contact surfaces inside the inductive pickup clip by wiping with a soft cloth. - Page 13 Notes...
- Page 14 Notes...
-
Page 15: Warranty And Service
Warranty and Service LIMITED ONE YEAR WARRANTY have rights which vary from state to state. This manual is copyrighted with all rights reserved. The Manufacturer warrants to the original No portion of this document may be copied or purchaser that this unit is free of defects in reproduced by any means without the express materials and workmanship under normal use written permission of the Manufacturer.
Need help?
Do you have a question about the 3351 and is the answer not in the manual?
Questions and answers