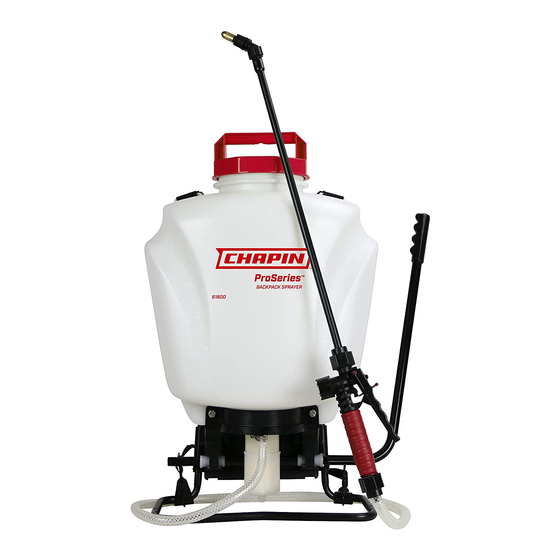
Chapin ProSeries 61800 Use And Care Manual
Backpack sprayer
Hide thumbs
Also See for ProSeries 61800:
- Use and care manual (36 pages) ,
- Use and care manual (18 pages)
Table of Contents
Advertisement
Quick Links
- 1 Replacement Parts Order Information
- 2 Sprayer Components and Use Information
- 3 Disassembling and Repairing the Shut off Valve
- 4 Disassembling and Repairing the Pressure Cylinder
- 5 Filling the Sprayer
- 6 Sprayer Component and Use Information
- 7 Disassembling and Repairing the Piston Pump
- 8 Troubleshooting
- Download this manual
See also:
Use and Care Manual
REPLACEMENT PARTS ORDER INFORMATION
Description
Description
Order #
Order #
Shut-off Gasket
Compression
Spring
O-ring
6-8102
6-8118
Elbow O-ring
6-8100
Hose Retaining Nut
6-8111
O-ring
6-8114
Nozzle Gasket
6-8129
O-ring
6-8115
Shut-off Clamp
6-8109
O-ring
6-8116
Poly Adjustable
Nozzle
Clear Hose 48"
6-8093
6-8105
Flat Spray
Carrying Strap
Nozzle
6-8137
6-8096
Piston Collar
6-8113
Wand Elbow
6-8099
Hose Clamp
6-8106
Valve Plate
Shut-off assembly
6-8117
6-8138
Shut-off Pin
Nozzle Retaining
Nut
6-8104
6-8094
Sealing Spring
Shut-off Filter
6-8119
6-8128
Chapin International, Inc
P. O. Box 549 700 Ellicot St. • Batavia, NY 14021-0549 U.S.A. • 1-800-950-4458 • www.chapinmfg.com
Due to our ongoing product improvement process, product specifications may change without notice. U.S. and foreign patents pending.
Description
Order #
ProSeries
Wand
6-8101
Hose Washer
Backpack
6-8110
Shut-off O-ring
6-8108
Sprayer
Shut-off Retaining
Nut
6-8112B
Use and Care Manual
Brass
Nozzle
6-8122
Piston Pump
Repair Kit
#6-8091
Wand O-ring
6-8127
Shut-off Valve
Repair Kit
#6-8120B
Chapin International, Inc
Shut-off Wand
Repair Kit
#6-8092B
Batavia, NY 14021-0549 U.S.A.
www.chapinmfg.com
Warning: Carefully Read These Instructions Before Use
P .O. Box 549
700 Ellicott St.
1-800-950-4458
Model 61800 • 4.0G/15.1L
™
010683
Advertisement
Table of Contents

Subscribe to Our Youtube Channel
Related Manuals for Chapin ProSeries 61800


Summary of Contents for Chapin ProSeries 61800
- Page 1 6-8099 Hose Clamp 6-8106 Shut-off Valve Valve Plate Repair Kit Shut-off assembly 6-8117 #6-8120B 6-8138 Chapin International, Inc Shut-off Pin Nozzle Retaining P .O. Box 549 6-8104 Shut-off Wand 6-8094 700 Ellicott St. Repair Kit #6-8092B Batavia, NY 14021-0549 U.S.A.
- Page 2 READ ME FIRST O-ring 6-8100 Your Chapin sprayer is designed to provide years of dependable use for a variety of needs. Manufactured from durable high-density polyethylene, your Chapin sprayer will operate at optimum efficiency for years to come by performing easy maintenance after each use.
- Page 3 2. Turn and tighten the screw cap clock-wise onto the shut-off valve. 1) Chapin backpack sprayers come with a shut-off valve, wand, and elbow/nozzle assembly. If the sprayer has an adjustable plastic nozzle unscrew the nozzle cap first. Remove the nut, INSTALLING THE PUMP LEVER nozzle and nozzle O-ring, filter and filter O-ring, and elbow from the wand.
- Page 4 Be sure to use a with an empty tank. The air chamber will fill with the required volume of air to repressurize. Chapin rag or piece of cloth between the sprayer and the 2 x 4 to protect the pressure advises performing this procedure from time to time as routine maintenance.
- Page 5 Figure 5 • When service is required call your nearest Chapin dealer and always insist on original Figure 10 Chapin manufactured replacement parts. • Inspect the hose, wand, pump, tank and shut-off valve for wear, damage or leaks on a 11) Replace the cap.
- Page 6 NOZZLE ASSEMBLY TROUBLE SHOOTING YOUR SPRAYER Symptom Possible Reason Correction Spray Tip Assembly Part # Difficulty pumping the pump lever Dirty bushing Remove the pump lever, clean & grease 1. Poly Adjustable Nozzle 6-8093 the bushings with petroleum jelly 1a. Brass adjuatable Nozzle 6-8122 Dirty cylinder wall Remove the piston, clean &...
Need help?
Do you have a question about the ProSeries 61800 and is the answer not in the manual?
Questions and answers