
Related Manuals for HELLER HECS11


Summary of Contents for HELLER HECS11
- Page 1 Instruction Manual 10L Evaporative Cooler Model: HECS11 READ AND SAVE THESE INSTRUCTIONS...
- Page 2 Please read and follow the instructions in this user manual even if you feel you are familiar with the product, and find a place to keep it handy for future reference. For your convenience record the complete model number (located on the product identification plate) and the date you received the product, together with your purchase receipt and attach to the warranty and service information.
- Page 3 The use of attachments or accessories not recommended or sold by the product distributor may cause personal or property hazards or injuries. This product is intended for normal domestic/household use only. Never leave a working appliance unattended, even for a short period of time – always switch it off. Please unplug the appliance from the power supply when not in use.
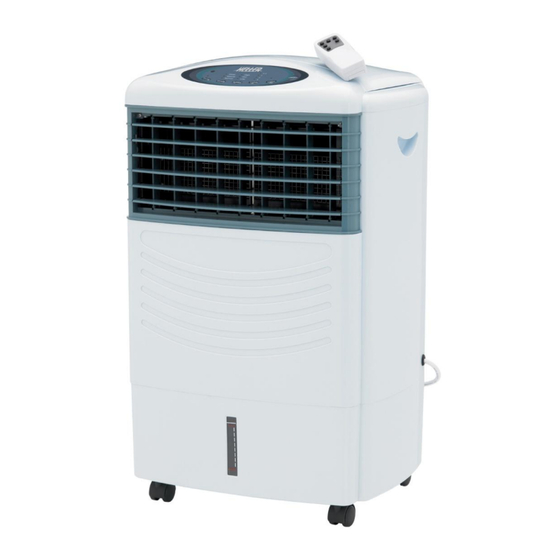
- Page 4 Parts Location Fig1(Construction diagram) 1. Control panel 7. Water filling box (for add water and ice) 2. Louver 8. Back cover 3. Water level indicator 9. Air filter 4. Wheel (4pcs) 10. Filter cover 5. Water tank 11. Water drainage outlet 6.
- Page 5 TIMER: can be set the length of time before the cooler switches itself OFF. Press once for every 0.5hr increments. Maximum allowable is 7.5hrs. Example of use, if 0.5hr and 1.0hr lights on at the same time, it means timer is set 1. 5hrs before automatically switching OFF. The TIMER function is OFF when no LED is illuminated.
- Page 6 8. The vertical louvers can be set to a direction or allowed to rotate through 120 by pressing the SWING button. 9. All the functions can be performed with the remote control supplied with this unit. a) Remove battery cover and install two “AAA” batteries (not included) as indicated. (Please observe correct battery polarity.) b) Point the remote towards the unit and depress the appropriate button.
- Page 7 5. Disconnect the electric motor connection and remove the complete filter assembly by pulling out from the top and then lifting the filter assembly - up and out. 6. The air filter is connected into the back cover via two clips at the top. Release by pressing the two clips down and give it a little push.
Need help?
Do you have a question about the HECS11 and is the answer not in the manual?
Questions and answers