Table of Contents
Advertisement
Owner's Manual
INCLUDES
User, Maintenance, Service, and Installation
Instructions
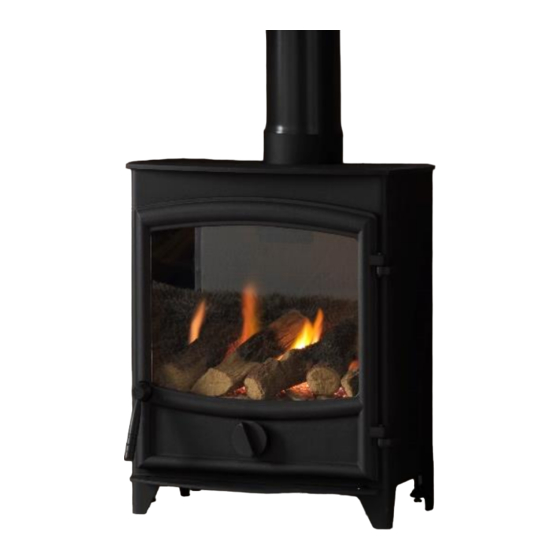
FXW / FPW FREESTANDING GAS STOVE RANGE
Keep this booklet for service log and future reference
IMPORTANT
This appliance is guaranteed for 12 months subject to conditions. The 5 year extended parts
warranty will only be valid if the annual service recommended in this manual has been
completed and appliance has been registered online.
For use in Great Britain and Ireland.
Literature NO 6498 (ISS 2)
Advertisement
Table of Contents

Subscribe to Our Youtube Channel
Related Manuals for Fireline FXW


Summary of Contents for Fireline FXW
- Page 1 Owner’s Manual INCLUDES User, Maintenance, Service, and Installation Instructions FXW / FPW FREESTANDING GAS STOVE RANGE Keep this booklet for service log and future reference IMPORTANT This appliance is guaranteed for 12 months subject to conditions. The 5 year extended parts warranty will only be valid if the annual service recommended in this manual has been completed and appliance has been registered online.
-
Page 2: Table Of Contents
Contents EXTENDED FIVE YEAR PARTS WARRANTY ....2 Benchmark Scheme ............. 3 SECTION ONE Introduction (Users Instructions) ..5 EXTENDED FIVE YEAR SECTION TWO Operating the Appliance (Users PARTS WARRANTY Instructions) ..............7 SECTION THREE Cleaning (Users Instructions) ... 8 In order to validate your extended 5 years parts SECTION FOUR Fuel Bed Cleaning and Layout (Users warranty please read the Benchmark Scheme on the... -
Page 3: Benchmark Scheme
Benchmark Scheme Charlton and Jenrick Ltd is a licensed member of the Benchmark Scheme which aims to improve the standards of installation and commissioning of domestic heating and hot water systems in the UK and to encourage regular servicing to optimise safety, efficiency and performance. Benchmark is managed and promoted by the Heating and Hotwater Industry Council. - Page 4 Important For future reference we suggest you record the following details here, and keep the receipt as proof of purchase. This information may be asked for when you contact the helpdesk. MODEL: FXW / FPW FREESTANDING Serial GAS STOVE This information can be found on the label attached to the packaging and on the data badge, which is located on the base of the appliance behind the control cover.
-
Page 5: Section One Introduction (Users Instructions)
Introduction The FIRELINE FXW/FPW has been designed and tested for use in GB (Great Britain) and IE (Ireland). The FIRELINE FXW/FPW incorporates a single gas control, which selects ignition pilot, and main burner low and high settings. -
Page 6: Important Information
When installing the FIRELINE FXW/FPW Gas Stove, careful consideration should be made to the siting of the appliance as a spillage test will need to be carried out at the Draught Diverter at the rear of the stove. -
Page 7: Section Two Operating The Appliance (Users Instructions)
SECTION TWO Operating the Appliance (Users Instructions) The full lighting procedure is as follows: - 1. The Gas Control Knob protrudes through the bottom of the front door. 2. Push knob in as far as possible on gas control. 3. Turn knob anti-clockwise until a click is heard. The knob will stop at the position marked and a spark should be seen at the tip of the ignition probe. -
Page 8: Section Three Cleaning (Users Instructions)
Glass Cleaning From time to time it will be necessary to clean the glass panel of your Fireline FXW/FPW Gas Stove. We recommend you use a Ceramic hob cleaner these are available for all leading super markets: - i.e. ASDA, TESCO, SAINSBURY’S Etc. -
Page 9: Section Four Fuel Bed Cleaning And Layout (Users Instructions)
REMOVING GLASS PANEL Remove the Gas Control Knob by removing the two retaining screws on the rear of the knob, it may be necessary to turn the knob to gain access to the screws (Isolate Gas supply for safety). ... - Page 10 Log Fuel Bed Layout Place a thin layer of vermiculite over the stainless steel burner, making sure not to cover or block the pilot assembly on the left hand side Before laying the rear shapes, make sure that the cut out`s in the shapes are at the rear as shown in the picture.
- Page 11 Place the LH1 (shorter log) and RH2 (longer log) Rear Log shapes at the back of the Air Tray with the cut outs at the back and the Bark effect at the Top so they lie on the pointed edge. ...
- Page 12 Place the first Log Shape (3) as far to the right and back as possible, resting on the rear shape and resting on top of the Bark Chips as shown in the picture. Place the second Log Shape (4) next to the first shape so it touches at the front right hand side and leaves a gap between the first shape at the rear.
- Page 13 Place the third Log Shape (5) so that it sits on it`s edge and sits between the two back shapes as shown. Place the last Log Shape (6) as so that is as far back and to the left as possible at the rear, and as far to the right at the front so it touches the third log shape.
-
Page 14: Section Five General Points (Users Instructions)
Like all appliances incorporating an aerated burner a low frequency noise may be heard, particularly on the low setting, this is quite normal and does not affect the operation of the appliance. It is advised that a competent person service the Fireline FXW/FPW fire annually. The fire is more likely to provide trouble-free operation. -
Page 15: Section Six Appliance Data (Installation Instructions)
9222 L.P.G. Gas Connection: 8mm compression: semi-rigid or rigid Data Badge located on inside of door or on plate attached to the rear of stove. Appliance Dimensions :- FXW/FPW STOVE DIMENTIONS STOVE SHOWN AS TOP EXIT www.charltonandjenrick.co.uk LT6498 (ISS 2) - Page 16 FXW/FPW STOVE DIMENTIONS STOVE SHOWN AS REAR EXIT N.B. - Rear Stand off brackets must be attached prior to installing ! Data Badge located on inside of door or on plate attached to the rear of stove. NOTE: The efficiency of this appliance has been measured as specified in BS EN 613:2001 and the result is 70.3%.
-
Page 17: Section Seven Regulations And Warnings (Installation Instructions)
SECTION SEVEN Regulations and Warnings (Installation Instructions) This appliance must only be installed in Great Britain or Ireland. The appliance is suitable for use on natural gas and propane GB (Great Britain) This fire does not normally require purpose build ventilation. ... - Page 18 IMPORTANT NOTE: - WARNINGS The glass front of the fire act as a dress guard, conforming to BS 1945 (1971) and satisfies the heating appliance regulations (1991) However, a guard conforming to BS6539 (1984) must be used to protect young children, the elderly or infirm.
-
Page 19: Section Eight Siting The Appliance (Installation Instructions)
SECTION EIGHT Siting the Appliance (Installation Instructions) REAR EXIT: - Using Closure Plate Provided. The Stove can be fitted by using the Closure Plate provided & Elbow Spigot attached directly to a chimney opening. The Stand off Brackets MUST be attached prior to fitting (see page 19). - Page 20 In addition it is strongly recommended that any furniture or other combustible materials are kept at least 900mm clear from the front of the stove. Due to the fact that combustible shelves, timber fireplaces and beams have potentially thousands of possible configurations in conjunction with stoves outset or inserted partially or fully into chambers, it is not possible to give firm guidance on dimensions to these features.
- Page 21 When installing the FIRELINE FXW/FPW Gas Stove, careful consideration should be made to the siting of the appliance as a spillage test will need to be carried out at the Draught Diverter at the rear of the stove.
-
Page 22: Section Nine To Install The Appliance (Installation Instructions)
SECTION NINE To Install the Appliance (Installation Instructions) CHECKING THE FLUE AND FIRE OPENING Check that the chimney conforms to the required specifications as previously stated. Examine the condition and carry out any remedial work including removing any debris from the base. ... -
Page 23: Section Ten Checking Operation Of Fire (Installation Instructions)
STOVE SITING WITH CLOSURE PLATE:- Method 1 A non combustible hearth must be provided beneath the appliance and must extend outwards all around the appliance base. The stove should be positioned onto a solid non combustible hearth with a minimum thickness of 12mm and must have a clearly defined edge (change of level) to discourage placing of any combustible materials on or partially over it. - Page 24 Lay Log fuel bed as described under Users Section. Warning: It is important that the fuel bed components are positioned as shown in these instructions. If the fuel bed components are not positioned correctly this may result in damage to the glass. DOOR CLOSURE AND SECURING OF THE DOOR:- ...
-
Page 25: Section Eleven Maintenance (Maintenance Instructions)
ADVISE CUSTOMER THAT: The glass front of this fire acts as a dress guard, conforming to BS 1945 (1997) and satisfies the heating appliance regulations (1991) however; a fireguard conforming to BS6539 (1997) must be used to protect young children, the elderly, or infirm. - Page 26 TO REMOVE THE BURNER TRAY Turn off the gas supply by the isolating elbow. Remove the Gas Control Knob by undoing the two screws on the rear, then undo the Door Handle fixing Allen screw on left hand side and open door. ...
-
Page 27: Section Twelve Short Spare's List
FLUE CHECK It may be necessary to remove the stove to gain access to the flue system: - Reversing fitting instructions, but first remove Log Shapes, Bark and Vermiculite. Examine flue and rectify as necessary. Replace the stove, referring to fitting instructions. SECTION TWELVE Short Spare’s List Parts may vary/change due to development of products. - Page 28 LT6498 (ISS 2)
- Page 29 Register your appliance online today to active your warranty www.charltonandjenrick.co.uk LT6498 (ISS 2)
-
Page 30: Gas Fire Commissioning Checklist
GAS FIRE COMMISSIONING CHECKLIST This Commissioning Checklist is to be completed in full by the competent person who commissioned the gas fire as a means of demonstrating compliance with the appropriate Building Regulations and then handed to the customer to keep for future reference. -
Page 31: Service Record
SERVICE RECORD It is essential that your gas fire is serviced regularly and that the appropriate Service Interval Record is completed. Service Provider Before completing the appropriate Service Record below, please ensure you have carried out the service as described in the manufacturer’s instructions. - Page 32 Fireline FXW/FPW GAS STOVE (NG) & (L.P.G.) LOG A-0399 NL/NM N.G. A-0401 Product Serial No ID Label Prefix A-0403 NP/NQ L.P.G. A-0404 Burner Tray / Box Assembly Restrictor Elbow (2189) Log Fuel Bed ( 6394 ) Bag of Vermiculite Bag of Bark Chips...
Need help?
Do you have a question about the FXW and is the answer not in the manual?
Questions and answers