Table of Contents
Advertisement
Advertisement
Table of Contents
Troubleshooting

Summary of Contents for Xiaomi MiniJ
- Page 1 User Manual...
-
Page 2: Table Of Contents
Contents Display product color Safety Precautions A.Important safety symbols and precautions B.Please read the following contents before using the washing machine Installing the Washing Machine A.Appearance of the washing machine B.Accessories C.Guide Removing the shipping bolts Adjusting the leveling leg Fixing the cover bottom aLeveling feetnLeveling feetd guide-leg Connecting the hose-water(in) Connecting the hose drain... - Page 3 Contents How to operate the washing machine? A.Control panel and program description B.Boiling wash Application method of boiling wash function Inspection before carrying out boiling wash program C.Boiling wash program Precautions Precautions for using the detergent How to clean and maintain the washing machine? A.Drum clean B.Cleaning the water supply valve filter C.Cleaning the enclosure...
- Page 4 Safety Precautions Important Safety Symbols and Precautions.Please read this manual carefully before using the product and keep it properly. Please read the instructions carefully and perform operation with caution and care when installing, maintaining and operating your washing machine to make the most of functions and extend the service life of the machine.we are't liable for damages resulting from improper use.
- Page 5 Risk of fire ◆ Do not use the strong acid cleanser. ◆ Do not put gasoline, alcohol, dry cleanser or other flammable and explosive substances into the washing machine as detergent. ◆ Do not overload the wall power socket or the extension cord. Otherwise, it may cause fire and electric shock.
- Page 6 Safety Precautions Important Safety Symbols and Precautions.Please read this manual carefullybefore using the product and keep it properly. Risk of power supply ◆ Please unplug the washing machine before performing maintenance, cleaning or repair.Please unplug the washing machine before performing maintenance, cleaning or repair.Do not attempt to repair the washing machine by yourself.
- Page 7 How to install the washing machine? Unpack your washing machine and inspect it for shipping damage. Also make sure that you have received all items shown below. If the washing machine damaged during shipping or you do not have all items, contact we dealer immediately.
-
Page 8: B.accessories
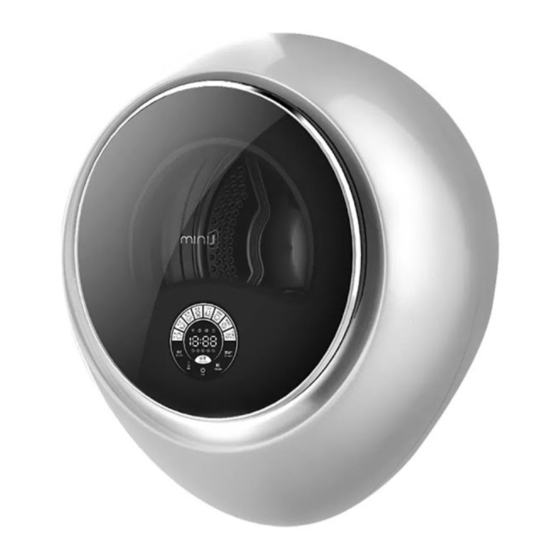
Washing machine appearance Common part names and positions of the mini drum washing machine. ASSY-COVER TOP PANEL-CONTROL FRAME-HANDLE HOUSING DRAWER PLUG ASSY-DOOR ASSY-LEG Accessories Complete accessories and personalized design BOLT-SPANER HOSE-WATER(IN) HOSE-DRAIN LINK GUIDE-LEG (optional) WARRANTY CARD CAP-FIXER COVER BOTTOM MANUAL-BOOK... -
Page 9: Installing The Washing Machine
GUIDE INSTALLING THE WASHING MACHINE... -
Page 10: Removing The Shipping Bolts
Removing the shipping bolts Take each bolt head and pull it out from Loosen all bolts with the wrench. the loose hole. Dismantle three shipping bolts in turn and keep them properly Three shipping bolts on the back of the machine must be dismantled before using the washing machine. -
Page 11: Adjusting The Leveling Leg
Adjusting the leveling leg Wrench Adjust the leg higher Leg bolt Leveling leg Adjust the leveling leg until it is at the Turn left to loosen the leg bolt with the wrench. desired height, turn left for higher, and turn right for lower. Wrench Leg bolt Leveling leg... -
Page 12: Fixing The Cover Bottom Aleveling Feetnleveling Feetd Guide-Leg
Fixing the cover bottom aLeveling feetnLeveling feetd guide-leg a.Side lay the machine body and place b.Align one side of the cover bottom c.Clip four bayonets of the cover the cover bottom to the bottom and insert it into the groove bottom into the groove, and press the whole bottom plate into the groove. -
Page 13: Connecting The Hose-Water(In)
Connecting the hose-water(in) a.Dismantle the existing hose-water(in); b.Loosen the screw B,turn it to a position c.Tighten the hose-water(in) and with a distance of 5mm from A; the water tap connector. e. Turn part B in the direction as shown f. Take down the blank plug from the g. -
Page 14: Connecting The Hose Drain
Connecting the hose drain The end of the hose drain may be positioned in three ways: 1.In a floor drain directly We recommend that you shall use the hose drain attached to the appliance; it can be directly inserted into the floor drain with the width of the trough entry not less than 4 cm. 2.In a sink hose drain branch: The end of the hose drain is connected to a sink hose drain branch. -
Page 15: D.installation Requirements
Installation requirements all electrical circuit and grounding must be setas per the national electrical standard. Power supply ◆ To avoid the unnecessary risk of fire, electric shock or personal injury, all electrical circuit and grounding must be set as per the national electrical standard. It is the owner’s responsibility to provide proper maintenance on the electrical appliance. -
Page 16: Grounding
◆ The water supply faucet must be less than 122cm away from the rear of the washing machine so that the water supply hose can be easily connected to the washing machine and the water faucet. ◆ To prevent the risk of water leakage and waterway damage, consider the following ways: Ensure water tap is at a reasonable position for easy connection. -
Page 17: Ground Location
Installation requirements all electrical circuit and grounding must be setas per the national electrical standard. Ground location To minimize the vibration or unbalanced load, the wood floor has to be reinforced. The carpet and the soft floor tile surface may cause vibration and slight movement of the washing machine in operation. -
Page 18: How To Operate The Washing Machine
How to operate the washing machine? Description of buttons and programsUsing methods High temperature boiling wash, as well as precautions Using methods of detergents and additives... -
Page 19: A.control Panel And Program Description
Control panel and program description Control panel and program description facilitate easy operation of the drum washing machine Boiling wash button Program button This button is for washing routine clothing, such as Press this program button to select one from eight children clothing and underclothes;... - Page 20 Intelligent control program,washing precisely Multiprogramming, washing state is absolutely clear Quick Wash Cotton suitable for washing slightly soiled laundry that is worn suitable for washing generally or slightly soiled cotton only once or needs washing a little, has a special smell. textiles, linen bed sheet, linen table cloth, underwear, towels, shirts, etc.
-
Page 21: B.boiling Wash
Boiling wash Eradicating invisible residual bacteria, facilitating comprehensive protection for health Application method of boiling wash function a.Put clothing into the washing drum and add a proper amount of detergent, then close the door; b.Press the power supply button c.Press the “program” button to select standard wash or baby care program;... -
Page 22: C.boiling Wash Program Precautions
Boiling wash program Precautions ◆ Please use a dedicated wall type AC power outlet of 220V-240V/50Hz and 10A; ◆ Never use power extension line; ◆ Adopting other supply voltage or current may result in fire, electric shock or power failure; ◆... -
Page 23: Precautions For Using The Detergent
Please ensure the cap-drawer is placed at the correct position, and it cannot be taken down during wash cap-drawer Addition level of laundry liquid should not exceed MAX base line marked on the cap-drawer,Laundry power or laundry beads should be added into drum directly. -
Page 24: How To Clean And Maintain The Washing Machine
How to clean and maintain the washing machine? Keeping the washing machine clean can improve its performance, avoid unnecessary repairs and prolong its service life. When the washing machine has been in service under a wet environment for a long time, all sorts of bacteria in air may adhere to it, forming mould and bringing harm to human bodies thereby. -
Page 25: A.drum Clean
Drum clean This is a drum auto clean program and can remove the possibly bred mould in the drum. Precautions for using drum cleaning function A. Turn on the water supply faucet. B.Press the Power button to start the washing machine. C.Press the Program button to select the Drum clean program. -
Page 26: B.cleaning The Water Supply Valve Filter
Cleaning the water supply valve filter You should clean the supply valve filter at least 3 to 4 times per year, or when you see “SF” error message on the display: Pull out the power plug and turn off Unscrew the water supply hose from the With a pair of pliers, gently pull out the water the water supply faucet of the washing back of the machine. -
Page 27: C.cleaning The Enclosure
Cleaning the enclosure Clean the housing of washing machine regularly to keep it clean and sanitary a. Unplug the washing machine before cleaning, b. Never spill water on the washing machine, otherwise otherwise electric shock or personal injury may occur. short circuit or electric shock may occur. -
Page 28: D.storing The Washing Machine
Storing the washing machine Drain the residual water out of the machine; otherwise the washing machine may be damaged Select the Spin program to drain the water out with the fastest speed. Turn off the water faucet and separate the water Unplug the washing machine and open the machine supply hose. -
Page 29: Troubleshooting
Troubleshooting If the washing machine is in the following situations, sometimes it is not a failure; Check according to the list below before consigning for repair; If it is indeed a failure, contact with the after-sale service department company, and never handle it by yourself. -
Page 30: A.troubleshooting
Troubleshooting Problems and solutions Solution Phenomenon Detergent remains in the Check if the water pressure is sufficient when washing. ● detergent drawer after the Check if the washing powder are damp and caking. ● washing is complete Check if the washing machine is set on an uneven surface. If the surface is uneven, ●... - Page 31 Troubleshooting Error messages description Error code Code description Solution ● Check if the door is opened and make sure the door is closed firmly. ● Whether the wiring harness of the computer board falls off. Abnormal door lock ● Check if the plug wire of door switch is loose or has a poor contact. ●...
- Page 32 Error code Code description Solution ● Check if the NTC plug wire is in poor contact. ● Test the resistance of temperature sensor in cold state with the multimeter Temperature sensor abnormity and check if it is above 1.5MΩ. ● Check if the wire and plug-in between the temperature sensor and the computer board are in poor contact.
-
Page 33: B.product Specifications
Product Specifications Energy efficiency program:Power supply + strong wash + boiling wash for 5 times (pressed in five seconds) ”. Model MINIJ Type Full automatic washing machine Rated voltage and frequency 220V-240V/50Hz Wash mode Drum-type Spin mode Centrifugal type Wash 2.8kg... -
Page 34: C.pcb Control
ORANGE THERMISTOR VIOLET BLUE PINK YELLOW YELLOW/GREEN BLUE ORANGE ORANGE VIOLET VIOLET PINK PINK YELLOW YELLOW BLUE ORANGE BLUE BLUE BLUE BLUE DRAIN MOTOR GRAY VIOLET ORANGE BLUE BLUE PRE VALVE BLUE BLACK BLUE BLUE HEATER BLACK YELLOW/GREEN BLUE BLACK YELLOW/GREEN...
Need help?
Do you have a question about the MiniJ and is the answer not in the manual?
Questions and answers