
Related Manuals for Ecox RG57A7/BGEF


Summary of Contents for Ecox RG57A7/BGEF
- Page 1 OWNER´S MANUAL Thank you for purchasing this ecox product. Before using this unit, please read this owner's manual and retain it for future reference. EDFM REMOTE CONTROL EDFM Mini Split Inverter...
-
Page 2: Table Of Contents
CONTENTS HANDLING THE REMOTE CONTROL REMOTE CONTROL SPECIFICATIONS FUNCTION BUTTONS INDICATORS ON LCD HOW TO USE THE BUTTONS AUTO OPERATION COOLING/HEATING/FAN OPERATION DEHUMIDIFYING OPERATION TIMER OPERATION EXAMPLE OF TIMER SETTING REMOTE CONTROL EDFM Mini Split Inverter... -
Page 3: Handling The Remote Control
HANDLING THE REMOTE CONTROL LOCATION OF THE REMOTE CONTROL Use the remote control within a distance of 8 meters / 26 feet from the appliance, pointing it towards the receiver. Reception is confirmed by a beep. CAUTIONS The air conditioner will not operate if curtains, doors or the materials block the signal from the remote control to the indoor unit. - Page 4 USING THE REMOTE CONTROL HOLDER(OPTIONAL) The remote control can be attached to a wall or pillar by using a remote control holder(not supplied, purchased separately). Before installing the remote control, check that the air conditioner receives the signals properly. Install the remote control with two screws. For installing or removing the remote control, move it up or down in the holder.
-
Page 5: Remote Control Specifications
Do not leave the batteries in the remote control if it is not going to be used for 2 or 3 months. Dispose of the old batteries in the special containers. REMOTE CONTROL SPECIFICATIONS MODEL RG57A7/BGEF,RG57B1/BGE Rated Voltage 3.0V (Dry batteries (AAA) Lowest Voltage of CPU Emitting Signal 2.0V Signal Receiving Range (when using 3.0 voltage, it Gets 11m) -
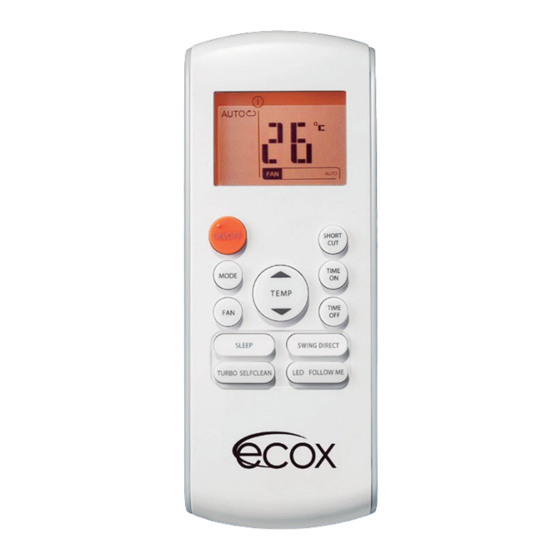
Page 6: Function Buttons
SELF CLEAN Button (applicable to RG57A7/BGEF) Active/Disable Self Clean function REMOTE CONTROL EDFM Mini Split Inverter... - Page 7 FUNCTION BUTTONS UP Button ( ) Push this button to increase the indoor temperature setting in 1ºC increments up to 30ºC. (1ºF increments up to 86ºF). DOWN Button ( ) Push this button to decrease the indoor temperature setting in 1ºC increments up to 30ºC. (1ºF increments up to 86ºF).
- Page 8 The louver changes 6º in angle for each press. TURBOSELFCLEAN LED FOLLOW ME FOLLOW ME Button (applicable to RG57A7/BGEF) Push this button to initiate the Follow Me feature, the remote control will sense the actual temperature at its location. The remote control will send this signal to the indoor unit every 3 minutes until the Follow Me button is pressed again.
-
Page 9: Indicators On Lcd
INDICATORS ON LCD Information is displayed when the remote control is powered up. Mode display Displayed when data transmitted. Displayed when remote controller is ON. Battery display (low battery detection). Displayed when the ECO function is ON. Displayed when TIMER ON time is set. Displayed when TIMER OFF time is set. -
Page 10: How To Use The Buttons
HOW TO USE THE BUTTONS AUTO OPERATION Ensure the unit is plugged in and power is available. The OPERATION indicator on the display panel of the indoor unit illuminates. Press the MODE button to select Auto. Press the TEMP button to set the desired temperature. The temperature can be set within a range of 17ºC ~ 30ºC (63ºF ON/OFF ~ 86ºF) in 1º... -
Page 11: Dehumidifying Operation
DEHUMIDIFYING OPERATION Ensure the unit is plugged in and power is available. The OPERATION indicator on the display panel of the indoor unit illuminates. Press the MODE button to select DRY mode. Press the TEMP button to set the desired temperature. The temperature can be set within a range of 17ºC ~ 30ºC (63ºF ON/OFF ~ 86ºF) in 1º... -
Page 12: Timer Operation
TIMER OPERATION Press the TIMER ON button to set the auto-on time of the unit. And press the TIMER OFF button can set the auto-off time of the unit. To set the Auto-on time. Press the TIMER ON button. The remote control shows TIMER ON, the last Auto-on setting time and the signal "H"... -
Page 13: Example Of Timer Setting
CAUTIONS When you select the timer operation, the remote control automatically transmits the timer signal to the indoor unit for the specified time. Therefore, keep the remote control in a location where it can transmit the signal to the indoor unit properly. The effective operation time set by the remote control for the timer function is limited to the following settings: 0.5, 1.0, 1.5, 2.0, 2.5, 3.0, 3.5, 4.0, 4.5, 5.0, 5.5, 6.0, 6.5, 7.0, 7.5, 8.0, 8.5, 9.0, 9.5, 10, 11, 12, 13, 14, 15,16,17, 18, 19, 20, 21, 22, 23 and 24. - Page 14 EXAMPLE OF TIMER SETTING TIMER OFF (Auto-off Operation) The TIMER OFF feature is useful when you want the TIMER OFF unit to turn off automatically after you go to bed. The air conditioner will stop automatically at the set time. Stop Example: 10 hours later...
- Page 15 TIMER ON TIMER OFF (Off Start Stop operation) This feature is useful when you want to start the air TIMER ON/OFF conditioner before you wake up and stop it after you Start leave the house. Stop Example: 2 hours later To start the air conditioner 2 hours after setting, and 5 hours later after setting...
Need help?
Do you have a question about the RG57A7/BGEF and is the answer not in the manual?
Questions and answers