Advertisement
Quick Links
Advertisement

Related Manuals for dibea R701


Summary of Contents for dibea R701
- Page 1 Robotic Vacuum Cleaner Model:R701 User Manual...
- Page 2 Safety Instructions Safety Instructions Safety Instructions Safety Instructions Table of Contents Table of Contents Table of Contents Table of Contents Before using this product,please read the safety instruction and follow all those regular safety precautions. Safety Instructions Safety Instructions regular safety precautions Read this user manual thoroughly and carefully before using the product.
- Page 3 Product Features Product Features Product Features Product Features Product Features Product Features Product Features Product Features Product Features Product Features Product Features Product Features Product Features Product Features Product Features Product Features Product Features Product Features Product Features Intelligent Suction Adjustment Intelligent Suction Adjustment Intelligent Suction Adjustment Intelligent Suction Adjustment...
- Page 4 Product Parts Product Parts Product Parts Product Parts Product Parts Product Parts Product Parts Product Parts Product Parts Product Parts Product Parts Product Parts Product Parts Product Parts Main body and accessories Main body and accessories Main body and accessories Main body and accessories Main body Main body...
- Page 5 Product Parts Product Parts Product Parts Product Parts Product Parts Product Parts Product Parts Product Parts Product Parts Product Parts Product Parts Product Parts Dustbin Dustbin Dustbin Dustbin Assy Dustbin Assy Charging Station Charging Station Charging Station Charging Station Primary filter Power light Top cover Handle...
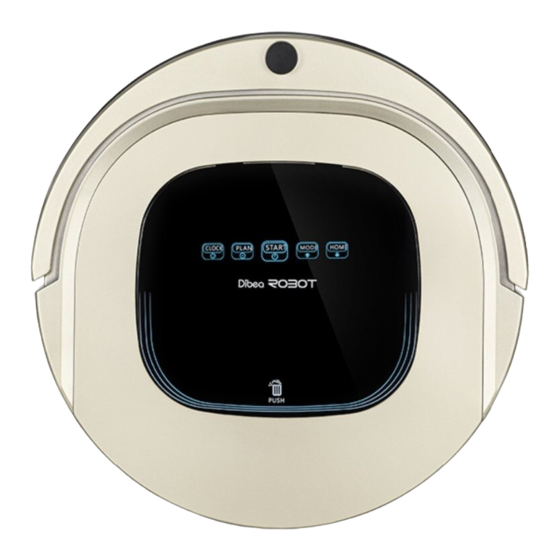
- Page 6 Product Components Product Components Product Components Product Components Product Components Product Components Product Components Product Components Display Panel Display Panel Display Panel Display Panel Display Panel "Sunday" "Monday" "Tuesday" "Wednesday" "Thursday" "Friday" "Saturday" Buttons Buttons Buttons Buttons auto cleaning button/confirm button A.when in standby mode, long press this button 3 seconds to change to sleeping mode;...
- Page 7 Product Operation Product Operation Product Operation Product Operation Product Operation Product Operation Product Operation Product Operation Product Operation Product Operation Product Operation Product Operation B. Standby 1. Battery charging 1. Battery charging 1. Battery charging 1. Battery charging 1. Battery charging Standby means the robot is connected to power supply and wait for your further operation, A.Place charging home base change to standby via followed ways:...
-
Page 8: Cleaning Modes
Product Operation Product Operation Product Operation Product Operation Product Operation Product Operation Product Operation Product Operation Note: 4 cleaning modes: The scheduled time of scheduling by robot panel is based on the robot clock. For example, if you set 9:00 to be the scheduling time, the robot will start cleaning every 9:00 1. - Page 9 Product Operation Product Operation Product Operation Product Operation Cleaning side brushes Cleaning side brushes Install water tank Install water tank Cleaning dust bin and filter Cleaning dust bin and filter push plug water tank B. Take out the dust bin A.
- Page 10 Product Maintaining Product Maintaining Product Maintaining Product Maintaining Cleaning rolling brush and assy Cleaning sensors and wheels Cleaning sensors and wheels Remove the rolling brush and assy from the main body, and clean them with soft dry cloth or cleaning Clean the sensors and wheels with soft dry cloth like in pitcure below: tools.
- Page 11 Product Specifications Product Specifications Troubleshooting Troubleshooting Error codes for sensors Error codes for sensors Cause Solution Error Code Detail Items Classification Front bumper right infared sensors detect Exx8 Clean front bumper sensor lens Diameter obstacle Mechanical Left anti-drop sensor detect cliff, front bumper right Exx9 Height infared sensors detect obstacle...
-
Page 12: Troubleshooting
Left and right wheel overloaded L0x4 Left side brush overloaded L0x5 Left wheel and left side brush overloaded Suzhou Dibea Electrical Technology Co., Ltd. Right wheel and left side brush overloaded L0x6 Check if it is stuck or wired www.dibea.com...
Need help?
Do you have a question about the R701 and is the answer not in the manual?
Questions and answers