National Instruments USB-6008 Quick Manual
Multifunction i/o devices
Hide thumbs
Also See for USB-6008:
- User manual (33 pages) ,
- User manual and specifications (30 pages) ,
- Quick start (5 pages)
Advertisement
Quick Links
Download this manual
See also:
User Manual
TechTeach: A quick guide to National Instruments USB-6009 and USB-6008 multifuncti ...
A quick guide to National Instruments USB-6009 and USB-
6008 multifunction I/O devices
Table of contents:
1 Introduction
2 Labeling the I/O terminals
3 Connecting the USB-6009 to the PC
4 Testing and configuring the USB-6009 in
5 Using the USB-6009 in LabVIEW
1 Introduction
This document is a quick guide to NI USB-6009 multifunction I/O device, and to the similar NI USB-
6008 device. In the following only the name USB-6009 is used. Special USB-6008 features are
described separately.
http://techteach.no/tekdok/usb6009/
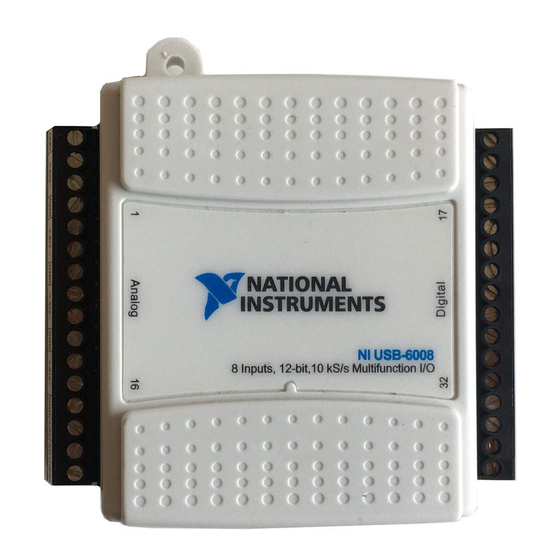
Figure 1: The USB-6009 (USB-6008 is similar)
MAX. Video included!
. Video included!
Page 1 of 21
2/14/2009
Advertisement

Related Manuals for National Instruments USB-6008


Summary of Contents for National Instruments USB-6008
- Page 1 . Video included! 1 Introduction This document is a quick guide to NI USB-6009 multifunction I/O device, and to the similar NI USB- 6008 device. In the following only the name USB-6009 is used. Special USB-6008 features are described separately. http://techteach.no/tekdok/usb6009/...
- Page 2 The NI USB-6009 is a USB based data acquisition (DAQ) and control device with analog input and output and digital input and output. The price is 2100 NOK. The NI USB-6008 is a similar, but somewhat simpler (and cheaper) device.
- Page 3 TechTeach: A quick guide to National Instruments USB-6009 and USB-6008 multifuncti ... Page 3 of 21 Figure 2: The analog I/O terminals with labels assuming differential signal coupling Figure 3 below shows the digital I/O terminals with connections for the individual lines. P0 is port 0, and P1 is port 1.
- Page 4 TechTeach: A quick guide to National Instruments USB-6009 and USB-6008 multifuncti ... Page 4 of 21 Table of contents 3 Connecting USB-6009 to the PC The first time you connect the USB -6009 to the PC, the Windows Hardware Installer Wizard will open, see Figure 4.
- Page 5 TechTeach: A quick guide to National Instruments USB-6009 and USB-6008 multifuncti ... Page 5 of 21 Figure 5: The wizard has finished the installation of the driver software, and the USB-6009 is ready for use, after you click Finish (Norwegian: Fullfør) If you disconnect the USB-6009 from your PC, and then connect it again later, the New Data Acquisition Device dialog window pops up, giving you several options, see Figure 6.
- Page 6 (9 minutes, 104 MB) Testing the USB-6009 in MAX Before you start to use the USB-6008 in an application, you should test the device in the MAX utility, which is available via Start / Programs / National Instruments. Figure 7 shows MAX.
- Page 7 TechTeach: A quick guide to National Instruments USB-6009 and USB-6008 multifuncti ... Page 7 of 21 Figure 7: MAX (Measurement and Automation Explorer) In the MAX window, expand the Devices and Interfaces item, see Figure 8. . http://techteach.no/tekdok/usb6009/ 2/14/2009...
- Page 8 TechTeach: A quick guide to National Instruments USB-6009 and USB-6008 multifuncti ... Page 8 of 21 Figure 8: The Devices and Interfaces item If MAX recognizes the USB-6009, the device appears under NI-DAQmx Devices. Assuming that MAX recognizes the device, you can now run a self-test of it by selecting Self-Test in the menu.
- Page 9 TechTeach: A quick guide to National Instruments USB-6009 and USB-6008 multifuncti ... Page 9 of 21 Figure 9: The terminals or pins are shown in the NI-DAQmx Device Terminals window Figure 10 shows the AI0 and AO0 channels wired together.
- Page 10 TechTeach: A quick guide to National Instruments USB-6009 and USB-6008 multifun ... Page 10 of 21 To actually perform the loopback test, right-click on the device labeled NI USB -6009: "Dev1" in MAX, and then select Test Panels, thereby opening the Test Panels. In the Test Panels window, select the Voltage Output tab, see Figure 11.
- Page 11 TechTeach: A quick guide to National Instruments USB-6009 and USB-6008 multifun ... Page 11 of 21 Figure 12: The Analog Input dialog window in the Test Panels window If the channel testing passed without problems, you may end the testing session by setting 0V on the output (in the Voltage Output window).
- Page 12 TechTeach: A quick guide to National Instruments USB-6009 and USB-6008 multifun ... Page 12 of 21 represents the configuration of the signal input or signal output operation to be executed by the I/O device. Creating tasks is a general feature of the MAX utility, i..e. tasks are used also for configurating other I/O devices than the USB-6009.
- Page 13 TechTeach: A quick guide to National Instruments USB-6009 and USB-6008 multifun ... Page 13 of 21 In our case, in Figure 13 we select Analog Input (later we will select Analog Output). This opens the window shown in Figure 14 where you can select the measurement type from a list.
- Page 14 TechTeach: A quick guide to National Instruments USB-6009 and USB-6008 multifun ... Page 14 of 21 Figure 15: Window where you can enter the name of the task By clicking the Finish button in the window shown in Figure 15, the window shown in Figure 16 is opened where you can select the physical channels for your task.
- Page 15 TechTeach: A quick guide to National Instruments USB-6009 and USB-6008 multifun ... Page 15 of 21 Figure 16: Selecting physical channel for the task In the window shown in Figure 16, we select ai0, which opens the window shown in Figure 17.
- Page 16 TechTeach: A quick guide to National Instruments USB-6009 and USB-6008 multifun ... Page 16 of 21 scaled value (e.g. cm) which becomes available in the application software (e.g. LabVIEW). If you select No Scale, it is the numeric value of raw measurement signal (V) that becomes available in the application software.
- Page 17 TechTeach: A quick guide to National Instruments USB-6009 and USB-6008 multifun ... Page 17 of 21 Figure 19: The task configuration window for the task_ao task. As shown in Figure 19, the tasks which have been configured, appears under Data Neighborhood/NI- DAQmx Tasks .
- Page 18 TechTeach: A quick guide to National Instruments USB-6009 and USB-6008 multifun ... Page 18 of 21 The functions needed for programming I/O operations for USB-6009 are found on the Functions / NI Measurements (Measurements I/O in LabVIEW 8) / DAQmx palette (not DAQmx Base, if you happen to have the latter installed).
- Page 19 TechTeach: A quick guide to National Instruments USB-6009 and USB-6008 multifun ... Page 19 of 21 Figure 20: Front panel of ao_ai.vi Figure 21: Block diagram of ao_ai.vi Comments: The two tasks task_ao and task_ai have been defined in MAX, cf.
- Page 20 TechTeach: A quick guide to National Instruments USB-6009 and USB-6008 multifun ... Page 20 of 21 The DAQmx Start Task function must be invoked once, before the While loop starts. The DAQmx Stop Task function must be invoked once, after the While loop has stopped. Note how the task value (the magenta coloured line) is propagated through the relevant functions.
- Page 21 TechTeach: A quick guide to National Instruments USB-6009 and USB-6008 multifun ... Page 21 of 21 Figure 22: Block diagram of multiple_ai.vi Table of contents More free tutorials are available at http://techteach.no Updated 17 April 2008. Finn Haugen (finn@techteach.no). http://techteach.no/tekdok/usb6009/...
Need help?
Do you have a question about the USB-6008 and is the answer not in the manual?
Questions and answers