
Subscribe to Our Youtube Channel
Related Manuals for Quanmax QBOX-210S


Summary of Contents for Quanmax QBOX-210S
- Page 1 QBOX-210S Series Fanless Box PC with Intel® Bay Trail SoC Processor User’s Guide QBOX-210S Series User’s Manual...
-
Page 2: Table Of Contents
Chapter 3 AMI BIOS Setup ....................24 Overview ........................24 Main Menu ......................25 Ad vanced Menu ....................26 Power Menu......................32 Security Menu .......................33 Boot Menu......................34 Save & Exit Menu ....................35 Chapter 4 Driver Installation .....................37 QBOX-210S Series User’s Manual... -
Page 3: Figures
Figure 4 VGA/ HDMI .....................18 Figure 5 Connect USB mouse & keyboard ............19 Figure 6 RJ45 connector ..................20 Figure 7 Com ports ....................21 Figure 8 Turning on the system................22 Figure 9 VESA mounting (1)................23 Figure 10 VESA mounting (2)................23 QBOX-210S Series User’s Manual... -
Page 4: Tables
Tables Tables Table 1 QBOX-210S Series Specification ............13 Table 2 QBOX-210S BIOS Main Menu ..............25 Table 3 Advanced Menu ..................26 Table 4 Advanced Menu – Display Configuration..........27 Table 5 Advanced Menu – Super IO Configuration..........28 Table 6 Advanced Menu – Super IO Configuration – Serial Port 1 Configuration ....................28... -
Page 5: Safety Instructions
The product chassis may be hot when the system is working. Please do not touch the surface before turn off the system power and wait for about 5 minutes until the system cools down. QBOX-210S Series User’s Manual... -
Page 6: When Working Inside A Computer
Also, before connecting a cable, make sure both connectors are correctly oriented and aligned. CAUTION Do not attempt to service the system yourself except as explained in this user’s guide. Follow installation and troubleshooting instructions closely. QBOX-210S Series User’s Manual... -
Page 7: Preventing Electrostatic Discharge
Handle components and boards with care. Don’t touch the components or contacts on a board. Hold a board by its edges or by its metal mounting bracket. Do not handle or store system boards near strong electrostatic, electromagnetic, magnetic, or radioactive fields. QBOX-210S Series User’s Manual... -
Page 8: Instructions For Lithium Battery
Do not dispose of lithium batteries in domestic waste. Dispose of the battery according to the local regulations dealing with the disposal of these special materials (e.g. to the collecting points for disposal of batteries) QBOX-210S Series User’s Manual... -
Page 9: Preface
(take adequate measures) at their own expense. The user is encouraged to try to correct the interference by one or more of the following measures: Reorient or relocate the receiving antenna. QBOX-210S Series User’s Manual... -
Page 10: Maintaining Your Computer
Buildings in which climate is controlled usually maintain an acceptable level of humidity for system equipment. However, if a system is located in an unusually QBOX-210S Series User’s Manual... - Page 11 Surge protectors should be used with all UPS systems, and the UPS system should be Underwriters Laboratories (UL) safety approved. QBOX-210S Series User’s Manual...
-
Page 12: Chapter 1 Introduction
Chapter 1 Introduction Overview QBOX-210S Series is a fanless digital signage player ideal for space critical applications. This embedded hardware platform features Intel® Bay Trail Processor, Celeron® N2930 (QBOX-210S) or N2807 (QBOX-220S), and 1x DDR3L SO-DIMM. It comes with 1x HDMI, 1x VGA, 2x USB2.0, 1x USB3.0, 1x GbE L AN, 1 x COM, 1x mSATA, 1 x mPCIe. -
Page 13: Product Specifications
Chapter 1 Product Specifications Construction Aluminum extrusion QBOX-210S: Intel® Bay Trail SoC Processor, Celeron® N2930 (2M Cache, up to 2.16 GHz) System Board QBOX-220S: Intel® Bay Trail SoC Processor, Celeron® N2807 (1M Cache, up to 2.16 GHz) Memory 1x DDR3L SO- DIMM 1x Audio Jack for Line-out &... -
Page 14: System Tour
The hard disk LED blinks when data is being written into or read from the HDD. Phone Jack Audio Out The green stereo headphone jack is used to connect the system’s audio out signal to amplified speakers or headphones. QBOX-210S Series User’s Manual... - Page 15 The USB (Universal Serial Bus) port is compatible with USB devices such as keyboards, mouse devices, cameras, and hard disk drives. USB allows many devices to run simultaneously on a single computer, with some peripheral acting as additional plug-in sites or hubs. QBOX-210S Series User’s Manual...
-
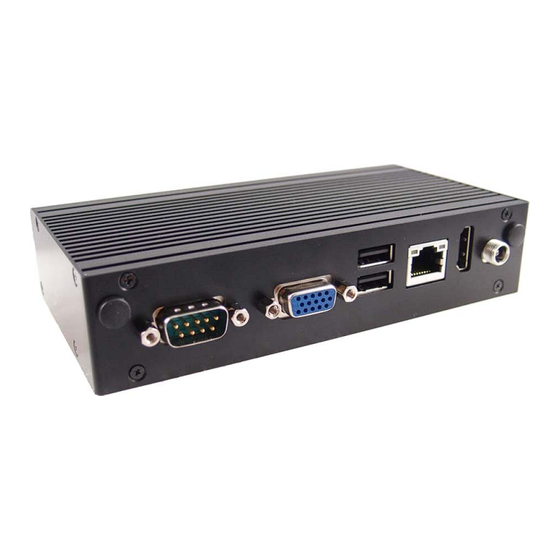
Page 16: Figure 2 Rear Panel
The eight-pin RJ-45 LAN port supports a standard Ethernet cable for connection to a local network. HDMI HDMI connector for display output D-Sub 15 pin VGA connector for display output Antenna reserved holes for wireless antenna connections. QBOX-210S Series User’s Manual... -
Page 17: Mechanical Dimensions
Chapter 1 Mechanical Dimensions Dimension: 150.6 x 80.8 x 33 mm ( W x D x H ) Figure 3 Mechanical Dimensions QBOX-210S Series User’s Manual... -
Page 18: Chapter 2 Getting Started
Figure 4 VGA/ HDMI NOTE When the system reboots without connecting the VGA/HDMI, there might be no image on screen when you insert the VGA/HD MI cable. Please pressing <Ctrl>+<Alt>+<F4> simultaneously to show the image on screen. QBOX-210S Series User’s Manual... -
Page 19: Figure 5 Connect Usb Mouse & Keyboard
Chapter 2 Connect USB mouse & keyboard Your QBOX-210S Series does not come with a keyboard and mouse connector, but you can use any USB keyboard or mouse to connect with your computer. USB 3.0 USB 2.0 Figure 5 Connect USB mouse & keyboard NOTE Using a third-party USB mouse or keyboard may require software drivers. -
Page 20: Figure 6 Rj45 Connector
Chapter 2 Connect LAN port Connect one end of a network cable to the LAN port on the system rear panel and the other end to a hub or switch. RJ45 Figure 6 RJ45 connector QBOX-210S Series User’s Manual... -
Page 21: Figure 7 Com Ports
Chapter 2 COM Ports COM ports with the pin definitions. COM 1 COM1 RS-232/422/485 Port 1 D-SUB 9P Figure 7 Com ports QBOX-210S Series User’s Manual... -
Page 22: Figure 8 Turning On The System
Connect the power cable to the power adapter Connect the power cable to a power outlet Press the power switch on the front panel to turn on the system DC Jack Power Switch Figure 8 Turning on the system QBOX-210S Series User’s Manual... -
Page 23: Mounting Your Pc To A Monitor
NOTE To fasten the metal shelf, your monitor must comply with VESA75 or VESA100 standard. Place the QBOX-210S Series onto the monitor and secure it with the four screws properly on both sides of VESA mount kit as shown below. -
Page 24: Chapter 3 Ami Bios Setup
It is possible for the CMOS battery to fail, which will cause data loss in the CMOS only. If this happens you will need to reconfigure your BIOS settings. QBOX-210S Series User’s Manual... -
Page 25: Main Menu
Menu provides System Overview information and allows you to set the System Time and Date. Use the “<” and “>” cursor keys to navigate between menu screens. Table 2 QBOX-210S BIOS Main Menu BIOS SETUP UTILITY A d v a n c e d... -
Page 26: Advanced Menu
F3: Optimized Defaults F4 Save & Exit ESC Exit Version 2.16.1242. C opyright (C) 2013, American M egatrends, Inc. Onboard LAN 1 Controller Options: Disabled, Enabled Onboard LAN 1 Boot Options: Disabled, Enabled Audio Controller Options: Disabled, Enabled QBOX-210S Series User’s Manual... -
Page 27: Table 4 Advanced Menu - Display Configuration
Options: 128MB, 256MB, 512MB DVMT Pre-Allocated Options:64M, 96M, 128M, 160M, 192M, 224M, 256M, 288M, 320M, 352M, 384M, 416M, 448M, 480M, 512M DVMT Total Gfx Mem Options: 128M, 256M, MAX Primary IGFX Boot Displa y Options: VBIOS Default, CRT, HDMI QBOX-210S Series User’s Manual... -
Page 28: Table 5 Advanced Menu - Super Io Configuration
IO=2F8h; IRQ=3, 4, 5, 6, 7, 9, 10, 11, 12; IO=3E8h; IRQ=3, 4, 5, 6, 7, 9, 10, 11, 12; IO=2E8h; IRQ=3, 4, 5, 6, 7, 9, 10, 11, 12; Serial Port Type Options: RS232, RS422, RS485 QBOX-210S Series User’s Manual... -
Page 29: Table 7 Advanced Menu -Cpu Advanced Configuration
F4 Save & Exit Port 1 [ Enabled ] ESC Exit Version 2.16.1242. C opyright (C) 2013, American M egatrends, Inc. SATA Options: Disabled, Enabled SATA Mode Options: IDE Mode, AHCI Mode Port 1 Options: Disabled, Enabled QBOX-210S Series User’s Manual... -
Page 30: Table 9 Advanced Menu -Usb Configuration
Legacy USB Support Options: Disabled, Enabled, Auto XHCI Legacy Support Options: Enabled, Disabled XHCI hand-off Options: Enabled, Disabled EHCI hand-off Options: Disabled, Enabled USB Mass Storage Driver Support Options: Disabled, Enabled XHCI hand-off Options: Enabled, Smart Auto QBOX-210S Series User’s Manual... -
Page 31: Table 10 Advanced Menu -H/W Monitor
: +0.789 V F2: Previous Values +VIN : +12.060 V F3: Optimized Defaults : +5.106 V F4 Save & Exit +VMEN : +1.357 V ESC Exit Version 2.16.1242. C opyright (C) 2013, American M egatrends, Inc. QBOX-210S Series User’s Manual... -
Page 32: Power Menu
Options: Disabled, EUP Enabled Resume By PCIE Device Options: Disabled, Enabled Resume By Ring De vice Options: Disabled, Enabled Resume By RTC Alarm Options: Disabled, Enabled Watchdog Timer Configuration [Disabled] WDT Function ■ Options: Disabled, Enabled QBOX-210S Series User’s Manual... -
Page 33: Security Menu
Version 2.16.1242. C opyright (C) 2013, American M egatrends, Inc. Security Boot menu [Disabled] Secure Boot ■ Options: Disabled, Enabled [Custom] Secure Boot Mode ■ Options: Standard, Custom Key Management ■ [Disabled] Default Key Provision Options: Disabled, Enabled QBOX-210S Series User’s Manual... -
Page 34: Boot Menu
Version 2.16.1242. C opyright (C) 2013 American Megatr ends , Inc. Full Screen LOGO Display Options: Disabled, Enabled Bootup Numlock State Options: On, Off Keyboard Detect Warning Options: Enabled, Disabled CSM Support Options: Enabled, Disabled Boot Option Filter Options: UEFI and Legacy, Legacy only, UEFI only QBOX-210S Series User’s Manual... -
Page 35: Save & Exit Menu
+- Change Opt. Save C hanges F1: General H elp Discard Changes F2: Previous Values F3: Optimized Defaults Restore Defaults F4 Save & Exit ESC Exit Version 2.16.1242. C opyright (C) 2013, American M egatrends, Inc. QBOX-210S Series User’s Manual... - Page 36 Load Optimal Default values for all the setup values. This option allows you to load failsafe default values for each of the parameters on the Setup menus, which will provide the most stable performance settings. The F8 key can be used for this operation. QBOX-210S Series User’s Manual...
-
Page 37: Chapter 4 Driver Installation
You can download the drivers for the QBOX-210S Series from the our website and install as instructed there. For other operating systems, please contact us.
Need help?
Do you have a question about the QBOX-210S and is the answer not in the manual?
Questions and answers