Table of Contents
Advertisement
Thank you very much for choosing of two-way radio. This transceiver offers reliable, clear and
efficient telecommunication service. This transceiver adopts innovative DSP base processing
system to achieve high-fidelity voice processing and encryption. It is including the best stability
and great reliability as well as exterior smooth lines, novel, fashionable, nice timbre and long
distance communication design. is a cost-effective, multi-function handheld transceiver which
meets every walk of life needs.
We convinced that you will be satisfied with this transceiver's quality and functions.
In order to full comprehend the various excellent functions and using maintenance of this
transceiver, please read the user manual carefully before using.
CAUTIONS
When programming the transceiver, first of all, read the factory initial data , and then rewrite the
frequency and signaling etc., otherwise errors may occur because of different frequency band etc.
Models apply to this manual
VHF/UHF FM Transceiver
Programming Software
Advertisement
Table of Contents

Related Manuals for Retevis RT23


Summary of Contents for Retevis RT23
- Page 1 Thank you very much for choosing of two-way radio. This transceiver offers reliable, clear and efficient telecommunication service. This transceiver adopts innovative DSP base processing system to achieve high-fidelity voice processing and encryption. It is including the best stability and great reliability as well as exterior smooth lines, novel, fashionable, nice timbre and long distance communication design.
-
Page 2: Main Features
Main Features Dual Band 、Dual Display、Dual Receive、(V/v, U/u, V/u, Two Way Voice Can Be Output ● At The Same Time. Repeater Function(V/u Or U/v)One-Way Or Two-way Selection ● Pf1,Pf2 The Side Key Programmable ● Ani Identity Recognition ● Dtmf Dual Tone Multiple Frequency ●... -
Page 3: Table Of Contents
CONTENTS Warning........................01 Unpacking and Checking the Equipment................02 Battery Information....................03 Care and Clearing......................05 Accessory Installation....................06 Getting Acquainted......................10 Operating Mode......................14 Menu Introduction.......................16 Technical Specifications....................28... -
Page 4: Warning
Warning · Please read this manual carefully before using this transceiver. · Please do not communicate or charge this transceiver in flammable,explosive and area which transceiver communication is prohibited(such as oil station,gas station, airport etc.) · Please do not operate this transceiver without licence in government laws banned areas. ·... -
Page 5: Unpacking And Checking The Equipment
Unpacking and Checking the Equipment Carefully unpack the transceiver. We recommend that you identify the items in the following table before discarding the packing material. If any items are missing or have been damaged during shipment, please notify your chierda dealer. Standard accessories battery charger... -
Page 6: Battery Information
Batter y Information Notice for charging batter y The battery is not charged at the factory, please charge it before using. Charge the battery for the first time after purchase or extended storage (more than 2 months) may not bring the battery to its normal operating capacity. - Page 7 WARNING: when keys or ornamental chains and other electric metals with the battery terminals, the battery may cause damage or hurt bodies. If the battery terminal short circuit, it will generate a lot of heat, please be careful when you bring or use the battery, please put battery or radio into insulated container.
-
Page 8: Care And Clearing
Care and clearing. 1 To keep away from hot place and direct sunlight 、 2、When using this transmitting , we recommend transmitting for 1minute then receiving for 4 minutes continuously transmitting for long time or working in high power will heat the back of the transceiver. -
Page 9: Accessory Installation
Attachment Installing Installing/ Removing the Li-ion Batter y Match the two grooves of the battery pack with the corresponding guides on the back of the transceiver, and then push it. Press the battery and transceiver firmly together until the release latch on the top of the transceiver locks. After hearing a “click” sounds, the battery has been locked. - Page 10 Installing/ Removing the Antenna Screw the antenna into the connector on the top of the transceiver by holding the antenna base and turning it clockwise until secure. Turn the antenna anticlockwise to remove it. STEP STEP 5.00K 5.00K Dual Band FM Transceiver Dual Band FM Transceiver Call Call...
- Page 11 Installing/Removing the Belt Clip Place the belt clip to the corresponding grooves on the back of the transceiver for easy carry. Push the buckle up, the belt clip can be removed. (Removing diagram) (Installation diagram)
- Page 12 Installing Optional Speakers/ Microphone: Uncover the MIC-SP cover and then insert the HS03 speaker/ microphone Plug into MIC-SP Jack (Installation diagram)
-
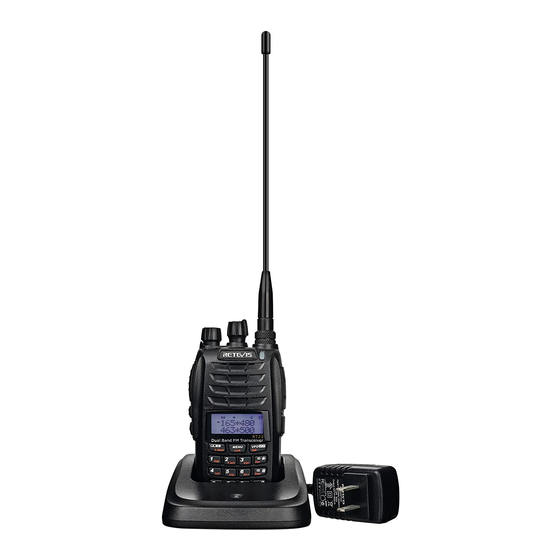
Page 13: Getting Acquainted
Getting started Step / Channel Switch Antenna Volume / Power Switch Status Indicator MIC Input Mic Output STEP Screen/ LCD Display 5.00K Menu / Confirm Key Dual Band FM Transceiver VF O A/B Switch Key Call Left Right Select Key Number Key (be used for input frequency and function) - Page 14 PTT key:Press PTT key, transceiver will be Earphone in transmitting status, Jack/Programming Jack: release it to back to to connect earphone and receiving status programming cable. When programming cable is Pf1 Key: connected, you can use When close dual standby, programming software by it's default FM computer.
- Page 15 LCD Display Description Icon Corresponding meaning Signal and power indicator Low power in current channel or edit channel indication Open dual Standby function Save battery function ON indication VOX function ON indication Offset frequency Reverse frequency Narrow band Key lock...
- Page 16 Icon Corresponding meaning Tone Of indication Battery capacity indication Current edit channel or current transmit channel select CT indicator Current edit channel or current transmit channel select DCS indicator Optional Signaling of Current edit channel or current transmit channel select DTMF indicator When Standby,current edit channel indicator;...
-
Page 17: Operating Mode
Working Mode 1、Frequency Mode (VFO Under this mode, you can rotate channel switch key to change frequency or direct input frequency and store channel by pressing number keys. 2、MR Mode When at least one channel is stored and under VFO mode, press[ VF O ]key to enter MR Call... - Page 18 then PF1 and PF2 are in sub-channel transmit. 6、Menu Mode Press[ ]key to enter menu mode, total 38 functions. Please refer to shortcut operation. 7、Restart Mode Press [PTT] key and 1 key and VFO to enter restart mode, initialize all setting under frequency mode.
-
Page 19: Menu Introduction
Selectable Function Brief Introduction Screen Display Selectable Settings Brief Introduction STEP 5.00K/6.25K/.../50K Step Frequency Select RX.SAV ON/OFF Battery Save Mode OFF/1/2...5 VOX Switch POWER HIGH/LOW Output Power Select Squelch Level RELAY ON/OFF Repeater Switch Band Setting WIDE/NARROW Time-Out Timer 30/60/.../270/OFF BEEP Prompt Voice Switch ON/OFF... - Page 20 Screen Display Selectable Settings Brief Introduction FULL/DC/MSG OPNSET Open Mode Set OFF/SOT/EOT/BOTH PTT-ID Push-To-Talk ID Set ------- PONMSG Power On Message Edit SCANS CO/SE/TO Scan Mode ON/OFF Monitoring Transceiver When FM Radio is on OFF/67.0/69.3/.../D754I C-CDC CTCSS / DCS Set OFF/67.0/69.3/.../D754I R-CDC Receiving CTCSS / DCS Code Set...
-
Page 21: Shortcut Operations
Shortcut Operations 1:Short press[ ]to change main channel 2:Short press to switch VFO model and MR model VF O Call 3:Press PPT and at the same time to open the radio , reset all setting about VFO model 4:Press PPT and at the same time to open the radio,reset all setting about VFO model and MR model 5:Long press... - Page 22 Shortcut Operations Rotate Channel Knob to Confirm Return NO.Menu Name Enter Menu Screen Display select parameter(notes) State Setting Can select 5K/6.25K/10K/12.5K/20K/25K/50K step frequency, input frequency range is related to channel step frequency.If the STEP 1 Step Frequency VF O entered frequency range does not match Call 5.00K the step frequency range, the input...
- Page 23 Confirm Return Rotate Channel Knob to NO.Menu Name Enter Menu Screen Display select parameter(notes) State Setting When beyond the setting time,transceiver will limited transmitting and send out 8 Time-Out Timer VF O beep tone. Call Prompt voice is a indicator of transceiver operate, Beep function is a kind of prompt voice function 9 Prompt Voice when transceiver operation, fault operations or F...
- Page 24 Rotate Channel Knob to Confirm Return NO.Menu Name Enter Menu Screen Display select parameter(notes) State Setting ROGER ON to start,OFF to close VF O 16 Roger Prompt Tone Call AUTO Indicates that the keypad is automatically 17 Keypad Lock AUTOLK locked when there is no operation on the radio VF O Call...
- Page 25 Rotate Channel Knob to Confirm Return NO.Menu Name Enter Menu Screen Display select parameter(notes) State Setting Same operation as setting Power On SCANS VF O 24 Scan Mode Call Character String. ON indicates that listening to FM radio While 25 Monitoring VF O receiving signals, OFF indicates that listening to Transceiver...
- Page 26 Rotate Channel Knob to Confirm Return NO.Menu Name Enter Menu Screen Display select parameter(notes) State Setting ON to indicates aster start repeater,radio RPT-SPK 32 Repeater speaker also start monitoring function OFF VF O Call Speaker set indicates close speaker monitoring function ON indicates PTT transmitting is still available 33 Repeater PTT RPT-PTT...
- Page 27 Other Functions Operation Instruction Start FM Radio Notice: PF1/PF2 buttons have been set as FM Radio hot key on software 1.Press PF1/PF2 buttons to start FM radio 2.Input FM radio frequency by keypad directly 3.If local FM Radio frequency is unknown, then scan local FM Radio frequency to solve this problem. Method: press PF1/PF2 buttons to start FM Radio press【...
- Page 28 then press【 】key shortly→ press【 】key 2s, when a prompt sound is heard→ rotate channels knob to VF O Call the required channel→press【 VF O 】 key 2s, when a prompt sound is heard, that means storage successful→ Call press【 】key to exit.
- Page 29 For Example: There is a group with 15 people in 3 teams, each team code is ※,and each group member ID are : 5 people in Team 1, each ID : ↓ ↓ ↓ ↓ ↓ 121 122 123 124 125 5 people in Team 2, each ID : ↓...
- Page 30 Remote Stun/Remote Stun wakeup Transmit remote stun code (such as 1212), transmit 1212 code then that transceiver can be only receiving To wakeup that transceiver , only need to transmit remote stun code 1212+# code Remote Kill/Remote Kill wakeup Transmit remote kill code (such as 1234), transmit 1234 code then that transceiver can not transmitting and receiving.
-
Page 31: Technical Specifications
100*60*36mm...
Need help?
Do you have a question about the RT23 and is the answer not in the manual?
Questions and answers