Table of Contents
Advertisement
Quick Links
Advertisement
Table of Contents

Related Manuals for Bernafon VERITE 7


Summary of Contents for Bernafon VERITE 7
- Page 1 FITTING GUIDE VÉRITÉ 9 | 7 | 5 Hearing systems www.bernafon.com...
-
Page 3: Table Of Contents
BERNAFON VÉRITÉ Vérité Fitting Guide Table of contents Vérité – Overview Selection chart for acoustic options Fitting ranges Selecting speaker unit length Attaching speaker unit to Vérité Detaching speaker unit from Vérité Selecting correct dome size M-speaker unit in detail... -
Page 5: Vérité - Overview
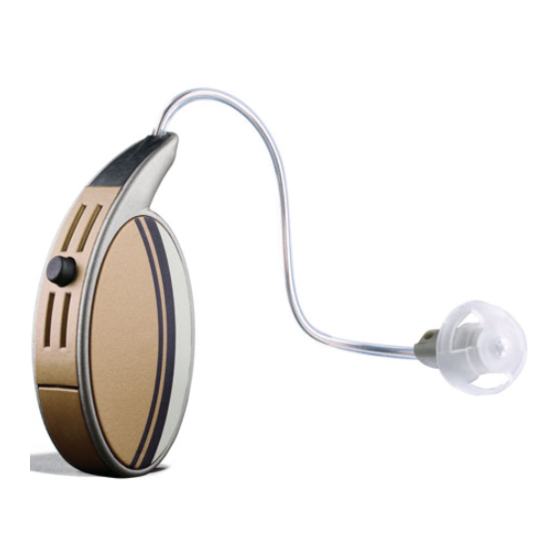
BERNAFON VÉRITÉ Vérité – Overview Vérité is a premium receiver-in-the-ear instrument that delivers unmatched client benefits thanks to its outstanding ChannelFree™ signal processing, binaural coordination, unique design and wireless connectivity. This guide is designed to help you fit and manage Vérité hearing systems. -
Page 6: Selection Chart For Acoustic Options
Selection chart for acoustic options Speaker unit Fitting type Ear pieces protection M-speaker Instant Open Domes Tulip Dome Power Domes ( 8, 10, 12 ) NoWax ( 6, 8, 10 ) Custom Micro Mold Canal Mold Canal Lock Skeleton WaxStop P-speaker Instant Tulip Dome... -
Page 7: Fitting Ranges
BERNAFON VÉRITÉ Fitting ranges Vérité offers two speaker units: the M-speaker is appropriate for mild to moderate losses, while the P-speaker provides additional power for severe hearing loss. Expected fitting ranges with different ear pieces are shown below. M-speaker unit 1.000... -
Page 8: Selecting Speaker Unit Length
The measurement procedure is the same for both the M-speaker and P-speaker. Place the Bernafon measuring tool over the ear, keeping the top line horizontal. With your eyes at the same level as the ear, determine which mark is closest to an imaginary line running over the top of the ear canal. -
Page 9: Detaching Speaker Unit From Vérité
BERNAFON VÉRITÉ Detaching speaker unit from Vérité To detach the speaker unit, first open the battery drawer slightly and remove the wind filter with your fingernails, lifting the bottom end next to the battery drawer. You may need to gently twist the top of the wind filter until it comes loose. -
Page 10: Selecting Correct Dome Size
Selecting correct dome size Check the ear canal and choose between “small”, “medium” or “large” for the dome. The dome should stay in the ear canal without movement while wearing, talking or eating. The correct dome size is very important for optimal performance and comfort. -
Page 11: M-Speaker Unit In Detail
BERNAFON VÉRITÉ M-speaker unit in detail The M-speaker unit is suitable for mild to The soft domes are intended to be dispos- moderately severe losses and comes in four able. The client should be instructed to lengths. It can be used for both instant and change the dome every time the battery is custom fittings. -
Page 12: Attaching The Ear Grip To The M-Speaker
Attaching the Ear Grip to the M-speaker The Ear Grip should be used to obtain a more secure hold in the ear canal. One version works for both left and right ears. Insert the Ear Grip in the slot in the receiver as shown, noting the orientation. -
Page 13: Custom Molds For The M-Speaker
BERNAFON VÉRITÉ Custom Molds for the M-speaker Custom Molds are acrylic ear pieces in a variety of styles that provide a customized fitting solu- tion. They have a firmer fit in the ear canal and may be used for more significant hearing losses. - Page 14 Attaching the Custom Mold to the M-speaker unit Measure and select the correct M-speaker unit length. Place the speaker wire into the slot in the extended part of the Custom Mold tool as shown. Align and firmly insert the speaker unit into the Custom Mold until it clicks into place.
- Page 15 BERNAFON VÉRITÉ Detaching the Custom Mold from the M-speaker Remove the WaxStop. (See page 16) Insert the tool into the Custom Mold adapter, making sure to align with the cross as illustrated. Push the tool into the Custom Mold. The Custom Mold will disengage with a click.
- Page 16 Changing the WaxStop in the Custom Mold The WaxStop in the Custom Mold should be changed as needed, to ensure efficient wax pro- tection, and to prolong the life of the speaker. Take the stick with the new WaxStop on it. On the opposite end is a removal socket for the old WaxStop.
-
Page 17: P-Speaker Unit For Power Fittings
BERNAFON VÉRITÉ P-speaker unit for power fittings The P-speaker unit contains a high performance receiver which requires ample room in the ear canal. To determine if your client’s ear canal can accommodate this receiver, please use the measurement gauge supplied. This step is necessary for both instant fittings with the Power Dome and custom fit- tings with a Canal Mold. -
Page 18: Instant Fit With Power Dome
Instant fit with Power Dome The Power Dome is available in three sizes and offers an instant fit solution for P-speaker users needing extra power. It is important to select the correct size to fit the ear canal. If the Power Dome is too small, the speaker will not be securely posi- tioned in the ear canal and it may also itch or tickle. -
Page 19: Custom Fit With The Power Mold
BERNAFON VÉRITÉ Custom fit with the Power Mold Power Molds are made from an impression just like an in the canal hearing instrument. It is possible to include a vent up to a maximum of 2.4 mm, if specified at the time of order. - Page 20 Place the locking plate on the receiver housing and use the special screwdriver to turn the locking plate approx. 45º clockwise until it locks into the grooves of the shell. Next snap the cover into the faceplate, covering the receiver housing and surrounding the base of the tubing for reduced visibility.
- Page 21 BERNAFON VÉRITÉ Detaching Power Mold from P-speaker unit To remove the speaker unit, first remove the cover by very gently sliding the screwdriver between the tube and the cover and applying a slight upward pressure. Using the screwdriver, turn the locking plate counterclockwise by approx.
-
Page 22: Changing From Power Dome To Power Mold
Changing from Power Dome to Power Mold Remove the transparent cover on the dome adapter by gently prying it off with a screwdriver. Use the screwdriver to unlock the locking plate by turning it counter clockwise. Remove the dome adapter from the P-speaker unit. -
Page 23: Changing From Power Mold To Power Dome
BERNAFON VÉRITÉ Changing from Power Mold to Power Dome Remove P-speaker unit from Power Mold as show on page 21. Attach special dome adapter to the speaker unit by first inserting the speaker unit seal into the P-speaker unit as shown. -
Page 24: Wax Protection
Wax protection Power Mold The Power Mold is equipped with a NoWax wax protection filter. Replace the filter if it is clogged or there is no sound in the instrument. Power Dome The wax filter is integrated into the dome. Replace the dome. -
Page 25: Wearing Vérité
BERNAFON VÉRITÉ Wearing Vérité Before putting Vérité on the ear, make sure a dome or Custom Mold is attached. Place Vérité behind the ear and position the speaker unit over the ear. Insert the speaker into the ear. The speaker wire should follow the... -
Page 26: Adjusting Length And Shape Of The Speaker Unit Wire
Adjusting length and shape of the speaker unit wire By using the measurement tool as described on page 17, you should be able to achieve a good fit on most ears. If the wire is not flush with the ear, check that the insertion depth of the speaker is correct. A different dome size or speaker unit size with a longer or shorter wire may be required. -
Page 27: Vérité Program Selector, Remote Control And Soundgate
The optional RC-P remote control provides access to program changes, volume adjustments and muting. The RC-P must be synchronized with Vérité instruments via the fitting software. For complete information, see the Bernafon RC-P operating instructions booklet. SoundGate* The SoundGate is an optional communication device that provides a wireless connection between Vérité... -
Page 28: Fitting Vérité 9 | 7 | 5 With Oasis
Fitting Vérité 9 | 7 | 5 with Oasis Vérité 9 | 7 | 5 is programmed with Oasis 11.5 and higher using Bernafon’s programming cables – New Standard (no. 2). Attaching and removing the programming cables Open the battery drawer slightly, then remove the Vérité... - Page 29 BERNAFON VÉRITÉ Open Oasis On the left side of your screen you will see the navigation bar, clearly showing Oasis functions. On the following pages, we will review the main screens in each section of the software.
-
Page 30: Client
You will also find a choice of fitting rationales. Please select the one you prefer. The default is Bernafon’s BernaFit NL rationale. Audiogram The client’s NOAH audiogram will form the basis for the Vérité frequency response. Alternatively, In Situ Audiometry may be performed at this point by clicking on Create In Situ Audiogram. - Page 31 BERNAFON VÉRITÉ Lifestyle Profile The Lifestyle Profile is a structured interview that analyzes the client’s communication problems by identifying and prioritizing the individual listen- ing situations most important to the client. A completed Lifestyle Profile determines the default settings for the automatic features in Vérité...
-
Page 32: Hearing Instrument
Hearing instrument Instrument view This screen shows a summary of the instrument you are fitting including se- rial number, receiver, acoustics and acces- sories that have been selected. Acoustics Oasis will recommend a receiver type and ear acoustics based on hearing levels. You can accept these by clicking “OK”... -
Page 33: Fitting
BERNAFON VÉRITÉ Fitting Program assignment If you have completed the Lifestyle Profile, the pro- grams chosen for the client will be displayed in the pro- gram assignment screen. You may change or add pro- grams as desired. Amplification Vérité offers three levels of fine-tuning from simple to advanced. - Page 34 Features The features screen allows you to control the features in the fitting. The buttons at the bottom allow you to switch between programs, adjusting features separately for each individual program. Feedback Manager Vérité has an adaptive feed- back cancellation system.
- Page 35 Bernafon prod- the level preferred by the listener. Learning is ucts. Click on the appropriate button to view the available for all microphone programs and can be logged data.
-
Page 36: End Session
End Session Save and quit Options This screen shows a summary of the settings In this section you will find access to all local in the instrument as well as providing a space for controls, indicators and external devices. comments. This includes lock and binaural synchronization functions, VC range, access to Vérité’s start up, low battery, program change, SoundGate... -
Page 37: Vérité - Customization
BERNAFON VÉRITÉ Vérité – Customization A rainbow of natural colors is available for Vérité. Three stock colors are available for direct order. Many additional colors can be ordered. The side shells, wind filter and battery drawer may be removed and replaced with a different color in the dispensing office. -
Page 38: Changing The Shells, Battery Drawer And Wind Filter
Changing the shells, battery drawer and wind filter 1 / 2 To change shells 1 Open the battery drawer and insert the large end of the removal tool 2 When the tool is firmly in place, pull the battery drawer away from the pin as shown 3 When detaching the side shells it is very important to hold the housing firmly between your thumb and index finger to ensure that the... - Page 39 BERNAFON VÉRITÉ To install new shells Place the new wind filter, attaching the narrow top end near the battery drawer first and then the wide end. A click indicates that the wind filter is in the correct position. Attach the new side shells, placing the bot- tom snap (nearest the battery drawer) first.
-
Page 40: Ordering Information
Ordering information Color sets and tools Product Quant. per packaging Reference Color set, striped gold 654-60-200-00 Color set, striped stone 654-60-201-00 Color set, striped anthracite 654-60-202-00 Color set, striped mocca 654-60-203-00 Color set, striped black 654-60-204-00 Color set, striped birch beige 654-60-205-00 Color set, striped dune beige 654-60-206-00... -
Page 41: M-Speaker Parts For Instant Fit
BERNAFON VÉRITÉ M-speaker parts for instant fit Product Quant. per packaging Reference Speaker unit M, 1L 632-02-530-00 Speaker unit M, 2L 632-02-531-00 Speaker unit M, 3L 632-02-532-00 Speaker unit M, 4L 632-02-533-00 Speaker unit M, 1R 632-02-520-00 Speaker unit M, 2R... -
Page 42: M-Speaker Parts For Custom Fit
M-speaker parts for custom fit Product Quant. per packaging Reference Micro Mold adapter, red 100 pcs. 573-87-210-00 Micro Mold adapter, blue 100 pcs. 573-87-211-00 WaxStop filter 689-30-282-00 Micro Mold / speaker unit disassembly tool 825-01-220-00... -
Page 43: P-Speaker Parts For Instant Fit
BERNAFON VÉRITÉ P-speaker parts for instant fit Product Quant. per packaging Reference Speaker unit P, 1L, dome adapter mounted 632-02-430-00 Speaker unit P, 2L, dome adapter mounted 632-02-431-00 Speaker unit P, 3L, dome adapter mounted 632-02-432-00 Speaker unit P, 4L, dome adapter mounted... -
Page 44: P-Speaker Parts For Custom Fit
P-speaker parts for custom fit Product Quant. per packaging Reference Speaker assembly P, 1L 632-02-160-00 Speaker assembly P, 2L 632-02-161-00 Speaker assembly P, 3L 632-02-162-00 Speaker assembly P, 4L 632-02-163-00 Speaker assembly P, 1R 632-02 150-00 Speaker assembly P, 2R 632-02 151-00 Speaker assembly P, 3R 632-02 152-00... - Page 45 Notes...
- Page 46 Notes...
- Page 48 Our aim is to provide extra value to our partners every day. Bernafon representatives and employees in over 70 countries fulfill our vision to help people with impaired hearing communicate again without limitation.
Need help?
Do you have a question about the VERITE 7 and is the answer not in the manual?
Questions and answers