
Related Manuals for DAHAO BECS-A18


Summary of Contents for DAHAO BECS-A18
- Page 1 刺绣机电脑 Computerized Embroidery Machine BECS-A18/A58 (English) Version : 2017-03 操作手册 OWNER’S MANUAL...
-
Page 3: Table Of Contents
Content Content Chapter 1 General Descriptions ......1 1.1 Warnings and Cautions .................. 1 1.2 Main Features ....................3 1.3 Technical Specifications ................6 Chapter 2 Embroidery Guide ........ 7 2.1 Configuration and Direction of the Control Panel ........7 2.2 Instruction of Control Panel................ - Page 4 5.1 Setting Procedure for General Parameters ........... 43 5.2 Introduction of Some Functions of General Parameters ......45 5.2.1. Cyclic Embroidery Function ............45 5.2.2. Store Manual Color-changing ............45 5.2.3. Brake Adjustment (A Must for New Machine) ........ 46 BECS-A18/A58 computerized embroidery machine owner’s manual...
- Page 5 Content 5.2.4. Forbidding Design Output ............... 46 Chapter 6 Memory Design Management ....... 47 6.1 Memory Design Management Screen and Other Memory Design Operation Screens ........................ 47 6.2 Select a Design to Embroider ..............49 6.3 Memory Design Preview ................50 6.4 Setting Design Parameter ................
- Page 6 9.3 Set Offset Point ..................... 83 9.4 Set B Point ....................84 9.4.1. Setting Course .................. 84 9.4.2. Notes ....................85 9.5 Special Emb Functions ................. 85 9.6 Reset Total Stitch ..................86 9.7 Needle Down ....................86 BECS-A18/A58 computerized embroidery machine owner’s manual...
- Page 7 Content 9.8 Reset X/Y Displacements ................87 Chapter 10 Other Functions ....... 88 10.1 Positioning Idling ..................88 10.1.1. Forward Stitches ................88 10.1.2. Backward Stitches ................. 89 10.1.3. Go to Next Color ................89 10.2 Design border operation ................90 10.2.1.
- Page 8 11.9 Sequin Mending ..................122 Chapter 12 Operation of Cording Embroidery ....123 12.1 Functions ....................123 12.2 Key Technical Indexes ................123 12.3 Procedure of Cording Embroidery ............123 12.4 Related Parameters and Their Setting ............123 BECS-A18/A58 computerized embroidery machine owner’s manual...
- Page 9 Content 12.5 Relative Operations of Cording Embroidery ........... 124 12.5.1. Shift between Flat Embroidery Position and Cording Embroidery Position……… ……… ..................124 12.5.2. M Axis Operation of Cording Embroidery ........126 Chapter 13 Directions on Coiling, Taping and Zigzag Embroidery ..........128 13.1 Function Introductions ................
- Page 10 Content Appendix II Directions on USB Operations ....161 Appendix III Error List ......... 162 Appendix Ⅳ Network Connection of Embroidery Machines ..164 All rights reserved. Beijing Dahao Technology Corp., Ltd. VIII BECS-A18/A58 computerized embroidery machine owner’s manual...
-
Page 11: Chapter 1 General Descriptions
Chapter 1 General Descriptions Chapter 1 General Descriptions Thanks for using the Computerized Embroidery Control System of DAHAO Company. It is appreciated that you do read this manual carefully in order to operate the machine correctly and effectively. Besides, you should keep this manual for future use. - Page 12 Circuit boards can be damaged by static. Non-professional technician can Notice not disassemble circuit boards. If machine is inactive for a while, users must power on the machine Notice regularly (once in 2 or 3 days, more than an hour for each time). BECS-A18/A58 computerized embroidery machine owner’s manual...
-
Page 13: Main Features
Chapter 1 General Descriptions If machine is inactive for a long time, users should have the machine Notice checked before power on. Rejection Rejection should obey the rules and regulations set by national industrial Notice electronic standards. 1.2 Main Features User Friendly Touch Screen Adoption of touch screen technology offers delightful operation and easy learning. - Page 14 100 degree. Starting Point Saving This function can save and store the start embroidering point of each design, instead of repeating moving frame manually to find the design origin when selecting the same design. BECS-A18/A58 computerized embroidery machine owner’s manual...
- Page 15 Chapter 1 General Descriptions Mechanical Maintaining and Debugging This function is to easily judge the malfunctions when maintaining and testing, which consists of computer testing, encoder testing, main shaft speed testing, machine parts testing and the main shaft stopping at any position, etc. Multi-Language Support Currently, the system supports language shift among Chinese, English, Spanish and Turkish and so on.
-
Page 16: Technical Specifications
Maximum design saving quantity: 800 designs Memory capability: 100,000,000 stitches Screen resolution: 1024*768 Network transfer speed: 10Mbps Data transfer mode supported: floppy disk, USB disk and network Stepping Precision: minimum stepping precision is 0.1mm Stitch range:0.1mm~12.7mm BECS-A18/A58 computerized embroidery machine owner’s manual... -
Page 17: Chapter 2 Embroidery Guide
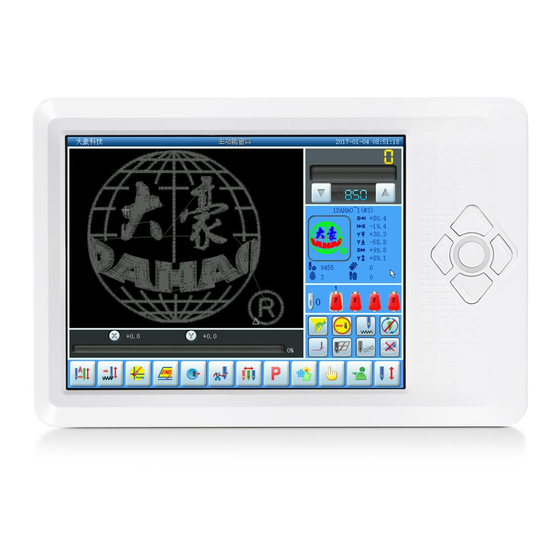
Chapter 2 Embroidery Guide Chapter 2 Embroidery Guide 2.1 Configuration and Direction of the Control Panel I. Configuration of Control Panel 1. Touch Screen It adopts high-luminance LCD display and touch screen man-machine interaction. 2. Operational Buttons Common actions can be realized by using operational buttons on the control panel. Those actions include: frame moving speed shifting, frame moving, and manual color changing. -
Page 18: Instruction Of Control Panel
The direction of frame moving is the same as the Manual Frame direction key. The combination of directions is Moving supported. Speed Shift of Press this key to switch the frame-moving speed between Manual (high)and (low). Frame-moving BECS-A18/A58 computerized embroidery machine owner’s manual... -
Page 19: Instruction Of The Main Screen
Chapter 2 Embroidery Guide 2.3 Instruction of the Main Screen Note: in the following charts, the icons with are touch keys; those without indicate the machine status. Display Name Description Design viewing This area displays the embroidery designs. Area Frame This shows the displacement of the embroidery Displacement frame. - Page 20 The machine is currently in high-speed idling High-speed Idling status. When pulling the bar for normal embroidery, the main shaft and the frame remain inactive while the count of stitches decreases. BECS-A18/A58 computerized embroidery machine owner’s manual...
- Page 21 Chapter 2 Embroidery Guide Display Name Description When pulling the bar for stop, the frame directly moves to the actual position of the current stitch count. When the machine stops, click this key to switch to the normal embroidery status Back to origin When the machine stops, click it, the frame will automatically return to the start point of the...
- Page 22 100° position manually by (100°). clicking Assistant embroidery status/ Lockstitch , sequin, etc. lockstitch/special embroidery BECS-A18/A58 computerized embroidery machine owner’s manual...
- Page 23 Chapter 2 Embroidery Guide Display Name Description The machine is currently set with cyclic Cyclic Embroidery embroidery. Click to enter the parameter Prompt management screen, in which the cyclic parameters can be set. Press relative icon to select the embroidery mode Taping mode you need The machine is currently set with offset point.
-
Page 24: Notes On Menu State
The machine embroiders based on the designs in its memory. The following is the basic Flow Chart of Embroidery. ①Inputting Designs ②Choosing a Design ③Assistant Operations ④Embroidery Confirmation ⑤Pull the Bar to Embroidery ⑥Manual Operation ⑦Cancel Embroidery BECS-A18/A58 computerized embroidery machine owner’s manual... - Page 25 Chapter 2 Embroidery Guide Input of Designs The user can input designs through network, floppy disk or USB disk. Only with displayed (register successfully), can it possible to transmit designs by network. For disk operation,(USB disk included), you can input designs by choosing in the design management screen.
- Page 26 Setting Off-Set Point After embroidery confirmation, if needed, click to set off-set point according to the prompts. Note: It’s of no effect to set off-set point after starting embroidery. Setting the Way for Color-Changing and Starting BECS-A18/A58 computerized embroidery machine owner’s manual...
- Page 27 Chapter 2 Embroidery Guide In the main screen, click “ ” (or “ ”, “ ”), the status will switch among (auto color-change, auto start), (auto color-change, manual start) and (manual color-change, manual start). Setting Normal Embroidery and Idling Click the position pointed in the above picture and the status will switch among (normal embroidery), (low-speed idling) and (high-speed idling).
- Page 28 ”. Please note: if the user wants to automatically save the order of the manual color-changing (yes for “Store Manual Color” in embroidery parameters), it has to be operated in the manual color-changing screen of the touch screen. BECS-A18/A58 computerized embroidery machine owner’s manual...
- Page 29 Chapter 2 Embroidery Guide Turn the Main Shaft to 100° Manually Usually the main shaft is needed to stop at 100°when needle/color-changing, frame-moving and beginning embroidery. The user can manually turn the main shaft at 100° when it hasn’t reached there. Click in the main screen and then choose goto 100, in the followed prompt to carry out the function.
- Page 30 . After this operation, the needle is still down. When the cloth is place on the frame again, click to turn the main shaft to 100º manually. BECS-A18/A58 computerized embroidery machine owner’s manual...
-
Page 31: Normal Embroidery, Returning And Patching
Chapter 2 Embroidery Guide Manual Operations of Automatic Frame Changer (AFC), Sequin and Special Embroidery Some machines are equipped with devices for AFC, sequin and special embroidery. For such machines, click and then use “Operations for special embroidery” to enter the concerned menu. -
Page 32: Relations Of Normal Embroidery, Idling And Position Idling
(including idle running in high or low speed) Running status: pull the bar right to the end to embroider slowly and release to normal speed and pull the bar left to stop embroidery. BECS-A18/A58 computerized embroidery machine owner’s manual... -
Page 33: Thread Break Detect And Mending Switch
Chapter 2 Embroidery Guide II. Turn Shaft Button (over the operation bar case, on the right under the table) To press the button to make the main shaft rotate one cycle and stop at 100±2.5°. 2.10 Thread break detect and mending switch Based on working different principles, thread break detect have three methods: thread take-up spring type, thread winding wheel (chopper wheel) type and mixed type. -
Page 34: Working States
(Again, pull the bar right, the machine goes into embroidery running status). In embroidery confirmation status( is displayed), first press , then press to release embroidery confirmation status. Now the machine enters preparation status( is displayed). BECS-A18/A58 computerized embroidery machine owner’s manual... -
Page 35: Chapter 3 Disk Management
Chapter 3 Disk Management Chapter 3 Disk Management In disk management, users can input the designs in the disk to machine, and vise versa; meanwhile, users can enjoy some common disk managing actions, like erasing file, formatting disk, etc. Floppy disk and USB disk are both supported. Users can save design data based on different types. - Page 36 Object is indicated by using following icons: for folder Icons objects for files of DSB form for files of DST form Names of the Names of the files or folders objects BECS-A18/A58 computerized embroidery machine owner’s manual...
-
Page 37: Select One Or Several Designs
Chapter 3 Disk Management 3.2 Select One or Several Designs Before preview, input and deletion of files, the objective design has to be selected first. The user can select one object for one time, and can also select several objects for one time to improve efficiency. -
Page 38: Design Preview
Design files and folders are shown by icon in the list. One page of the list contains 20 items. Click the key to turn pages to look for designs in another page. The selected object has a green frame and a different background color. BECS-A18/A58 computerized embroidery machine owner’s manual... -
Page 39: Deleting Objects In Disk (Including Design Files And Folders)
Chapter 3 Disk Management Click Design Preview Key The system reads the data from the disk and displays the design’s image according to a certain ratio. At the same time the design’s information and color-changing number will show in the information area. Note: More than one design is allowed to select for preview. -
Page 40: Design Input
Select one or more files in the disk Click the design input key The system asks the customer to input design number and name for system saving. The user inputs the design number and name. BECS-A18/A58 computerized embroidery machine owner’s manual... -
Page 41: Creating A New Folder In The Current Folder
Chapter 3 Disk Management The system provides the minimum available design number as the default value. The customer can use the small panel on the right to change the value. See D type sequin operation about “Is multi-sequin Design?”. When several designs are input for one time, the user can only input the number of the first design. -
Page 42: Folder Operation
Click “Up Dir” to return to the highest level of folder and the screen will be refreshed. 3.8 Formatting a Disk Select the disk device for formatting (read 3.1 for reference) Click the function key “Format Disk” BECS-A18/A58 computerized embroidery machine owner’s manual... - Page 43 Chapter 3 Disk Management The system will change to the Format Disk screen, which is to display the storage information of the current disk, alert information for disk formatting and formatting process bar as well as Start and back button. Click to confirm System will begin to format the disk and show the speed with a process bar.
-
Page 44: Chapter 4 Common Parameters And Color-Changing Order
Normal parameters include: “X-Y Scales”, “Rotate”, “Direction”, “Prior Mode”, “Rep. Mode”, “Rep. Prior”, “X-Y Reps” and “X-Y Interval”. Users can control the final embroidery results by adjusting these parameters. → Touch in the main screen for setting parameters: BECS-A18/A58 computerized embroidery machine owner’s manual... -
Page 45: Setting X-Y Scales
Chapter 4 Common Parameters and Color-Changing Order The way to set each parameter is similar. This chapter will explain how to set the “X-YScales” as an example and give the definitions of other parameters (Read 4.1.1 as reference). Setting X-Y Scales 4.1.1. -
Page 46: Setting Of Rotate
Only if you press after modification does the system save the value. It’s similar to set Y scale. Setting of Rotate 4.1.2. Users can rotate the design to a certain angle by changing this parameter. BECS-A18/A58 computerized embroidery machine owner’s manual... -
Page 47: Design Directions
Chapter 4 Common Parameters and Color-Changing Order Design Directions 4.1.3. Prior Mode 4.1.4. There are two modes: rotating prior to scaling and scaling prior to rotating. When the user has set the parameters “X-Y Scales” and “Rotate”, the design will rotate first and then scale up/down with the setting rotating prior to scaling. -
Page 48: Setting Of Color-Changing Order
Delete needle operation position of the needle sequence number numbers. Move upward the color-changing list to Move upward select the color block. Move downward the color-changing list to Move downward select the color block. BECS-A18/A58 computerized embroidery machine owner’s manual... -
Page 49: Setting Of Color-Changing Order
Chapter 4 Common Parameters and Color-Changing Order Display Name Description Open the needle interchanging screen and Interchange needles set it. Setting of needle Select and set needle colors in the default color colors. Help Display the help menu. Save the patching setting and return. Exit Drop out the color-changing screen. -
Page 50: Setting Needle Color
Click in the main screen to enter the color-changing screen. Click to enter the needle color setting screen. In the needle color setting screen there are totally 400 default colors for selection. BECS-A18/A58 computerized embroidery machine owner’s manual... -
Page 51: Interchanging Of Needle Colors
Chapter 4 Common Parameters and Color-Changing Order To set the needle color, select the needle first and then select the color from the 400 default color blocks, key ">>" to select color. The corresponding color will be refreshed on the needle button. Click to save the needle color setting and return to the color-changing order setting screen. -
Page 52: Chapter 5 Setting General Parameters
“purview of machine parameter manage” screen. (Please read Chapter 10) → Click in the main screen. System enters the parameter setting screen, where users can set the parameters. BECS-A18/A58 computerized embroidery machine owner’s manual... -
Page 53: Setting Procedure For General Parameters
Chapter 5 Setting General Parameters Note: I. The number, name and value of every parameter are displayed in the parameter list window. II. When a parameter in the machine with password-protected function is set with a password, it can’t be changed. There will be an icon in the parameter-changing window to show this situation. - Page 54 Return to the screen of machine parameter 1. Note: Some of the parameter can not be inputted, only the choice of the parameters in the drop-down menu. BECS-A18/A58 computerized embroidery machine owner’s manual...
-
Page 55: Introduction Of Some Functions Of General Parameters
Chapter 5 Setting General Parameters 5.2 Introduction of Some Functions of General Parameters There are brief introductions of the parameters in the appendix 1. Here are some functions used in embroidery. Cyclic Embroidery Function 5.2.1. This function is to increase the embroidery productivity. When the parameter “To Do Cyclic Emb.”... -
Page 56: Brake Adjustment (A Must For New Machine)
The function is to forbid copying the designs in memory (into the disk). If the machine administrator set “No Output Design” as “Yes”, other persons are unable to output the designs to the disk. If the user needs to output, he has to cancel “No Output Design” first. BECS-A18/A58 computerized embroidery machine owner’s manual... -
Page 57: Chapter 6 Memory Design Management
Chapter 6 Memory Design Management Chapter 6 Memory Design Management Memory design management includes selecting embroidery designs, setting designs and operations to create designs. 6.1 Memory Design Management Screen and Other Memory Design Operation Screens Click in the screen to enter the memory design management screen. The memory design management screen includes: design image display area, navigation and pagination area, information area, menu and memory design management operation area. - Page 58 “ ” are used to switch Single between single and multi-selection. It /Multi-selection is a preserved button and single selection by default. And it cannot be BECS-A18/A58 computerized embroidery machine owner’s manual...
-
Page 59: Select A Design To Embroider
Chapter 6 Memory Design Management Display Name Description changed. Preview the design’s details, scale Design preview up/down, move or imitate the design. Page down Go to the next page. Page up Go to the last page. Click to enter the more functions operation screen. (To operate a single design, select the design first before entering the screen.) In this screen click the buttons to enter the corresponding operation screens. -
Page 60: Memory Design Preview
Display in real Display the design in its real size. size Display to the Display the design to the full size in the design full size preview area. Speed up Accelerate the display speed. BECS-A18/A58 computerized embroidery machine owner’s manual... - Page 61 Chapter 6 Memory Design Management Display Name Description Speed down Decelerate the display speed. Draw/halt switch for switching between drawing design and halting the drawing. Single step Draw the design by single step according to display clicks. Redraw Display the selected design again. design 3D display Display the 3D image of stitches.
-
Page 62: Setting Design Parameter
6.5 Deleting Memory Design This is to delete one or more designs in the machine memory. Click in the main menu to enter the memory design management screen as follows. BECS-A18/A58 computerized embroidery machine owner’s manual... -
Page 63: Sorting The Design
Chapter 6 Memory Design Management Select the design. The user can choose to select one design for one time or several designs by switching between . The screen is similar to the memory design management screen, in which the designs can also be sorted and previewed. -
Page 64: Copy The Memory Design
Click “Copy Design” in the memory design management screen to enter its operation screen. The system will automatically provide the available smallest design number and default design name. If the user doesn’t want to change them, go to “6” directly. BECS-A18/A58 computerized embroidery machine owner’s manual... - Page 65 Chapter 6 Memory Design Management To input a new design number, click “New Design number” and input the new number in the pop-up window, and then click to confirm the input. To input a new design name, click “New Design name” and input the new name in the pop-up window, and then click to confirm the input.
-
Page 66: Combine Design
If you don’t use the default values, click the design number and design name and change them. Click “X interval” and “Y interval” to input values and then click BECS-A18/A58 computerized embroidery machine owner’s manual... -
Page 67: Setting Patching Embroidery
Chapter 6 Memory Design Management Click to combine and return to the design operation choosing screen. Click to cancel the setting and return. 6.9 Setting Patching Embroidery The system has two ways for patching embroidery: manual moving frame out and automatic moving frame out. - Page 68 Move downward the patching list to Move downward select the position for patching. Help informations about patching Help embroidery Save the patching setting and return. Cancel the setting and return. BECS-A18/A58 computerized embroidery machine owner’s manual...
-
Page 69: Generate Design From Parameter
Chapter 6 Memory Design Management The design display area shows the design which is being set with patching. After setting the patching point, the design will refresh and the result will show directly. Click to move the list to the position for patching. If choose to move the frame out to the offset point, click the switch button of the item list to select "Another Origin". -
Page 70: Satin Stitch Adjust
Select the design in the memory design image area of the memory design management screen. Click to enter the design operation choosing screen. Click “Satin Stitch Adjust” to enter its operation screen. BECS-A18/A58 computerized embroidery machine owner’s manual... -
Page 71: Shift The Frame To Make A New Design
Chapter 6 Memory Design Management If don’t use the default values, click the design number and design name and change them. Click “X Adjust” to input the new value. Click “Y Adjust” to input the new value. Click to adjust the satin width and save it as a new design to return to the design operation choosing screen. -
Page 72: Make True Design Range
Click to enter the design operation choosing screen. Click “Make True Design Frame” to enter its operation screen. If don’t use the default values, click the design number and design name and change them. BECS-A18/A58 computerized embroidery machine owner’s manual... -
Page 73: Hi-Speed Design
Chapter 6 Memory Design Management Click to create a design and return to the design operation choosing screen. Click to cancel the setting and return. 6.14 Hi-Speed Design With this function, those long stitch forms can be cut to short ones, which will keep the embroidery speed at a high level. -
Page 74: Edit Combined Design
Click in the main menu to enter the memory design management screen. To edit a pre-saved combined design, select the combined design first. To create a combined design, carry out the following operations. BECS-A18/A58 computerized embroidery machine owner’s manual... - Page 75 Chapter 6 Memory Design Management Click “Edit Combined Design” to enter its operation screen. The combined ID shows the current design number and how many designs the combined design is composed of. Display form is “design number (the total amount of designs)”. Set the parameters of the first design, including design number, scaling ratio, rotating angle, design direction and priority mode.
-
Page 76: Compile Combined Design
The action will help to change combined design to normal embroidery design. Click in the main menu to enter the memory design management screen. Select saved design. Click to enter the memory operation choosing screen. Click “Compile Combined Design” to enter its operation screen. BECS-A18/A58 computerized embroidery machine owner’s manual... -
Page 77: Clear All Memory Designs
Chapter 6 Memory Design Management System asks to enter new design nuber and new design name. Click to save or click to cancel the operation and return to the design operation choosing screen. 6.18 Clear all Memory Designs This function is to clear all the designs in the memory. Be cautious to use it. Click in the main menu to enter the memory design management screen. - Page 78 Input of the design name for disk saving The system uses the design name in system memory as the default design name in disk. Use keyboard on the right to change the value , click to save the result. BECS-A18/A58 computerized embroidery machine owner’s manual...
-
Page 79: Chapter 7 Memory Design Edit
Chapter 7 Memory Design Edit Chapter 7 Memory Design Edit You can edit common designs smaller than 100000 needles in the memory through this function, or establish a new design. 7.1 Start Editing Design Choose the design that will edit in the window of memory design management, and then click In “Other Design Management Functions”, click “Edit Design”... -
Page 80: Edit Design
1. Document and view operation: Use for save design, withdraw and looking into the help, and zoom view function. 2. Design preview window: use for preview design. In view, use “+” mark the position of current stitch. The stitch trace of current stitch use white and outstanding manifestation. BECS-A18/A58 computerized embroidery machine owner’s manual... -
Page 81: Document And View Operation
Chapter 7 Memory Design Edit 3. Stitch check orientation front-panel: use for orient “current stitch” (stitch that need check and edit). Stitch edit function key: use for switch stitch code, insert stitch, delete stitch and move the stitch position. Help key: press this key to enter the usage explanation of keys in this edit window. 4. - Page 82 If the inserted stitch is in the middle of design, the new stitch will be inserted between the stitches before and after it. BECS-A18/A58 computerized embroidery machine owner’s manual...
-
Page 83: Move Stitch
Chapter 7 Memory Design Edit : delete the current stitch. After edition and you press , a pop-up window will ask you whether to save the edition result. Press to save or press to abandon. Move Stitch 7.2.4. Position the some stitch, click key and can move that stitch. -
Page 84: Convert Stitch Code
If the current stitch in the middle of design, so the new stitch insert at the middle position of current stitch and next stitch. Delete Stitch 7.2.8. Position the some stitch, click key and can delete that stitch. BECS-A18/A58 computerized embroidery machine owner’s manual... -
Page 85: Chapter 8 Letter Design Operations
Chapter 8 Letter Design Operations Chapter 8 Letter Design Operations System can generate letter design based on the built-in letter database. 8.1 “Generate letter design” Click design management key to enter into design management screen. Click “More Functions”. Click “Generate letter design” to enter into letter design parameter input screen. 8.2 Enter Embroidery Letter String and Basic Parameters After open the window of parameter input, enter into letter input screen automatically. - Page 86 “String rotate angle”: means rotate angle for whole letter bound. “Char height scale”: means increase or reduce letter high. “Char width scale”: means increase or reduce letter width. BECS-A18/A58 computerized embroidery machine owner’s manual...
-
Page 87: Adjust Letter Design
Chapter 8 Letter Design Operations “Density”: means distance between each stitch of born letter pattern. The value is smaller, the density is bigger. “Char rotate angle”: means rotate angle of each letter that opposite to centre of it selves. “Change color between letters”: whether add change color code before each letter. After establishing letter pattern parameter, click key, enter window of”... - Page 88 There are 4 rank modes. 。 "Level": Rank the letter bound by level method. 。 “Vertical”: rank letter bound by vertical method. 。 “Up arc”: rank letter bound by round arc method with up bend. BECS-A18/A58 computerized embroidery machine owner’s manual...
- Page 89 Chapter 8 Letter Design Operations “Down arc”: rank letter bound by round arc method with down bend. 。 "Fix the letter direction": When rank the letter bound by round arc method, the letter angle not change with the position of round arc, but be equal to a certain angle fixedly. 。...
- Page 90 “Clockwise rotate”: With the letter as centre, ( “+” in the centre of letter) rotate selected letter toward anticlockwise direction. Such as: “Density increase”: Increase stain stitch density of the born letter design. Such “Density reduces”: Reduce stain stitch density of the born letter design. Such as: BECS-A18/A58 computerized embroidery machine owner’s manual...
-
Page 91: Save Letter Design
Chapter 8 Letter Design Operations “Level overturns”: Left and right overturn the selected letter. “Flip vertical”: Up and down overturn the selected letter. “Change color switch”: Establish or cancel change the color that was set before selected letter. “Change letterform”: change letterform of selected letter. After clicking this key, will flick the dialog box of select letterform, choose one of letterform that you wished, and confirm. -
Page 92: Chapter 9 Assistant Operation Function
The start position will be kept in machine memory. Move the frame to start position. Click in the main screen to enter the assistant operation screen. Click “Save design start point”. System will ask to confirm action. BECS-A18/A58 computerized embroidery machine owner’s manual... -
Page 93: Restore Design Start Position
Chapter 9 Assistant Operation Function Click to to save the current frame position as the design’s start point. Or click to cancel the above operation.. 9.2 Restore Design Start Position If you have saved the start position of current design, you can use this function to locate that point. -
Page 94: Set B Point
Press the manual frame moving to move the frame to a proper position, click to let system back to other screen. Setting B point is complete. If you want to clear the point B, press “clear B point”. BECS-A18/A58 computerized embroidery machine owner’s manual... -
Page 95: Notes
Chapter 9 Assistant Operation Function Notes 9.4.2. When frame moves to the work-off point, there is only action on Y direction. Frame will not necessarily move to the B point wherever thread breaks. If the B point is set as the image below, then frame will be only moving above B (a zone indicates the inner edge of the stand), after thread break, press the slow moving switch, machine trims without letting frame go to B point;... -
Page 96: Reset Total Stitch
100 degree screen. Click the key of “Needle Down”. Confirm needle down action. You can click to confirm operation, and then needle pricks into the cloth. Click to cancel. BECS-A18/A58 computerized embroidery machine owner’s manual... -
Page 97: Reset X/Y Displacements
Chapter 9 Assistant Operation Function Loose cloth, move frame, then press Enter. Users need to loose the cloth and move frame to designated point, then click confirm. Click to cancel. After frame moving, system returns to the main screen Customers need to keep the cloth from moving, then use point set function, after which pull bar to continue embroidering. -
Page 98: Chapter 10 Other Functions
(backward). Forward Stitches 10.1.1. Click in the main screen to enter the assistant operation screen. Click “forward stitches” Type in desired forward stitches. System goes to forward stitches type-in screen. Customers need to click BECS-A18/A58 computerized embroidery machine owner’s manual... -
Page 99: Backward Stitches
Chapter 10 Other Functions confirm. If you click , operation will be cancelled. System goes back to the main screen, pull bar rightward so that machine can go to the desired stitch. Backward Stitches 10.1.2. The operations are similar to “Forward Stitches”. The only difference lies in “pull bar leftward”. -
Page 100: Design Border Operation
Design border operation . Click the key of “Query Border Info of Current Design”. System will show the boder info of current design on the screen. System will display design border info. Click to shut the window. BECS-A18/A58 computerized embroidery machine owner’s manual... -
Page 101: Move Frame Along Design Border
Chapter 10 Other Functions Move Frame along Design Border 10.2.3. This function is to move the frame along the design range to check if the design exceeds the limits. When the frame meets the limits during this process, system will make adjustment itself, so as to avoid damage to the machine frame. -
Page 102: Emb Cross
System will create necessary data and enter embroidery confirmation status and main screen. Then the main screen will show . And the user can pull the bar to embroider the cross. After finishing it, the machine will come back to preparation status. BECS-A18/A58 computerized embroidery machine owner’s manual... -
Page 103: Emb Line
Chapter 10 Other Functions Emb Line 10.2.6. The system can embroider lines based on the user’s needs. → Click Design border operation . Click “Emb Line”. Input the coordinates of the line’s first point. The system will ask the user to input the coordinates to the pop-up window. You can use the manual frame-moving key on the panel to move the frame to the start point of the line, and clicks to input the coordinates. -
Page 104: Emb Design Outline
Click in the main screen to enter the “Other functions” screen. Click “Set Frame Origin”. Users can decide either use “manually set frame origin” or “auto set frame origin”. BECS-A18/A58 computerized embroidery machine owner’s manual... -
Page 105: Frame Origin Recovery
Chapter 10 Other Functions System will ask users to make choice. Users can decide either use “manually set frame origin” or “auto set frame origin”. Before setting the frame zero point manually, manually move the frame the desired origin point position, and click the key. Then the system will save the current frame as the zero point. When meeting emergency stop because of malfunctions or something unusual such as power off unexpectedly, etc. -
Page 106: Set Frame Soft Protection
Use the move frame key on panel to move the embroidery frame, to confirmed right-up corner point of soft limit position, click to confirm. Move embroidery frame, input coordinate of right-down corner of soft limit position. BECS-A18/A58 computerized embroidery machine owner’s manual... -
Page 107: Date Time Config
Chapter 10 Other Functions Use the move frame key on panel to move the embroidery frame, to confirmed left-down corner point of soft limit position, click to confirm. The system memory embroidery frame software protection. 10.6 Date Time Config In date and time screens, the customer can look into and modify the system for current date and time. -
Page 108: View Statistics Info
System will display statistics information screen In the above screen, the statistics information is displayed in a chart. The user can click to thread break stat. , click to clear the value , click to return. BECS-A18/A58 computerized embroidery machine owner’s manual... -
Page 109: Machine Authorization Management
Chapter 10 Other Functions 10.10 Machine Authorization Management Note: The section is fit for the machine with password-protected function. For a convenient machine management, the common user can't access the setting of all parameters; the roles of the customer are divided into the common user, machine administrator and factory customer. -
Page 110: Load Admin Optimum Parameters
BECS-A18/A58 computerized embroidery machine owner’s manual... -
Page 111: Save Admin Optimum Parameters
Chapter 10 Other Functions Click other function key on the main appearance, enter other functions operation screen. Click “Machine Authorization Management” to enter this management window. Click “Input Admin Password to Unlock”. System will ask users to input password. Administrator input password After administrator inputs the password, the system will be unlocked. -
Page 112: Disable/Change Factory Password
The factory password has already established and hasn’t decrypt, embroidery BECS-A18/A58 computerized embroidery machine owner’s manual... -
Page 113: Save All Parameter To Disk
Chapter 10 Other Functions factory administrator password has already established and hasn’t decrypt, then the machine parameter was managed by factory recover to parameter value was saved by factory, the machine applications parameter was managed by administrator recover to parameter value that saved by administrator, the other parameters were initialized to default value that saved by system. -
Page 114: Read All Parameter From Disk
Insert the USB and then click "Success to read all parameters " will appear. After the above operations, the system parameters will resume to the status before user updates the software. The embroidery machine can be used now. BECS-A18/A58 computerized embroidery machine owner’s manual... -
Page 115: Debugging Machine
Chapter 10 Other Functions 10.11 Debugging Machine This operation to provide to maintenance man to use only, the common maintenance man not to use, this operation involves some mechanical works, so the need to notice the human body safety and equipments safeties when use it. Adjust function to mainly use in the test of the machine, support and check break down, include as follows function: Number... -
Page 116: Touch Screen Adjust
→Debugging Machine. Click Click touch screen adjust key Input admin password or factory password (Go to the fouth step if the machine has no password-protected function ). BECS-A18/A58 computerized embroidery machine owner’s manual... - Page 117 Chapter 10 Other Functions Click the centre of the cross in adjustment screen step by step. During the process of adjusting, a lot of crosses will appear on the screen. Users should click the center of those crosses. System receives the data of those points and saves as standard data.
-
Page 118: Chapter 11 D Type Sequin Embroidery
3. Delivering a sequin by operating either manual separated head or collective; 4. Display working status separated head; 5. Type of sequin sending and angle can be changed by operating on the control panel. BECS-A18/A58 computerized embroidery machine owner’s manual... -
Page 119: Embroider Sequin
Chapter 11 D Type Sequin Embroidery III. Specifications 1. Sequin diameter range: 3mm,4mm,5mm,6.75mm and 9mm; 2. The maximum speed for sequin embroidery is 850 rpm. 11.2 Embroider sequin You may follow the steps in sequin embroidery: 1. Input design with sequin code (see 11.3); 2. -
Page 120: Sequin Design Edit
Design” screen. centered; display design 4.5 times as original one; zoom in sequin design; zoom out sequin design; display in original size. 4. Click to show all stitches of the design as follow image: BECS-A18/A58 computerized embroidery machine owner’s manual... - Page 121 Chapter 11 D Type Sequin Embroidery 5. Click to shift the current stitch between “navigating by position” and “navigating by stitch number”. “navigating by position”: when you press down direction keys, the next stitch code in that direction will be selected, no matter its stitch number.
- Page 122 Click to select sequin mode and click to confirm. Sequin name are A, B, C and D. If all four sequins are included, A will be on the top, then B, C and D. BECS-A18/A58 computerized embroidery machine owner’s manual...
- Page 123 Chapter 11 D Type Sequin Embroidery b) After that, press and delivery sequin number ranging from 1 to 9999 is desired. If use same sequin mode, import “1” and confirm by pressing c) Click till you see “END” in the blank of “Input Sequin M”. Press to confirm.
-
Page 124: Parameter Setting About Multi-Sequin Embroidery
This is to set the time period from sequin device goes down to embroidering (0-15, the default value is 2). If the sequin device is controlled by valve, use the default value; if it is BECS-A18/A58 computerized embroidery machine owner’s manual... - Page 125 Chapter 11 D Type Sequin Embroidery controlled by motor, choose 4-5. 4. Sequin off after T.B. When the setting is “Yes”, sequin presser foot will be lift up automatically in case of thread break. When the setting is “No”, the sequin device needs manually lifting the presser foot. 5.
-
Page 126: Change Color Order And Set Sequin Mode
“10” means the lowest sensitivity. 11.6 Change Color Order and Set Sequin Mode User must set sequin mode before setting color-changing toward normal multi-sequin design, but expert multi-sequin design don’t need set multi-sequin sequin mode. Detailed operations are: BECS-A18/A58 computerized embroidery machine owner’s manual... - Page 127 Chapter 11 D Type Sequin Embroidery → 1. Click to enter color-changing order screen. 2. Click digital key to set color-changing position. If the first/last needle position is for multi-sequin embroidery, after one click, system will ask for setting the sequin delivery mode;...
- Page 128 “C”, then click ③ Click “1”, then click to confirm; ④ Click till you see“END”, then click to end first setting. (2) ① click digit key “9” to go to sequin delivery mode setting; BECS-A18/A58 computerized embroidery machine owner’s manual...
- Page 129 Chapter 11 D Type Sequin Embroidery ② Click till you see “AB” in “input sequin mode”, then press to confirm; ③ press“1”,then press to confirm; ④ you can use till you see “END” and then press complete setting. (3) ① press 9, system shows sequin delivery mode screen; ②...
-
Page 130: Manual Operation Of Sequin Embroidery
Thread break switch is embroidery switch. When thread break switch is at the down side, neither flat embroidery nor sequin embroidery is available; Thread break warning lamp is mounted on the sequin sending device, which BECS-A18/A58 computerized embroidery machine owner’s manual... -
Page 131: Debugging Multi-Sequin Embroidery
Chapter 11 D Type Sequin Embroidery offers the operator with easy view. Note: when the manual valve control switch is in the middle, blue lamp is on, which indicates a perfect condition of sequin embroidering. Location of the sequin switch board 11.8 Debugging Multi-Sequin Embroidery 1. -
Page 132: Sequin Mending
Pull bar again to let the sequin device (on mending head) down for mending. When it reaches the stop point, machine stops, then other sequin devices will be down to continue normal embroidery. “Patch count” in machine parameter setting is ineffective in sequin mending. BECS-A18/A58 computerized embroidery machine owner’s manual... -
Page 133: Chapter 12 Operation Of Cording Embroidery
Chapter 12 Operation of Cording Embroidery Chapter 12 Operation of Cording Embroidery 12.1 Functions 1. Cording Embroidery (ZIG Embroidery): this function is to make the bobbin thread form the design with certain stitch forms, which have been saved in the computer in advance, the Z4 and Z5. -
Page 134: Relative Operations Of Cording Embroidery
At present, this parameter is set as “N”. 12.5 Relative Operations of Cording Embroidery Shift between Flat Embroidery Position and Cording 12.5.1. Embroidery Position 1. Manual Shift In the main interface, click the key to enter into color-changing interface. BECS-A18/A58 computerized embroidery machine owner’s manual... - Page 135 Chapter 12 Operation of Cording Embroidery Click the figure corresponding to the operation of corresponding special embroidery, click to exit. Definition of Icons: Normal Embroidery; Z4 Embroidery: The rod swings once at each stitch. Z5 Embroidery: the same features as Z4, and suitable for thick thread (used in cooperation with the parameter: Swinging scope of frame in ZIG embroidery).
-
Page 136: M Axis Operation Of Cording Embroidery
(1)Step Moving of M Axis Press the key “M axis to cycle” and click the key on the dialogue window to let the M axis rotate to the “Zero Point”, or click the key to cancel the operation. BECS-A18/A58 computerized embroidery machine owner’s manual... - Page 137 Chapter 12 Operation of Cording Embroidery (2)Rotate M Axis Manually Click the key “M axis to return” and click “turn to left” on the dialogue window to let the M axis rotate to the left. It will rotate 18° left once you click the button. After 20 times click, it will return to its origin;...
-
Page 138: Chapter 13 Directions On Coiling, Taping And Zigzag Embroidery
10. The nipple of Special embroidery can be raised and lowered automatically before manual frame shifting or embroidering. 11. Zigzag sewing lever can be tested manually. BECS-A18/A58 computerized embroidery machine owner’s manual... -
Page 139: The Key Technical Indexes
Chapter 13 Directions on Coiling, Taping and Zigzag Embroidery 13.2 The Key Technical Indexes 1. The sequence of flat embroidery head and special embroidery head: The default setting is that first needle position is for special embroidery, the rest of neddles are for flat embroidery. 2. - Page 140 “3” indicates the swing postpones certain angle again to start. 13. C36 Ratio of Coil Emb.: The ratio of coiling: “1~4 Sti/L” The parameter can change the coiling density; e.g. the set value 2 means one coiling every two stitches. BECS-A18/A58 computerized embroidery machine owner’s manual...
-
Page 141: Relative Operations Of Special Embroidery
Chapter 13 Directions on Coiling, Taping and Zigzag Embroidery 13.5 Relative Operations of Special Embroidery 13.5.1. Shift between Lock Stitch Head and Special Head (1)Manual Shift In the main screen, click the key to enter into color changing screen. Click the figure corresponding to the operation of corresponding special embroidery, click to exit. - Page 142 “1”(special head) to change special embroidery pattern: Click relative icon to select the pattern you need, if you don’t want to change, then click to exit. After confirm of the pattern, system will display as: BECS-A18/A58 computerized embroidery machine owner’s manual...
-
Page 143: M Axis Operation Of Taping Embroidery
Chapter 13 Directions on Coiling, Taping and Zigzag Embroidery The icon means that system goes into manual shift state. While will still be in effect when system is in automatic shift state. During the embroidery process, it is common to shift between normal head and special head. -
Page 144: Operations Of Clamp Foot
E axis and clamp foot axis. M axis rotates a certain degrees every stitch to trace the stitch, which ensures cords or tapes always in front of needle movement. E axis swings once every one or two stitch to make the Zigzag embroidery. Clamp foot axis is for lifting and lowering BECS-A18/A58 computerized embroidery machine owner’s manual... - Page 145 Chapter 13 Directions on Coiling, Taping and Zigzag Embroidery the clamp foot. 1. M axis The mechanism of M axis can be divided to two types. One is with clutch device, whose action is controlled by electropneumatic valve or by hand. Its advantage is that only the M axis of the mending embroidery is moving and non-mending embroidery heads are still when mending.
- Page 146 4. The composition chart for special embroidery machine contwheel For different control systems, the E854 board takes different software programs while the E874 board changes the DIP switches. Refer to 12-8. BECS-A18/A58 computerized embroidery machine owner’s manual...
-
Page 147: Definition Charts Of Dip Switches Of E874 Boards
Chapter 13 Directions on Coiling, Taping and Zigzag Embroidery 13.8 Definition Charts of DIP Switches of E874 Boards Chart 1: DIP1 Composition Description of the M axis Manual clutch or without any clutch Automatic clutch Chart 2: DIP2 DIP3 Composition Description of the E axis Stepping motor, without proximity switch for positioning Stepping motor, with proximity switch for positioning Servomotor driving, with proximity switch for positioning... -
Page 148: Chapter 14 Updating Control Program
Chapter 14 Updating Control Program Updating Operation: 14.1 Update Data Software (Upper Machine) 1. Hold " " key and turn on the machine. 2. The screen shows the following picture, select the "updating data program". BECS-A18/A58 computerized embroidery machine owner’s manual... - Page 149 Chapter 14 Updating Control Program 3. Select the "updating from USB". 4. Click "Disk". BECS- A18/A58 computerized embroidery machine owner’s manual...
- Page 150 Chapter 14 Updating Control Program 5. Select the software for update after having access to the interface. 6. Click enter key to confirm the updating . BECS-A18/A58 computerized embroidery machine owner’s manual...
-
Page 151: Updating Control Program (Down Machine)
Chapter 14 Updating Control Program 7. The screen will show "Updating Complate , if not others , Pls repower" when finish updating. Please restart the computer. 14.2 Updating control program (Down Machine) 1. Hold " " key and turn on the machine. BECS- A18/A58 computerized embroidery machine owner’s manual... - Page 152 Chapter 14 Updating Control Program 2. The screen shows the following picture, select the second "updating control program" . 3. Select the "updating from USB". BECS-A18/A58 computerized embroidery machine owner’s manual...
- Page 153 Chapter 14 Updating Control Program 4. Click "Disk". 5. Select the software for update after having access to the interface. BECS- A18/A58 computerized embroidery machine owner’s manual...
- Page 154 Chapter 14 Updating Control Program 6. Click enter key to confirm the updating . 7. The screen will show "Updating Complate , if not others , Pls repower" when finish updating. Please restart the computer. BECS-A18/A58 computerized embroidery machine owner’s manual...
-
Page 155: Chapter 15 Updating Peripheral Equipment Program
Chapter 15 Updating Peripheral Equipment Program Chapter 15 Updating Peripheral Equipment Program Updating Procedure: 1. Click the " " key in the main screen. Select "Machine Test". BECS- A18/A58 computerized embroidery machine owner’s manual... - Page 156 Chapter 15 Updating Peripheral Equipment Program 3. Select "Management of Machine I/O Boards". 4. Select " Update PC006 Software ". BECS-A18/A58 computerized embroidery machine owner’s manual...
- Page 157 Chapter 15 Updating Peripheral Equipment Program Select the program for update and then click 6. When system displays "peripheral board program update window", please click BECS- A18/A58 computerized embroidery machine owner’s manual...
- Page 158 Chapter 15 Updating Peripheral Equipment Program 7. Wait for updating software. And the screen will display "Success" when updating is finished. BECS-A18/A58 computerized embroidery machine owner’s manual...
-
Page 159: Appendix I Parameter Setting List
Appendix I Parameter Setting List Appendix I Parameter Setting List Recommend Number Name Range of Setting Note ed Value Magnify, Rotate& Repeat Setting Parameters Scaling rate of Rotating angle of the 100/100 50%~200% X&Y directions design Rotating angle of 0~89 the design Direction Prior Mode... - Page 160 Speed Down Stop No Change, Down, Stop After Patch If “Yes”, all unclosed To Set All Heads No, Yes heads do patching when Patch patching. Detect No, Yes When Jump BECS-A18/A58 computerized embroidery machine owner’s manual...
- Page 161 Embroidery embroidery,plain Mode embroidery embroidery,clothes embroidery Frame Weight 0,5,10,15.20 It is fit for high-speed direction 230~280 machine using dahao Frame Angle A servo-motor driver direction 230~280 The same of above Frame Angle B BECS- A18/A58 computerized embroidery machine owner’s manual...
- Page 162 Speed of Slow 80 (rpm), the value of the Emb. minimum speed Stop Ok bef. Pull No, Yes The parameter is used Ratio -15% ~ +15% when the main shaft uses Induction induction motor. If the BECS-A18/A58 computerized embroidery machine owner’s manual...
- Page 163 Appendix I Parameter Setting List Recommend Number Name Range of Setting Note ed Value value is incorrect, the set rotation speed will be different from the virtual speed. Value for Thick Cloth Para. Of Needle 0~30 Down Lock Motor No,Yes When Stop Thread-trimming Parameter Jump &...
- Page 164 Thread holder all No, Yes on when darn Solenoid Solenoid cutter, Stepmotor Cutter ype cutter cutter Sequin Parameter(D type) Speed for Sequin 300,310,…,the maximum speed 300,310, … , the maximum Speed for Sequin 400 BECS-A18/A58 computerized embroidery machine owner’s manual...
- Page 165 Appendix I Parameter Setting List Recommend Number Name Range of Setting Note ed Value speed Sequin R Adj. -15~15 Angle Sequin L Adj. -15~15 Angle Auto Start No, Yes Sequin Time of Sequin 0~15 Action Sequin Off after No, Yes T.B.
- Page 166 No, 1,2 of L Sequin Valve Time of Left Sequin R Motor Shift 6~40 Stroke Base R Motor Shift 1~30 Stroke Time With Origin at R No, Yes Motor Shift L Sequin Feeding 6~40 BECS-A18/A58 computerized embroidery machine owner’s manual...
- Page 167 Appendix I Parameter Setting List Recommend Number Name Range of Setting Note ed Value Angle Ad L Motor Shift 1~30 Stroke Time With Origin at L No, Yes Motor Shift L Knife Start 0~31 Angle Adj R Knife Start 0~31 Angle Adj Bead-breakage Detection...
- Page 168 9-needle machine. If Needles 1,2…MAXNEEDLE the value is different from the machine needles, the color changing will be abnormal. Needle of Boring No, 1, N Boring Emb. 0mm,12mm Disp. Needle of Cord No, 1, N Emb. BECS-A18/A58 computerized embroidery machine owner’s manual...
- Page 169 Appendix I Parameter Setting List Recommend Number Name Range of Setting Note ed Value Speed for Cord 300,310,320…600 Emb. Adjust Head 0,1,2…30 Solenoid It’s valid only when the color-changing motor is Color-Change 0,1,2…30 stepping motor. Speed larger the value, the faster the color-changing speed.
- Page 170 0.0~1.0 for mechanical DIP1 0~255 DIP2 0~255 DIP3 0~255 DIP4 0~255 Machine Head 1~80 Machine head 162.0 1.0~400.0 space To Do Machine Head Combine No, Yes Emb SETTING Frame shift scope 1~80 head number BECS-A18/A58 computerized embroidery machine owner’s manual...
-
Page 171: Appendix Ii Directions On Usb Operations
Appendix II Directions on USB Operations Appendix II Directions on USB Operations Operation Direction Remark Read & Write USB Same as floppy disk Priority Supporting format FAT16 and FAT32 Long filename Support but no display For instance: “清明 DOS 8.3 mode ( 8 digit 上河图.DST”will Filename display prefix is viewable,suffix is... -
Page 172: Appendix Iii Error List
Design has created! Not combined design No enough design mem. Please wait design operation Directory is invalid. Cannot delete emb. design FLASH media write-protect Stitch number too large Design file not existed Design stitches is over BECS-A18/A58 computerized embroidery machine owner’s manual... - Page 173 Appendix III Error List Mistakes Mistakes Design name is invalid Error design, or communication fail Design file corrupt Read Design Error Error read/write design Edit Forbid when Emb. Ready Not open design file Design is too big. Can't process. Error read FLASH media Can not format the disk! Device not existed! Unsupport operation!
-
Page 174: Appendix Ⅳ Network Connection Of Embroidery Machines
1-3, 2-6 crossover connection: Twisted-pair cable has 4 pairs of pins (8 pins). Only 4 pins are used in network, namely the first, second and third, sixth pins. They are used for receiving and sending signals. The connection rule is: the first pin of one terminal is connected BECS-A18/A58 computerized embroidery machine owner’s manual... - Page 175 Appendix Ⅳ Network Connection of Embroidery Machines to the third pin of the other terminal, and the second to the sixth. Other pins are connected to the corresponding pins. Cable made in this way is called “crossover cable”. Connection: Pin number corresponding Pin number Pin color...
- Page 176 B: the first two numbers represent network and the following 2 numbers represent computer. C: the first three numbers represent network and the last one represents computer. Use the following example to explain the network number and computer number of C type. BECS-A18/A58 computerized embroidery machine owner’s manual...
- Page 177 Appendix Ⅳ Network Connection of Embroidery Machines Network Network number Computer number 192.168.1 192.168.1 192.168.1 192.168.1 192.168.2 192.168.2 192.168.2 192.168.2 Subnet mask To show how the network number and computer number are divided, subnet mask is used to tell in one IP address which part is for network and which part is for computer. It’s regulated that “1”...
- Page 178 In this situation crossover cable is used to link the network interface of PC to the network interface of embroidery machine. C and embroidery machine linked by HUB In this situation straight-through cable is used to link PC with HUB. BECS-A18/A58 computerized embroidery machine owner’s manual...
- Page 179 Appendix Ⅳ Network Connection of Embroidery Machines 3. Connect the two networks in “2 ”through HUB Setting the network parameters of embroidery machine MAC address of embroidery machine Set MAC address of NIC of embroidery machine. Each embroidery machine has its sole address.
Need help?
Do you have a question about the BECS-A18 and is the answer not in the manual?
Questions and answers
la maquina no detecta rutura de hilo superior
The DAHAO BECS-A18 machine may not be detecting the upper thread break due to issues with the thread break detection mechanism. The machine uses two main detection methods:
1. Thread Take-Up Spring Type:
- If the spring pressure between the take-up spring and contact point is incorrect, it may cause false positives or false negatives.
- If the pressure is too large, false breakage warnings may occur.
- If the pressure is too small, the machine may fail to detect actual thread breaks.
2. Thread Winding Wheel Type:
- This method detects thread breakage by monitoring the winding wheel angle.
- If the system does not correctly track the reduction of face thread consumption, it may fail to detect a break.
To resolve the issue, check and adjust the spring pressure or ensure the winding wheel mechanism is functioning correctly.
This answer is automatically generated
We faced an issue in one header. One header is not working. There is no hardware problem. I think it is locked by the software. Is there any method to unlock that?