
Related Manuals for DAHAO BECS-D16


Summary of Contents for DAHAO BECS-D16
- Page 1 刺绣机电脑 Computerized Control System for Embroidery Machine BECS-D16 (General Unit) Version:2017-01 操作手册 OWNER’S MANUAL...
-
Page 3: Table Of Contents
4-12 “High speed design”...................... 52 4-13 Compile Packed Design ....................53 4-14 Create design from parameter ..................53 4-15 Move frame to make design ..................54 4-16 Create outline design from normal design ..............55 BECS-D16 computerized embroidery machine owner’s manual... - Page 4 Index 4-17 Copy design with varied switch length ................. 56 4-18 Design parameters operation ..................57 4-19 Import design from PC ....................58 4-20 Network Management Function ................... 58 Chapter 5 Management of Machine Parameters ................61 5-1 Normal Parameters ......................62 5.1.1 Design directions .......................
- Page 5 9-2 Input Char String and Basic Parameter ................. 119 9-3 Character Pattern Save ....................126 Chapter 10 JF Type Sequin Embroidery ..................127 10-1 Brief Introduction on Sequin Embroidery ..............127 10-2 Embroider sequin ......................128 10-3 Input sequin design ..................... 129 BECS-D16 computerized embroidery machine owner’s manual...
- Page 6 Appendix Ⅲ Error Information & Instruction of System Level Mistake ........ 195 Appendix Ⅳ Make Special Multi-Sequin Design ..............198 Appendix Ⅴ Network Connection of Embroidery Machines ..........209 All rights reserved. Beijing Dahao Technology Corp., Ltd. BECS- D16 computerized embroidery machine owner’s manual...
-
Page 7: Chapter 1 General Descriptions
Chapter 1 General Descriptions Thanks for using the Computerized Embroidery Control System produced by Beijing Dahao Technology Corp., Ltd. User are recommended to read this manual carefully, so as to operate the machine correctly and effectively. Besides, user should keep this manual for future use. -
Page 8: Main Features
Chapter 1 General Descriptions Cable Connection Don't test the insulation of the circuit loop. Forbidden Never try to connect overloading electronic device on the connector or the Forbidden power socket. Make sure the insulation cover of each cable is fine. Caution Communication cable and power cable should be separated. - Page 9 System can memorize the operational details for each design. Users can set parameters for a design during the embroidery process of the previous design, which will save time and improve the efficiency. More importantly, it is one basis to realize network management. BECS-D16 computerized embroidery machine owner’s manual...
- Page 10 Chapter 1 General Descriptions 7. Group Management of Parameters Parameters can be divided into groups based on their functions and embroidery types. The system can also save and recover the parameters used by technician at end-user and the parameters used by the manufacturer of machine. And for the machine with password-setting function, user can set password on the machine.
- Page 11 Design can be output and saved into floppy disk or USB disk. Adoption of TAJIMA’s binary system enables user to enjoy the advantage of data transmitting through the World Wide Web (other formats may not be transmitted directly). BECS-D16 computerized embroidery machine owner’s manual...
- Page 12 Chapter 1 General Descriptions 18. Repetition Embroidery The machine can increase embroidery productivity by repetition embroidery, which can also be used with cyclic embroidery. 19. Cyclic Embroidery The user also can increase embroidery productivity by using cyclic embroidery function, by which the machine automatically returns to the origin point and starts the same embroidery design again when finishing the design one time.
-
Page 13: Technical Specifications
At the color changing point, user can either act color changing manually or let the system do according to the preset order automatically. 27. Special Embroidery BECS-D16 computerized embroidery has special embroidery functions (coiling, taping and Zigzag embroidery). 1-3 Technical Specifications 1. -
Page 14: Chapter 2 Operation Instruction
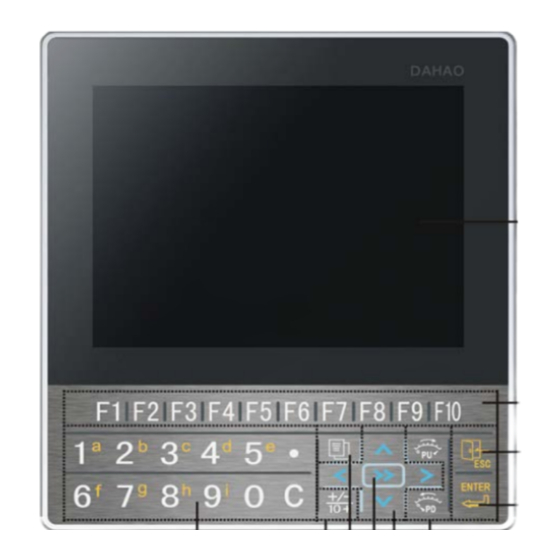
Chapter 2 Operation Instruction Chapter 2 Operation Instruction 2-1 Configuration and Direction of the Control Panel A. Configuration of the Control Panel 1. LCD Screen D16 adopts high-luminance LCD display. 2. Main USB Interface USB disk can be plugged in for data input/output. The external floppy driver is also connected by USB interface. -
Page 15: Instruction Of Control Panel
(Note: If you press the key (these keys are displayed in the Function select main screen area) twice without the interruption of any other operations, the system will enter or to exit the corresponding function. ) BECS-D16 computerized embroidery machine owner’s manual... -
Page 16: Instruction Of The Main Screen
Chapter 2 Operation Instruction Number Name Description Exit To exit certain operations. Confirm To confirm certain operations. Press the button to reduce or increase the Speed adjust embroidery speed. In operation, the direction of frame-moving is the same as the Manual Frame direction key. - Page 17 In embroidery preparation status, you can select design, set parameter and etc. Embroidery Press this key and confirm, then preparation status machine status changed from preparation status to confirmation status BECS-D16 computerized embroidery machine owner’s manual...
- Page 18 Chapter 2 Operation Instruction Display Name Description Reference Section In embroidery confirmation status, you Embroidery can pull bar to embroider. When confirmation status machine stops, press this key to (Embroidery can be confirm to cancel confirmation status cancelled) back preparation status System is now in normal embroidery status.
- Page 19 Color changing and current stitch position Machine status Frame moving speed(use information (In the order of left shift between low speed and high to right, top to bottom) speed BECS-D16 computerized embroidery machine owner’s manual...
-
Page 20: Notes On Menu Status
Chapter 2 Operation Instruction Display Name Description Reference Section Main shaft status(running , stop in position , not stop in position 、 Embroidery status(thread break 、 color changing 、 finish 、pull bar to stop ) jump Cyclic embroidery , none cyclic embroidery Assistant embroidery... -
Page 21: How To Input Numerals, Letters And Symbols
” for a while, the cursor will move consecutively among each option. 2-7 Procedure of Embroidery The machine embroiders based on the designs in its memory. The following is the basic Procedure of Embroidery. BECS-D16 computerized embroidery machine owner’s manual... - Page 22 Chapter 2 Operation Instruction 1. Input Designs 2. Choose a Design 3. Assistant Operations 4. Embroidery Confirmation 5. Pull the Bar for Embroidery 6. Cancel Embroidery 7. Manual Operation A. Input Designs The user can import designs through network, floppy disk or USB disk. Only in status, can user transmit designs by PC network.
- Page 23 After selecting the design, the user will enter the main screen, and he can do the needed assistant operations before embroidery. a. Set repetition, rotation and magnification and color-changing order——click “ ” then “ ” to enter the operation interface of design parameter and color-changing order BECS-D16 computerized embroidery machine owner’s manual...
- Page 24 Chapter 2 Operation Instruction b. Set applique embroidery——click “ ” to enter the design management screen. And click “ ” to set applique according to prompts. c. Show the range of embroidery design, move frame along the boundary of design, embroider along the design range, embroider one cross, embroider one line, embroider the design outline——press “...
- Page 25 ) in the main picture and the status will switch among (normal embroidery), (low-speed idling) and (high-speed idling). E. Pull the Bar for Embroidery Operation bar( or embroidery bar) is installed under the table BECS-D16 computerized embroidery machine owner’s manual...
- Page 26 Chapter 2 Operation Instruction 1) Stop Status: Pulling the bar to right is to begin embroidery (including low and high speed idling) Pulling the bar to left is to return (including low and high speed idling) 2) Running status: At normal embroidery, pulling the bar to the right end is to embroider slowly and releasing the bar will resume the normal speed.
- Page 27 Click in the main screen then the user can set the positioning idling of needle number, color-changing code, idling direction and stop code. BECS-D16 computerized embroidery machine owner’s manual...
-
Page 28: Normal Embroidery, Returning And Mending
Chapter 2 Operation Instruction 9) Let Needle Down (The Needle Stops at the Designated Low Position) This function is intended to quilt embroidering at replacing the fabric. Click in the main screen and then the option “Let needles down”. When clicking “ ”, the needle will prick into the embroidery cloth and a prompt will appear. -
Page 29: Relations Between Normal Embroidery, Idling And Position Idling
Functions as idling, returning, etc. are intended for the convenience of patching. Low-speed idling, high-speed idling or positioning idling can be used as needed in embroidery. In the status of idling, the returning also has low-speed idling returning, high-speed idling returning or positioning idling returning. BECS-D16 computerized embroidery machine owner’s manual... -
Page 30: Operation Bar And Turn Shaft Button
Chapter 2 Operation Instruction In the main screen, you may press “ or “ to switch among ” ” ”) , (“ “ normal embroidery), “ low speed idling) and “ high speed ” ( ” ( ” ( idling). After user sets low-speed idling , the main shaft remains inactive when user pulls bar for normal embroidery, but the frame runs forward along the stitch trace. -
Page 31: Thread-Breakage Detection And Mending Switch
False Positive, it is not as sensitive as the spring-type. For the mixed type method, these two detection methods can complement each other with their advantages, which results in sensitive and stabilized detecting effect. BECS-D16 computerized embroidery machine owner’s manual... -
Page 32: System's Working Status
Chapter 2 Operation Instruction No matter which method you use, there is one switch and one status light on each machine head. There are three positions to switch but only two positions can be locked. When you switch to the down side, status light does not shine, which means the head stops. - Page 33 In embroidery confirmation status ( is displayed), first press " " key. And then press “ ”key to release embroidery confirmation status. Now the machine enters preparation status ( is displayed). BECS-D16 computerized embroidery machine owner’s manual...
-
Page 34: Chapter 3 Disk Management
Chapter 3 Disk Management Chapter 3 Disk Management In disk management, users can input the designs in the disk to machine, and vise versa; meanwhile, users can enjoy some common disk managing actions, like erasing file or catalogue, formatting disk, etc. Floppy disk (external device) and USB disk are both supported. - Page 35 Select all the items in the current folder. Design input Input design from disk to memory Design output Output design from memory to disk Previous directory Go to previous directory Refresh the disk Refresh current disk directory BECS-D16 computerized embroidery machine owner’s manual...
-
Page 36: Design Preview
Chapter 3 Disk Management Number Icon Name Description Create new directory Create a new directory on current disk Delete document Delete the selected documents Monogramming Operations relating to monogramming Format disk Format the current disk Help Display the help menu. Current route Page information The current page and the total page... -
Page 37: Select One Or Several Designs
Before preview, input and deletion of files, the objective design has to be selected firstly. The user can select one object at one time, or select several objects at one time to improve efficiency. Select one object BECS-D16 computerized embroidery machine owner’s manual... -
Page 38: Design Import
Chapter 3 Disk Management Press “ ” to move icon to the object and then press “ ”to select it, and then the icon and word information of the selected design will be showed in the blue square. 2. Select Several Objects for Operation in Order At selecting several objects, you may press “... - Page 39 The customer can use the small panel on the right to change the value. When several designs are input at one time, the user can only input the number of the first design. BECS-D16 computerized embroidery machine owner’s manual...
-
Page 40: Design Export
Chapter 3 Disk Management At modifying the design number and name, the system will firstly change the design number at default. After the modification, please press “ ” to have system to have access to the item for changing design name. Please input the name according to the hints. -
Page 41: Directory Operation
3-7 Deleting Objects in Disk (Including Design Files and Folders) 1. Select one or more objects (See 3.3) 2. Click the deleting key “ ” 3. The system asks the user to confirm the deletion BECS-D16 computerized embroidery machine owner’s manual... -
Page 42: Formatting A Disk
Chapter 3 Disk Management 4. Press the key “ ”to delete; press “ ” to exit. Note: If the user chooses to select the directory, the system will delete all the files and sub-directory in this directory. If a file has the property of “only read” or “disk write protection”, the file will not be deleted. -
Page 43: Chapter 4 Memory Design Management
The design image display area can show 30 designs at most; beyond that, more pages will be needed. The function menu area is used to preview designs and set their order. BECS-D16 computerized embroidery machine owner’s manual... - Page 44 Chapter 4 Memory Design Management Press the key to shift among three pages; press to show designs in 、 next page. Press to change different design page. Number Icon Name Description Show the current page and total Page information page number. Total design number To show the total amount of memory...
- Page 45 Press this enter Generate high speed high-speed design generating design window This function is to generate Create design from standard design from combined packed designs design from parameter Generate design by parameter BECS-D16 computerized embroidery machine owner’s manual...
-
Page 46: Select Object
Chapter 4 Memory Design Management Number Icon Name Description Press this key to the interface Frame make for creating design with frame design motion Press this key to the interface Create outline from for creating outline design from design normal design Copy design with... -
Page 47: Selecting A Design For Embroidery
If the operation is completed, the system will close the memory design screen to return to the main screen. 4-4 Design Preview The selected design can be previewed in the memory design preview screen according to the designated way. BECS-D16 computerized embroidery machine owner’s manual... - Page 48 Chapter 4 Memory Design Management Number Icon Name Description Display the selected design on the Design preview area designated way and speed. Design information Display the design information. Stitch Track Information Zoom out the design picture in the Zoom out design preview area.
-
Page 49: Copy The Memory Design
3. In the memory design management screen, you may press “ ” to enter its operation screen. The system will automatically provide the available smallest design number and default design name. If the user doesn’t want to change them, go to 6 directly. BECS-D16 computerized embroidery machine owner’s manual... -
Page 50: Delete The Memory Design
Chapter 4 Memory Design Management 4. To input a new design number, press “design number” and input the new number in the pop-up window, and then press “ ”to confirm the input. 5. To input a new design name, press “design name” and input the new name in the pop-up window. -
Page 51: Add Applique Design
At last pull the bar for embroidery. Automatic moving frame out has two ways: moving frame to the offset point and setting the moving distance. The operation is as follows: Firstly set applique BECS-D16 computerized embroidery machine owner’s manual... - Page 52 Chapter 4 Memory Design Management embroidery function for the design. Then when reaching the applique point, the machine moves to the offset point (which has to be set) or move out according to the set distance. After applique, pull the bar and the machine will automatically return to the stop point to continue embroidery.
- Page 53 ”to save the appliqué information in the original pattern operation and return to the screen for selecting the design operation. Press “ ”to cancel operation and return to the screen for selecting design operation. BECS-D16 computerized embroidery machine owner’s manual...
-
Page 54: Satin Stitch Compensation
Chapter 4 Memory Design Management 4-8 Satin stitch compensation This operation is to adjust the satin width in the design according to the need. 1. Press in the main menu to enter the memory design management screen. 2. Select the design in the memory design image area of the memory design management screen. - Page 55 The serial number indicates how many designs form the packed design and the number of current operated design. 4. Set the parameters of the first design, including design number, scale ratio, rotating angle, design direction and priority mode as well as color-changing order. BECS-D16 computerized embroidery machine owner’s manual...
-
Page 56: Design Division
Chapter 4 Memory Design Management 5. Press “ ” to set more designs for packing. And press “ ” to go back to change the parameters of designs packed. If the current design is not the first design in the packed design, user should set the interval between it and the first design. -
Page 57: Combine The Designs
2. Choose two designs in design selecting area. Press the key “ ” to enter its operation screen. If More than two designs are selected, there will be a prompt to tell you to reselect. BECS-D16 computerized embroidery machine owner’s manual... -
Page 58: High Speed Design
Chapter 4 Memory Design Management 3. If you don’t use the default values, you can use keyboard to change the design number, design name and X (Y) interval. 4. Press “ ”to combine and return to the design operation selecting screen. Press “... -
Page 59: Compile Packed Design
2. Select the design in the memory design image area of the memory design management screen. 3. Click “ ” to enter the screen for creating design from parameter. BECS-D16 computerized embroidery machine owner’s manual... -
Page 60: Move Frame To Make Design
Chapter 4 Memory Design Management 4. Click “ ”to input new design number and name. 5. Click “ ”to create a new design and return to the design operation selecting screen. Click “ ”to cancel creating and return. 4-15 Move frame to make design The user often wants to embroider the boundary of a design before embroidering it, so as to provide convenience to the later applique operation. -
Page 61: Create Outline Design From Normal Design
This function is to create a new design according to the outline of the designated design. 1. Press in the main menu to enter the memory design management screen. 2. Select the design in the memory design image area of the memory design management screen. BECS-D16 computerized embroidery machine owner’s manual... -
Page 62: Copy Design With Varied Switch Length
Chapter 4 Memory Design Management 3. Press the key “ ” to enter the screen for creating outline design from normal design. 4. If user doesn’t use the default values, press “ ”and change them with keyboard. 5. Press “ ”to create a outline design and return to the design operation selecting screen. -
Page 63: Design Parameters Operation
For setting parameters, please refer to 5.1 and 7.1. After setting, press the key “ ”to save the parameters with the design. Press the key “ ”to return to design operation screen. BECS-D16 computerized embroidery machine owner’s manual... -
Page 64: Import Design From Pc
Chapter 4 Memory Design Management 4-19 Import design from PC This function is not supported in this model yet. 4-20 Network Management Function The network management function enables to realize the remote real-time supervision on machine working status and batch download. 1. - Page 65 (2) PC Software, like EmbNetServer & EmbClient; (3) Cable, hub (or switch) and other network tools; (4) Dahao network connection converter and the serial port cables; (5) Dahao computerized embroidery machine(at present, this function is supported by 1x2, 2x2, 1x8, 2x8, xx6, 322, 328, x9S, Ax8 and Cx8 series) and the corresponding main software that supports this network function.
- Page 66 PC to network port directly.(The cross network cable is needed for connection). 4. Procedures for Installation & Debugging (1) Ensure the connections of mother board, hub, Dahao network connection converter, embroidery machine computer serial port or network port are ok. And make sure the communication is ok;...
-
Page 67: Chapter 5 Management Of Machine Parameters
As the image shows, when you move the icon to a kind of parameters, system will show some parameters (4 at most). Press “ ”to enter the screen for setting that kind of parameters. BECS-D16 computerized embroidery machine owner’s manual... -
Page 68: Normal Parameters
Chapter 5 Management of Machine Parameters 5-1 Normal Parameters Normal parameters include: “X&Y Scales”, “Rotate”, “Direction”, “Prior Mode”, “Rep. Mode”, “Rep. Prior”, “X&Y Reps” and “X&Y Interval”. The user can control the final embroidery results by adjusting these parameters. That’s why these parameters are often adjusted when a design is selected. -
Page 69: Setting Of X-Scale
Chapter 5 Management of Machine Parameters 5.1.3 Setting of X-scale This parameter controls the scaling percentages in horizontal (X) direction, so as to scale up/down the design. 1. Press the option “X Scale” BECS-D16 computerized embroidery machine owner’s manual... -
Page 70: Rep. Prior
Chapter 5 Management of Machine Parameters Press “X Scale” in the normal parameter screen, and the screen will show the parameter-setting window. 2. Set the parameter “X Scale” Press the number panel in the parameter-setting window to change the scaling ratio in X direction. -
Page 71: Rep. Mode
& maintenance parameters. For some machines with parameter-protected function, some parameters can be attached passwords by BECS-D16 computerized embroidery machine owner’s manual... -
Page 72: Setting Procedure For Other Parameters
Chapter 5 Management of Machine Parameters administrators or embroidery factories. For setting the administrator passwords and the factory password, as well as initialization of parameters, please press to enter the “purview of machine parameter manage” screen. (See Chapter 5.4) Refer to the appendix one for description of each parameter. 1. - Page 73 “D01 Needles <1, 15>”, “machine & maintenance parameter”. (1) Press in the main screen, move the cursor to “machine & maintenance parameter”, press “ ”: (2) Select the parameter to be changed, select D01 Needles <1, 15>, press “ ”: BECS-D16 computerized embroidery machine owner’s manual...
- Page 74 Chapter 5 Management of Machine Parameters (3) Input needle numbers and press “ ” to save it. Press the key “ ”to turn back to machine & maintenance parameter. 2. Exp: For changing the setting of the sub-stitch position parameter, that parameter is at “C17 Turn off Trimming”...
-
Page 75: Introduction Of Functions In Other Parameters
Usually, cyclic embroidery accompanies repetition embroidery or special punched designs, and the parameter “Auto Origin” should be also set as “Yes”. Thus when the machine is embroidering the back embroidery cloth-piece, the front one BECS-D16 computerized embroidery machine owner’s manual... - Page 76 Chapter 5 Management of Machine Parameters can be replaced by user. After embroidering the designated design, the frame will automatically return to the start point and the machine will automatically embroider the front cloth-piece again and at this time it’s possible to replace the back one.
-
Page 77: Set User-Defined Parameter
5-3 Set User-defined parameter This function should be used with “select user-defined parameter from all”. “Set user-defined parameter” makes it easy to set the frequently changed parameters. The setting should follow the steps as below: BECS-D16 computerized embroidery machine owner’s manual... - Page 78 Chapter 5 Management of Machine Parameters 1. Press the key in the main screen, move the cursor to “select user-defined parameter from all”. 2. Press the key “ ”to make this parameter as user-defined parameter, then this parameter will be listed into user-defined parameter list. You may press “...
- Page 79 5. Move the cursor to “set user-defined parameter”, press the key “ ”to enter user-defined parameter screen. The setting is similar to other parameter setting. Note: when you enter the screen of user-defined parameter, system will automatically clear the saved ones. BECS-D16 computerized embroidery machine owner’s manual...
-
Page 80: Purview Of Machine Parameter Manage
Chapter 5 Management of Machine Parameters 5-4 Purview of Machine Parameter Manage Note: This section operation is fit for the machine with password-protected function only. For the convenient management of machine, the common user can't access to the setting of all parameters; the roles of the customer are divided into the common user, machine administrator and factory customer. - Page 81 The administrator needs to input the old password and new password one by one. The machine producer will tell the administrator about default password which is in 4-9 digits. To prevent the user’s wrong operation, the new password must be input two times in the same times. BECS-D16 computerized embroidery machine owner’s manual...
-
Page 82: Machine Administrator Cancels Machine Lock
Chapter 5 Management of Machine Parameters 5.4.2 Machine Administrator cancels machine lock After machine administrator set the password, the machine is locked. The common customer can't modify the machine application parameters. To set these parameters, the administrator must input the administrator password or the factory password. - Page 83 1)At main interface , press " "key to have the menu appear as following. 2) Press " "、" " to move the cursor to " Purview of Machine Parameter Manage", and press “ ”key. BECS-D16 computerized embroidery machine owner’s manual...
- Page 84 Chapter 5 Management of Machine Parameters 3) Press " "、 " "to move the cursor to "Admin Save Optimize Parameter", and press “ ”key. 4) Turn up "Admin Save Optimize Parameter", and then press “ ”key. After finishing the operations at above, the parameters are saved successfully.
- Page 85 " to move the cursor to "Purview of Machine Parameter Manage", and press “ ”key. 3) Press " "、 " " to move the cursor to " Admin Reset Optimize Parameter", and press “ ”key. BECS-D16 computerized embroidery machine owner’s manual...
-
Page 86: Change The Factory Password
Chapter 5 Management of Machine Parameters 4)Turn up "Admin Reset Optimize Parameter", and press " "key. After the above operations, the basic parameters of the machine are reset, and the embroidery machine can be used. 5.4.4 Change the factory password The machine producer can modify all parameters. -
Page 87: Unlock The Factory Password
BECS-D16 computerized embroidery machine owner’s manual... -
Page 88: Save All Parameter To Disk
Chapter 5 Management of Machine Parameters 5. When that factory password has not been set and administrator password has been set and unlocked, all general embroidery parameters are initialized to their default values. 6. When that factory password has not been set and administrator password has been set and not unlocked, all administrator-authorized machine application parameters are recovered to administrator saved values and other parameters are initialized to the default values. - Page 89 4 ) "Success to save all parameters to file "DH-PARAM.TXT" means the successful saving of the entire parameters to the USB. After the update, user needs to repower the computer. After the initialization, user can reset the parameters. BECS-D16 computerized embroidery machine owner’s manual...
-
Page 90: Read All Parameter From Disk
Chapter 5 Management of Machine Parameters 5-7 Read all parameter from disk Operation: 1、 At main interface , press " "key to have the menu appear as below: 2、 Press " "、" "to move the cursor to " Read All Parameters From Disk ", and press “... -
Page 91: Adjust Parameters Of X&Y Servo Drivers
The embroidery machine can be used now. 5-8 Adjust Parameters of X&Y Servo Drivers The type parameters are used for the machine, whose main shaft uses Dahao servo motor and driver. Only the factory can rework these parameters. Due to the password-protected function, you must input the factory password, if adjusting the parameters or performing the corresponding operation to the machine. -
Page 92: Set The Parameter
This operation can inquire the Dahao servo driver status. Machine gives the windows of X/Y servo driver status after user carries out the operation. User should turn off power and adjust Dahao servo driver if the following screen appears. BECS- D16 computerized embroidery machine owner’s manual... -
Page 93: Write Driver Parameters
And the parameters can be saved even power is off. 5.8.4 Restore default driver parameters The X&Y parameters of servo driver in the machine will be restored to their default values if you operate this item. BECS-D16 computerized embroidery machine owner’s manual... -
Page 94: Chapter 6 Assistant Operation
Chapter 6 Assistant Operation Chapter 6 Assistant Operation 6-1 Assistant embroidery operation Press the other function key in the main screen to enter assistant embroidery operation screen. If the frame origin has been set (see 6.2.3), in the status of embroidery confirmation, you can perform design start point operation. -
Page 95: Save Design Start
6.1.3 Auto to start position This function is used for locating design center to the frame software center set by the system (see 6.2.5) so that you can embroider the design to the center of the frame. BECS-D16 computerized embroidery machine owner’s manual... -
Page 96: Stitch Stop Down
Chapter 6 Assistant Operation 1. Follow the above instruction and enter assistant embroidery operation screen. 2. Move the cursor to “Auto to start position” and press “ ”. Press “ ”to confirm, then the system will find the centre of frame and move to that position;... -
Page 97: Setting Another Start
This function can only be used under the embroidery confirmation status and before embroidery. 1. Follow the above instruction and enter assistant embroidery operation screen. BECS-D16 computerized embroidery machine owner’s manual... -
Page 98: Set B Point
Chapter 6 Assistant Operation 2. Move the cursor to “set offset point” and press“ ”. 3. Move the frame to the offset point. The system will ask the user to move the frame to the offset point and display the coordinates of X and Y. - Page 99 (1) If B point is above the line, then frame will back to B after slow moving. There will be a long distance to go to the stop point after threading. BECS-D16 computerized embroidery machine owner’s manual...
-
Page 100: Operation On Afc, Sequin And Coiling Devices
Chapter 6 Assistant Operation (2)If B point is under the line, threading will be greatly influenced. 1、Frame 2、the best line for setting B point 3、edge of the table 6.1.7 Operation on AFC, Sequin and Coiling Devices For the machine attaching the devices for AFC, sequin or coiling, user can set that device via the controller 1. -
Page 101: View Embroidery Parameter
3. The system will show the current embroidery parameters. They include: design number, total embroidery stitch, free memory, cycle embroidery, frame origin, soft frame limit and offset point. Press to clear or press “ ”to return. BECS-D16 computerized embroidery machine owner’s manual... -
Page 102: View Statistics Information
Chapter 6 Assistant Operation 6.2.2 View Statistics Information 1. Press in the main screen to enter the “Other assistant operation” screen. 2. Move the cursor to “View Statistics Info” and press“ ”. 3. The system will show the machine’s statistics information. In the above screen, the statistics information is displayed in a chart. -
Page 103: Power Resume
BECS-D16 computerized embroidery machine owner’s manual... -
Page 104: Set Embroidery Scope In Software
Chapter 6 Assistant Operation 1. Press in the main screen to enter the “Other assistant operation” screen. 2. Move the cursor to “Power resume” and press“ ”. 3. Press “ ”to confirm or “ ”to return. If it is “auto” in “set frame origin”, the machine will automatically move to the frame origin point and then back to embroidering position before power-off. -
Page 105: Set System Clock
“Other assistant operation” screen. 2. Move the cursor to “set system clock” and press “ ”. 3. Use the digital key to input numbers; use to find the number you want; use to select option. BECS-D16 computerized embroidery machine owner’s manual... -
Page 106: Language Choice
Chapter 6 Assistant Operation 4. Press the key “ ”to confirm the modification, press “ ” to return without saving. 6.2.7 Language Choice The system supports Chinese, English, Spanish, Turkish and so on. 1. Press in the main screen to enter the “Other assistant operation” screen. 2. -
Page 107: Help
This operation is provided to maintenance engineers only. Embroidery workers don’t do this. This operation contains some mechanical work. Please pay attention to personal and equipment safety. This function is mainly used for machine test, maintenance and problem diagnose, including: BECS-D16 computerized embroidery machine owner’s manual... - Page 108 Chapter 6 Assistant Operation Number Machine Test Number Machine Test Test Encoder Test lift clamp foot Test main shaft Test Upper Thread Hold Function Rotate main shaft to fixed angle Sequin A send one sequin (from 100) Sequin B send one sequin Test the pull-bar Sequin C send one sequin Test the limit switches...
-
Page 109: Chapter 7 Other Operation
2. Press the digital key (Note: the number you input can not be over the needle number) and input the color-changing position. The color-changing position and relative order are displayed on the screen. When setting the repeated color-changing order, user can move the icon horizontally. BECS-D16 computerized embroidery machine owner’s manual... -
Page 110: Modify Color Line
Chapter 7 Other Operation If it is a special embroidery position or sequin embroidery position, the system will enter the selection window of sequin and special embroidery. For details, please refer to operations in related chapters. 3. Pressing “ ” or “ ”... -
Page 111: Replace A Needle
The needle bar color can be saved with the color-changing order. 1. Move the cursor to “set color of showing design” and press “ ”: There are altogether 40 different colors for you to choose. BECS-D16 computerized embroidery machine owner’s manual... -
Page 112: Design Border Operation
Chapter 7 Other Operation 2. First you should press to select the needle bar to be set, then press “ ” to select the desired color. Press“ ”to confirm the selection. After setting, the corresponding color will be displayed at the needle button. -
Page 113: Move The Frame Along The Boundary Of A Design
1. Move the cursor to “move the frame along the boundary of a design” and press “ ”: 2. Press “ ”to let the system go along the border, or press the key “ ”to cancel. 3. After finishing moving, system returns to the design border operation screen. BECS-D16 computerized embroidery machine owner’s manual... -
Page 114: Create Design From Outline
Chapter 7 Other Operation 7.2.3 Create design from outline This operation can create a new design with the outline of the selected design 1. In the main screen, you can move the cursor to “Create design from outline” and press “ ”: 2. -
Page 115: Embroider A "+" In Current Position
System will generate a temporary data of the “+” and return to the main screen. Now the label is displayed. You can pull bar to embroider a cross. After the embroidery, the system will return to the embroidery preparation status BECS-D16 computerized embroidery machine owner’s manual... -
Page 116: Frame And Embroider Back For One Line
Chapter 7 Other Operation 7.2.6 Frame and embroider back for one line 1. In design border operation, you can move the cursor to “Frame and embroider back for one line” and press “ ”. The system will display the start point of the frame-moving 2. -
Page 117: Embroider The Boundary Of Current Design
1. In design border operation, you can move the cursor to “Embroider true boundary of current design” and press “ ”: System will generate a temporary data according to the boundary design data and ask user to confirm. BECS-D16 computerized embroidery machine owner’s manual... -
Page 118: Positioning Idling
Chapter 7 Other Operation 2. Press “ ” to confirm and then system will return to the main screen. Now system displays on the main screen. Pull bar to embroider border, after that, system returns to the embroidery preparing status. 7-3 Positioning Idling This function is only available in embroidery confirmation status According to the user’s needs, this function enables to move the frame to the... -
Page 119: Go Back Stitches
2. Press the key“ ” System goes back to the main screen. You can pull bar right to idle to next code. Press “ ”to cancel. The other three positioning idling items is similar to above. BECS-D16 computerized embroidery machine owner’s manual... -
Page 120: Reset X/Y Displacements
Chapter 7 Other Operation 7-4 Reset X/Y Displacements This is to clear the X and Y displacements. Press “ ”on the keyboard, then the system will ask for user’s confirmation. You may press “ ”to set X and Y values as 0. Press the key “ ”to cancel. -
Page 121: Chapter 8 Memory Design Edition
”to edit the current design, press “ ”to edit new design. Note: the design you selected can not be combined design, or system will warn “It isn’t common design”. Design Editing Operation 8.2.1 Summary BECS-D16 computerized embroidery machine owner’s manual... -
Page 122: Document And View Operation
Chapter 8 Memory Design Edition Design preview window: use for preview design. In view, use “+”to mark the position of current needle. The needle trace of current stitch use white and outstanding manifestation. The scale information is displayed on the top-left while the positioning stitch type is shown at the top-right (use to shift);... -
Page 123: Key For Positioning Stitch And Editing Stitch
Click to move current stitch. Press direction key on the panel to move current stitch position. Press to change moving stitch speed status among high speed, middle speed and low speed. BECS-D16 computerized embroidery machine owner’s manual... - Page 124 Chapter 8 Memory Design Edition Press to add satin stitch at design trial continuously. Move coordinate index to proper position by pressing direction key. Press “ ”to add a stitch trace at present position; Move coordinate index continue to add more stitches. Press to switch coordinate index speed among high speed, middle speed and low speed.
-
Page 125: Chapter 9 Letter Design
After opening the window of parameter input, user can enter into pattern string input window automatically. Move the cursor to related parameters and press“ ” to adjust it. After adjustment, user can press “ ”again to save it. BECS-D16 computerized embroidery machine owner’s manual... - Page 126 Chapter 9 Letter Design 1. “Char string”: means the letter list that will be embroidered 2. “Font style”: means the letterform that is used for embroidering letter. The letterform selected here will be applied on all of the letters if necessary. (for the font adjustment of the single letter, please refer to the section of “create character pattern”).
- Page 127 And then, select one letter to adjust its arrangement parameter (Right buttons at screen). Character pattern display area: the central cross means coordinate, and the intersection is origin(0,0). The letters will surround the origin automatically. BECS-D16 computerized embroidery machine owner’s manual...
- Page 128 Chapter 9 Letter Design B. View and file operation Basic parameter operation of character string: it is used for setting the basic letter parameter operation. “Stitch/Outline”: show/hide stitch form, hiding stitch form can improve operation speed. “Zoom out": enlarge to show the window and to look into the detail part of the letter pattern.
- Page 129 “Radian reduces”: When user arranges the letter in arc, this parameter will reduce the radian of reference arc. “Whole anticlockwise rotate”: rotate for whole letter string in anticlockwise direction. BECS-D16 computerized embroidery machine owner’s manual...
- Page 130 Chapter 9 Letter Design “Whole clockwise rotate”: rotate for whole letter string in clockwise direction. "Extend letter space”: Increase the distance between the letter. “Reduce letter space”: reduce space between letters. D. Letter selection adjustment “Select switch”: switch the selected letter. User has to pick up a certain letter and then he can carry out the edition.
- Page 131 ”to return to the window of letter pattern input. If you need to change embroidery letter string, you can click this key to return to the previous screen to carry out the modification. All of adjustments for individual letter in this window will disappear. BECS-D16 computerized embroidery machine owner’s manual...
-
Page 132: Character Pattern Save
Chapter 9 Letter Design 9-3 Character Pattern Save After finishing letter pattern editor, user needs click key. Appoint the pattern number and patter name in the pop-up window, then click “ ”key to save. Click “ ”key to confirm saving. If it has no need to continue the edition of the letter pattern, please click “... -
Page 133: Chapter 10 Jf Type Sequin Embroidery
Design with Sequin codes has its own format. JF type multi-sequin embroidery of BECS-D16 machine is divided into two groups: one is normal multi-sequin design, made by normal design making method. -
Page 134: Embroider Sequin
Chapter 10 JF type sequin embroidery B. Features and Functions: 1. Two ways for sending sequin: Roller Type and Lever Type; Roller: the core part in the whole mechanism is a wheel-like device. Its operating principle is to rotate continuously towards in one direction so as to send sequins into position. -
Page 135: Input Sequin Design
For the normal sequin design, the changed sequin design will save all the multi-sequin as “A” type sequin. If you choose “No”, normal sequin design remains the normal sequin design, while special multi-sequin designs will be saved as special multi-sequin design automatically. BECS-D16 computerized embroidery machine owner’s manual... -
Page 136: Sequin Design Edition
Chapter 10 JF type sequin embroidery 10-4 Sequin design edition This function is to edit sequin design. All the designs will be saved as special multi-sequin design after edition, which don’t need set sequin mode at adjust the color-changing order. 1. - Page 137 12.7mm, or they are deemed as two groups) 4) Move the cursor to this menu and press “ ”to select sequins by color. This helps users to select all sequins with same color. BECS-D16 computerized embroidery machine owner’s manual...
- Page 138 Chapter 10 JF type sequin embroidery 4. Press key to enter “The way of viewing sequin design” screen 1) View all of sequins Select this menu and press “ ”to show all the sequins within the window. 2) Zoom in of the sequin Select this menu and press “...
- Page 139 Chapter 10 JF type sequin embroidery 6. Edition of Alternative Sequin You should first select a group of sequins or sequins with the same color, then press to edit. BECS-D16 computerized embroidery machine owner’s manual...
-
Page 140: Parameter Setting About Multi-Sequin Embroidery
Chapter 10 JF type sequin embroidery 1) to select sequin mode and press “ ”to confirm. Sequin name are A, B, C and D. If all four sequins are sent at same time, A will be on the top, then B, C and D. 2)... - Page 141 Note: the maximum speed of flat embroidery should be higher or equal to speed for sequin embroidery. Move the cursor to this parameter and press“ ”to enter it. Use modify the value and press “ ”to confirm. BECS-D16 computerized embroidery machine owner’s manual...
- Page 142 Chapter 10 JF type sequin embroidery (2) L/R Sequin Feeding Angle Adj. It is used for adjusting sequin feeding angle. (3) Auto start for sequin: When the setting is “Yes”, system will start embroidering sequin automatically. When the setting is “No”, machine needs manually start. (4) Time of Sequin Action: This is to set the time from sequin device going down to embroidery (0-15, the default value is 2).
- Page 143 The parameter is closely related to “left/right sequin device A/B/C/D size and color”. For example, “A size&color of R sequin” is set as “4mm X color”, then the corresponding sequin-feeding angle should use the value in “Set 4MM of R Sequin”. BECS-D16 computerized embroidery machine owner’s manual...
- Page 144 Chapter 10 JF type sequin embroidery Move the cursor to this parameter and press “ ”to enter. Use modify the feeding mode and press “ ”to confirm it. Then the system will automatically enter the screen for changing the sequin-feeding angle, where user can change value with the (15) A/B/C/D size&color of R/L sequin This parameter should be set according to the actual mechanical structure.
-
Page 145: Change Color Order And Set Sequin Mode
If it is single sequin device or special multi-sequin design, it will be not necessary to set it. For an example of the first needle position 1, then after you input 1, it will show: BECS-D16 computerized embroidery machine owner’s manual... - Page 146 Chapter 10 JF type sequin embroidery Setting of sequin-feeding mode: a) Press digital key confirm embroidery needle position, it will show “input sequin mode” at the position that has sequin device. b) Use to modify the delivery mode and press “ ”to confirm.
- Page 147 “AB” in “input sequin mode”, then press “ ”to confirm; ③ press“1”,then press “ ”to confirm; ④ You should use till you see “Over” in “input sequin mode”, then press “ ”to end setting。 BECS-D16 computerized embroidery machine owner’s manual...
- Page 148 Chapter 10 JF type sequin embroidery (3) ① press 9,it will show sequin delivery mode screen; ② Use till you see “B” in “input sequin mode”, then press “ ”to confirm; ③ press“1”,then press “ ”to confirm; ④ You should use till you see “C”...
-
Page 149: Manual Operation Of Sequin Embroidery
• Thread-breakage switch is embroidery switch. When it is at the down side, neither flat embroidery nor sequin embroidery is available. • Thread-breakage warning lamp is mounted on the sequin sending device, which offers the operator with easy view. BECS-D16 computerized embroidery machine owner’s manual... -
Page 150: Debugging Multi-Sequin Embroidery
Chapter 10 JF type sequin embroidery Note: when the manual valve control switch is in the middle, blue lamp is on, which indicates a normal condition of sequin embroidery. Location of the sequin switch board 10-8 Debugging multi-sequin embroidery 1. Separated debugging 1)... -
Page 151: Sequin Mending
(on mending head) go down for mending. When it reaches the thread-breakage point, machine stops, then other sequin devices will go down to continue normal embroidery. “Patch count” in machine parameter setting is ineffective in sequin mending. BECS-D16 computerized embroidery machine owner’s manual... -
Page 152: Chapter 11 Operation Of Cording Embroidery
Operation of Cording Embroidery Chapter 11 of Cording Embroidery Chapter 11 Operation 11-1 Functions 1. Cording Embroidery (ZIG Embroidery): this function is to make the bobbin thread form the design with certain stitch forms, which have been saved in the computer in advance, the Z4 and Z5. -
Page 153: Related Parameters And Their Setting
Angle = Parameter value *0.9. For example, if the parameter value is 30, the angle will be 30*0.9=27°. 10. Origin of Left Cording Device: 0 (Default Value). This is for the angle between the BECS-D16 computerized embroidery machine owner’s manual... -
Page 154: Relative Operations Of Cording Embroidery
Operation of Cording Embroidery Chapter 11 threading point and the direction of the mechanical origin of cording device at last needle position. Angle = Parameter value *0.9. For example, if the parameter value is 30, the angle will be 30*0.9=27°. 11. - Page 155 “1” (special embroidery machine head) to change the cording embroidery mode: Press relative icon to select the embroidery mode you need, otherwise press the key to exit. After user saves the changes, system will display as follows: BECS-D16 computerized embroidery machine owner’s manual...
-
Page 156: M Axis Operation Of Cording Embroidery
Operation of Cording Embroidery Chapter 11 Sepcil Sepcil embroidery needle embroidery mode During the embroidery, when the special embroidery head finishes the work, the machine will stop at the end point. At this moment, the system will display “embroidery pause, pull bar to continue” and wait for the operation of the string. After that, user need pull bar to continue. - Page 157 M axis rotate to the right and it will rotate 18° every time you click the button. After clicking 20 times, it will return to its origin. Click the key to exit. BECS-D16 computerized embroidery machine owner’s manual...
-
Page 158: Chapter 12 Directions On Coiling, Taping And Zigzag Embroidery
Directions on Coiling, Taping and Zigzag Embroidery Chapter 12 Chapter 12 Directions on Coiling, Taping and Zigzag Embroidery 12-1 Function Introductions 1. Coiling function: This is a method to wind core thread in a form of coiling. Left Coiling (clockwise) and Right Coiling (counterclockwise) are both available in coiling function, which is decided by the setting of parameters. -
Page 159: Main Technical Specification
2. Speed of special Embroidery: 300—600rpm, adjusting step at 10r/m. 3. Manual rotating angle of M-axis: 18°/step. 12-3 Parameters and setting Press the parameter-setting key in the main screen and click “ ” 、 enter “Special Embroidery Parameter” Press to shift page. BECS-D16 computerized embroidery machine owner’s manual... - Page 160 Directions on Coiling, Taping and Zigzag Embroidery Chapter 12 ”to input or select the Move icon to the corresponding parameter and press“ ” to save the setting or“ ”to cancel it. For the relating value. Press“ information of each parameter, please refer to appendix 1. The remarks of these parameters are at below: 1.
- Page 161 It is used for adjusting the embroidery quality. “1” means the swing starts at an early angle; “2” means the swing postpones certain angle; “3” indicates the swing postpones certain angle again and starts. BECS-D16 computerized embroidery machine owner’s manual...
-
Page 162: Relative Operations Of Special Embroidery
Directions on Coiling, Taping and Zigzag Embroidery Chapter 12 10. C36 Ratio of Coil Emb. (The ratio of coiling) : “1~4 Sti/L” The parameter can change the coiling density; e.g. the set value 2 means one coiling every two stitches. 12-4 Relative Operations of Special Embroidery 12.4.1 Shift between Flat Stitch Head and Special Head 1. - Page 163 (special head) to change special embroidery mode: Press relative icon to select the embroidery mode you need. Press “ ” to save the changes, or press “ ”to exit. After user saves the changes, system will display as: BECS-D16 computerized embroidery machine owner’s manual...
-
Page 164: M Axis Operation Of Special Embroidery
Directions on Coiling, Taping and Zigzag Embroidery Chapter 12 Sepcil Sepcil embroidery needle embroidery mode Note: Icon “ MANUAL” means that system go into manual shift status. The still in effect when system is in automatic shift status. During the embroidery, when the special head finishes the work, the machine will stop at the end point. -
Page 165: Operations Of Clamp Foot
” to lift the clamp foot, select “ ”to exit. Press the key and select“Nipple down”and “ ”to activate the operation window. Click “ ” to lower the clamp foot, select “ ”to exit. BECS-D16 computerized embroidery machine owner’s manual... -
Page 166: Debugging Special Embroidery
Directions on Coiling, Taping and Zigzag Embroidery Chapter 12 12-5 Debugging Special Embroidery Debugging special embroidery mainly includes Zigzag swing to its origin and test of clamp foot action. In the main screen, click Then move icon to “Machine Test” and click “ ”... -
Page 167: Mechanical Category And Driving Mode Selection For Special Embroidery Machines161
E axis devices can be divided to the following types: 1) Driven by stepping motor separately, without proximity switch for positioning origin 2) Driven by stepping motor collectively, with proximity switch for positioning origin BECS-D16 computerized embroidery machine owner’s manual... - Page 168 Directions on Coiling, Taping and Zigzag Embroidery Chapter 12 3) Driven by stepping motor collectively, without proximity switch for positioning 4) Driven by servomotor, with proximity switch for positioning origin 3. Clamp foot axis The working progress of the special clamp foot is shown at below: (The clamp foot working height is the distance of the foot’s movement at every stitch.
- Page 169 Transmitted by pneumatic motor separately, without proximity switch. In this mode, the clamp foot working height relies on the rotation of the cam and the clamp foot is raised to the limited height by pneumatic motor that drives the heads separately. BECS-D16 computerized embroidery machine owner’s manual...
-
Page 170: Chapter 13 Instruction On Operating High-Efficiency System
Chapter 13 Instruction on Operating High-Efficiency System Chapter 13 Instruction on Operating High-Efficiency System 13-1 Descriptions of Parameters in High- Efficiency Mode With the new speed control solution at the main software of high-efficiency system, client only needs adjust the parameters within the “High-Efficiency Mode”, to receive the speed parameter in the high-efficiency mode. - Page 171 Chapter 13 Instruction on Operating High-Efficiency System 2. Have access to the interface for setting the main shaft speed, input passwords (Dahao general password or special passwords customized by manufacturer) and set the Max Speed to 850 or other values.
- Page 172 Chapter 13 Instruction on Operating High-Efficiency System 4. Have access to setting interface BECS- D16 computerized embroidery machine owner’s manual...
- Page 173 Clients only need set the “High-efficiency Mode” at “No”, the parameters at the speed setting interface, such as “Max Speed”, “Min Speed” and “Shift Stitch Length” will be changeable. BECS-D16 computerized embroidery machine owner’s manual...
-
Page 174: Chapter 14 Updating Control Program
Chapter 14 Updating Control Program Chapter 14 Updating Control Program Updating Operation: 14-1 Update Data Software (Upper Machine) 1. Hold the button “8”, at the same time turn on the power: 2. The screen shows the following picture, select the first “updating data program”... - Page 175 Chapter 14 Updating Control Program 3. Select the “updating from USB” and press enter key: 4. Select the inserted USB disk, then press enter key: BECS-D16 computerized embroidery machine owner’s manual...
- Page 176 Chapter 14 Updating Control Program 5. Select the data software file, such as:D16-D001A11: 6. Press enter key to confirm the updating : BECS- D16 computerized embroidery machine owner’s manual...
-
Page 177: Updating Control Program (Down Machine)
Chapter 14 Updating Control Program 7. The screen will show “restart” when update is finished. Please turn off power: 14-2 Updating control program (Down Machine) 1. Please press the button“ 8”, at the moment turn on the power: BECS-D16 computerized embroidery machine owner’s manual... - Page 178 Chapter 14 Updating Control Program 2. The screen shows the following picture, select the second “updating control program” and press enter key: 3. Select the “updating from USB” , then press enter key: BECS- D16 computerized embroidery machine owner’s manual...
- Page 179 Chapter 14 Updating Control Program 4. Select the inserted USB disk , then press enter key: 5. Select the control software file, such as:DX64MQ0EI4411: BECS-D16 computerized embroidery machine owner’s manual...
- Page 180 Chapter 14 Updating Control Program 6. press enter key to confirm the updating: 7. The screen will shows “restart” when updating is finished, please turn off power and restart: BECS- D16 computerized embroidery machine owner’s manual...
-
Page 181: Chapter 15 Updating Peripheral Equipment Program
” key in the main screen to move the cursor to , and press “ ” key: Press " " to move the cursor to " Management of Machine I/O Boards ", and press " " key: BECS-D16 computerized embroidery machine owner’s manual... - Page 182 Chapter 15 Updating Peripheral Equipment Program 3. Please input password, and press " " key: 4. Press " " to move the cursor to " Update Head Board Software ", and press " " key. BECS- D16 computerized embroidery machine owner’s manual...
- Page 183 5. At main interface , move the cursor to " " , Equipment is the USB , and press " " key. 6. Press " " select the software for update , and press " " key. BECS-D16 computerized embroidery machine owner’s manual...
- Page 184 Chapter 15 Updating Peripheral Equipment Program 7. Turn up "Update Software of Peripheral board",and press " " key. 8. Wait for updating software. And the screen will display "Success" when updating is finished. BECS- D16 computerized embroidery machine owner’s manual...
-
Page 185: Appendix Ⅰ Parameter Setting List
If “No”, the empty stitches won’t be omitted. Do Filter No, Yes It is fit for high-speed Short Stitch machine using dahao servo-motor driver. It only get effective after user confirm the embroidery again. BECS-D16 computerized embroidery machine owner’s manual... - Page 186 Appendix Ⅰ Parameter Setting List Length of 0.2mm 0.1mm~0.6mm The same as above Filter Short Stitch Long Stitch No, Yes The same as above Do Auto Jump Stitch Len of The same as above No ,3mm~11mm Auto Jump Satin Sti, No, Yes Comp.
- Page 187 Frame Angle machine using Dahao servo-motor driver. X direction 230~280 The same as above. Frame Angle Y direction 230~280 The same as above. Frame Angle Y direction 230~280 The same as above. Frame Angle BECS-D16 computerized embroidery machine owner’s manual...
- Page 188 Appendix Ⅰ Parameter Setting List X Backlash 0.0mm 0.0~1.0mm Correction Y Backlash 0.0mm 0.0~1.0mm Correction Over frame No, Yes by Step Speed When 0,1,2…30 Over frame High 1~30 Frame-Shift Speed 1~30 Frame-Shift Speed (AFC) Use No, Yes (AFC) 0~15 Interval Time Machine Plain, hat, Clothes Embroidery...
- Page 189 Needle Trim 3 Stitch No Trim, 1 Sti.~7 Sti. Jump & Trim Lengt 1 is the min trimming length <any> Any,1~6 h of and 8 is the max trimming Needle Trim length. Length Trim BECS-D16 computerized embroidery machine owner’s manual...
- Page 190 Appendix Ⅰ Parameter Setting List Lock Stitch 0.3~2.0 Len Bef Trim Lock Stitch Num Bef Trim Speed When 80,90,100…250 Trimming Lock Stitch. No, Yes When Trim Length of 0.3~1.5 Lock Sti. (mm) Lock Num. Set the lock stitch number After Trim when pulling the bar for embroidery after setting the trimming.
- Page 191 T.B. of the sequin device after the thread-breakage. Sequin Ind. No, Yes UpDown Up Valve No, Yes When Jump & Nocut R Motor 6~40 Shift Stroke Base R Motor 1~30 Shift Stroke Time BECS-D16 computerized embroidery machine owner’s manual...
- Page 192 Appendix Ⅰ Parameter Setting List With Origin at R Motor Shift R Knife Start 0~31 Angle Adj L Sequin 6~40 Feeding Angle Ad L Motor Shift 1~30 Stroke Time With Origin at L Motor Shift L Knife Start 0~31 Angle Adj Bead-breakag 0~10 e Detection...
- Page 193 L Sequin Red/ Golden/ Silver/Cyan Sequin Gap No, 1,2 Num of L Sequin Valve Time of Left Sequin Special Embroidery Parameter Check No, Yes A_ZIG' LOOSING- MOTOR A_ZIG great efficiency mode BECS-D16 computerized embroidery machine owner’s manual...
- Page 194 Appendix Ⅰ Parameter Setting List A_ZIG EMB. No, Yes R ON/OFF A_ZIG EMB. No, Yes L ON/OFF A_ZIG EMB. ON/OFF TIME A_ZIG SWING 0~125 ANGLE A_ZIG EMB. 300~850 SPEED A_ZIG EMB. No, Yes LOOSING- MOTOR LOOSING- MOTOR 0~15 PARAM A_ZIG 5 SWING -10.0~10.0 ANGLE...
- Page 195 Slow Down No, Yes When Coil Machine &Maintenance Parameter Needles 1,2…15 Set the value according to the machine situation. E.g. the value should 9-needle machine. If the value is different from the machine needles, the BECS-D16 computerized embroidery machine owner’s manual...
- Page 196 Appendix Ⅰ Parameter Setting List color-changing will abnormal. Machine 1~80 Head Num Adjust Head 0,1,2…30 Solenoid Color-Chang 0~30 It’s valid only when the e Speed color-changing motor is stepping motor. The larger the value, the faster the color changes. DIP1 0~255 DIP2 0~255...
- Page 197 93~650 X Embroidery Param 93~650 X Frame -moving Param 6~50 X Frame -moving Param 10~50 X Parameter 1 10~50 X Parameter 2 10~50 X Parameter 3 10~50 X Parameter 4 10~50 X Parameter 5 BECS-D16 computerized embroidery machine owner’s manual...
- Page 198 Appendix Ⅰ Parameter Setting List 10~50 X Parameter 6 X Parameter 7 10~50 X Parameter 8 10~50 10~50 X Parameter 9 10~50 X Parameter 10 10~50 X Parameter 11 X Gear 0~50 Blacklash compensation 0~100 X CMR 1~255 X CMD -10~10 X Mofidy All Paramenters...
- Page 199 Lock Shaft No,Yes When Stop Drive 0℃ Temperature Motor 0℃ Temperature Drive Voltage Servo Driver Test Write Servo Driver Param. Read Servo Driver Param. Reload Default Driver Param. Rotate main shaft to fixed angle BECS-D16 computerized embroidery machine owner’s manual...
-
Page 200: Appendix Ⅱ Directions On Usb Operations
Appendix Ⅱ Directions on USB operations Ⅱ Appendix Directions on USB operations Operation Direction Remark Read & Write USB Same as floppy disk Priority Supporting format FAT16 and FAT32 Long filename Support but no display For instance: “清 明上河图.DST” DOS 8.3 mode(8 digit prefix is Filename display viewable, suffix is 3 digits)... -
Page 201: Appendix Ⅲ Error Information & Instruction Of System Level Mistake
Design file not existed Design name is invalid Design file corrupt Error read/write design Not open design file Error read FLASH media Device not existed! No floppy disk Invalid disk type Disk sector error BECS-D16 computerized embroidery machine owner’s manual... - Page 202 Appendix Ⅲ Error Information Mistakes File not in disk Not a file File corrupt disk write protect Invalid directory File existed! Directory is full in memory. Not enough space Not open media Error design data Invalid design type Not normal design Not combined design Please wait design operation Cannot delete emb.
- Page 203 This phenomenon may have two causes, one is not updating the data program, the other is the chip on E8820 board is damaged. Therefore the solution of it is to re-update the data program. If the problem still exists after the update, please replace the E8820. BECS-D16 computerized embroidery machine owner’s manual...
-
Page 204: Appendix Ⅳ Make Special Multi-Sequin Design
For instance, it can not recognize it’s a sequin A or B at one stitch position. Dahao special multi-sequin design-making principle is to add a few jump stitch codes after the original sequin code(jump stitch or stitch length is less than 0.1mm)to indicate... - Page 205 We here take sequin B designing as an example. 1) Open any design making software. Firstly, we zoom in the blank to certain scale (it is for easily inputting sequins in a same place) and enter sequin status. 2) Input a sequin. BECS-D16 computerized embroidery machine owner’s manual...
- Page 206 Appendix Ⅳ Make Special Multi-Sequin Design 3) Since the value of sequin B is 2, we should put 2 sequins in here, which means, we have to add another sequin. BECS- D16 computerized embroidery machine owner’s manual...
- Page 207 4) Continue to type in other single-stitches. 5) You can see “stitch list” shows 2 sequins as the following image. 6) Select all stitches. 7) Making Motif, group is JP, name is JP-B 8) Input two reference points. BECS-D16 computerized embroidery machine owner’s manual...
- Page 208 Appendix Ⅳ Make Special Multi-Sequin Design Single needle multi-sequin, you can use “Stitch form -> Motif -> 3、 Apply”. Then “manual stitch” to finish entering. BECS- D16 computerized embroidery machine owner’s manual...
- Page 209 Others (curve) can apply trace too. 1) Click sequin button to enter “sequin status” (this is to ensure all the curve section have sequin, it is of importance.). Input the curve as the following. 2) Select a target. BECS-D16 computerized embroidery machine owner’s manual...
- Page 210 Appendix Ⅳ Make Special Multi-Sequin Design 3) Set “target properties” and select related trace. BECS- D16 computerized embroidery machine owner’s manual...
- Page 211 A1B1 embroidery can realize embroidery effect of A, B, A, B… 1) Firstly, you should make the alternative motif (the A1B1), as shown in below: 2) Apply the above motif to achieve alternative A1B1, as shown in below. BECS-D16 computerized embroidery machine owner’s manual...
- Page 212 Appendix Ⅳ Make Special Multi-Sequin Design 6、 Design maker should build up design data base Now we have sequins: 3MM, 4MM, 5MM, 6.75MM and 9MM. while the first needle position can have 4 sequin delivery devices at most. So we can get the following 15 combinations: A,B,AB,C,AC,BC,ABC,D,AD,BD, ABD,CD,ACD,BCD,ABCD.
- Page 213 A, AB, A, AB… 7、 Turn normal sequin design to Dahao special sequin design According to the above rules, we just need insert some jump stitch after “sequin code” , so that we can change the original sequin code to “multi-sequin code”.
- Page 214 Appendix Ⅳ Make Special Multi-Sequin Design You can see the stitch list as the following image. The first sequin is overlap A+B, the second one is sequin A. Save as the TAJIMA DST document. BECS- D16 computerized embroidery machine owner’s manual...
-
Page 215: Appendix Ⅴ Network Connection Of Embroidery Machines
Shown in the following picture: One terminal The other terminal Usage: a. Link switch or HUB to router b. Link computer (including server and workstation) to switch or HUB BECS-D16 computerized embroidery machine owner’s manual... - Page 216 Appendix Ⅴ Network Connection of Embroidery Machines 2、 Making crossover cable 1-3, 2-6 crossover connection: Twisted-pair cable has 4 pairs of pins (8 pins). Only 4 pins are used in network in the matter of fact, namely the first, second and third, sixth pins.
- Page 217 One IP address includes 4 decimal integers partitioned by decimal points. Each integer is in fact composed of 8 binary numbers. So the maximum of each integer is 255 and the minimum is 0. BECS-D16 computerized embroidery machine owner’s manual...
- Page 218 Appendix Ⅴ Network Connection of Embroidery Machines 3) Structure and classification of IP The four numbers of IP address can be divided into 2 parts. One is network number for marking the network. Another is computer number for marking the specific machine in one network.
- Page 219 2, this data packet has to be sent to the router linked to us. It’s like in BECS-D16 computerized embroidery machine owner’s manual...
- Page 220 Appendix Ⅴ Network Connection of Embroidery Machines sending by post that you only need to deliver a letter to postman instead of delivering by yourself. So when the computers are not in the same network segment, the gateway also has to be set properly in setting computers. Otherwise computers don’t know where to deliver the data packet.
- Page 221 For the usage and installation of EmbNetServer, please refer to the CD with embroidery machine. 3、 Server Port Number This parameter value is the port number used by EmbNetServer. The number can be found in the display window of EmbNetServer. 4、 IP address of embroidery machine BECS-D16 computerized embroidery machine owner’s manual...
- Page 222 Appendix Ⅴ Network Connection of Embroidery Machines It is the IP address of embroidery machine when it’s linked with PC. The IP addresses of embroidery machines can’t be repeated. The network numbers of embroidery machines and PCs within one sub network have to be the same. And their computer numbers have to be different.
Need help?
Do you have a question about the BECS-D16 and is the answer not in the manual?
Questions and answers