Table of Contents
Advertisement
Quick Links
PCE Americas Inc.
PCE Instruments UK Ltd.
711 Commerce Way
Units 12/13
Suite 8
Southpoint Business Park
Jupiter
Ensign way
FL-33458
Hampshire / Southampton
USA
United Kingdom, SO31 4RF
From outside US: +1
From outside UK: +44
Tel: (561) 320-9162
Tel: (0) 2380 98703 0
Fax: (561) 320-9176
Fax: (0) 2380 98703 9
info@pce-americas.com
info@pce-instruments.com
www.pce-instruments.com/english
www.pce-instruments.com
Manual
Wind Measurer PCE-WL 2
Version 1.0
Date of creation: 20.03.2015
Date of last change: 08.12.2015
Advertisement
Table of Contents

Related Manuals for PCE Americas PCE-WL 2


Summary of Contents for PCE Americas PCE-WL 2
- Page 1 From outside UK: +44 Tel: (561) 320-9162 Tel: (0) 2380 98703 0 Fax: (561) 320-9176 Fax: (0) 2380 98703 9 info@pce-americas.com info@pce-instruments.com www.pce-instruments.com/english www.pce-instruments.com Manual Wind Measurer PCE-WL 2 Version 1.0 Date of creation: 20.03.2015 Date of last change: 08.12.2015...
-
Page 2: Table Of Contents
Setup by means of the terminal programme (for experts) ............. 9 How to read out data from the memory card ................13 Evaluation by means of the WindSpeedAnalyser ..............13 How to import records into Excel ....................14 Contact ........................18 PCE Instruments UK ........................ 18 PCE Americas .......................... 18... -
Page 3: Introduction
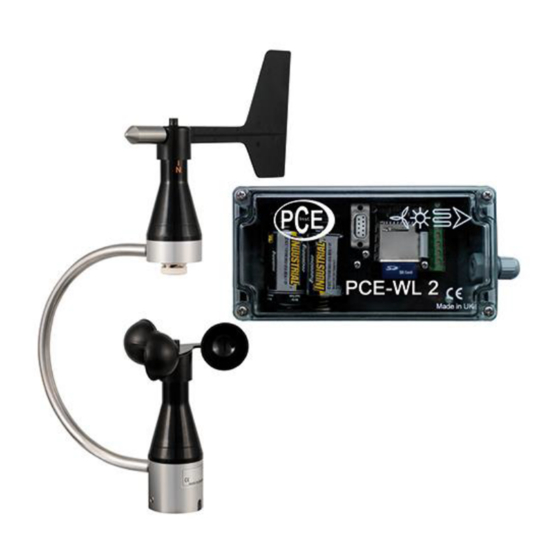
Thank you for purchasing a wind logger PCE-WL2 from PCE Instruments. The wind logger PCE-WL 2 is used to determine and analyse the current wind situation before putting wind energy plants into service. The wind sensor saves measured data on wind direction as well as wind velocity to an SD memory card. -
Page 4: Specifications
Manual Specifications Wind logger Memory SD/MMC card (FAT16/32) Power supply 2 x 1.5 V C type batteries Operating conditions -15 ... + 50 °C Inputs 1x analogue input 2x digital input Interface RS232 Recording interval 10 seconds, 1 minute or 10 minutes Storage medium SD memory card (max. -
Page 5: System Description
Manual System description Installation of hardware 4.1.1 How to open the case and install the cable Open the case of the wind logger by loosening four screws at its corners by means of a screwdriver. You can now see the circuit board of the data logger. The next step is to install the cable. To do so, open the PG gland and remove the sealing ring. -
Page 6: How To Connect The Sensor
Manual Now you can insert the cable into the case through the gland and fix the nut. 4.1.2 How to connect the sensor The connector block of the sensors is fixed to the main circuit board. The connectors on the main circuit board have the following functions: From left to right: ground... -
Page 7: How To Mount The Waterproof Box To The Wall
Manual We recommend to use tweezers or long nose pliers for installation. Note: The green and the green-yellow cable are not connected. We recommend to insulate the ends of both cables. 4.1.3 How to mount the waterproof box to the wall As there are 4 prepared holes, the PCE-WL2 can easily be mounted to a wall. -
Page 8: Setup Of The Wind Logger Pce-Wl2
Manual LED off: The logger is in normal data storage mode. The LED flashes in the recording interval you set up. If the set interval is 10 seconds, the LED flashes every 10 seconds. If the set interval is 1 minute, the LED will flash every minute. -
Page 9: Setup By Means Of The Terminal Programme (For Experts)
Manual After making all settings, click on the “Write setup file” button to save the settings. You can now remove the SD card from the PC and insert it into the logger again. Data storage will start automatically. The flashing LED in the set recording interval indicates that the wind logger works properly. 5.2.2 Setup by means of the terminal programme (for experts) The PCE-WL2 data logger has an integrated menu which can easily be configured by means of a... - Page 10 Manual Click on “Configure”: Confirm by clicking on “OK”. 5.2.2.2 How to start the menu Make sure that the SD card is not inserted in the SD card slot and that the wind logger is supplied with voltage. Otherwise the SD card must be removed and the device must be supplied with voltage. Press “M”...
- Page 11 Manual 4 – Back You now have the opportunity to change the interval in line with your requirements. Select the suitable interval by means of the related number and confirm with “ENTER”. When the settings are finished, you will return to the main menu. Note: The value in brackets is the recording interval which is currently set.
- Page 12 Manual 6 - Wind direction calibration Select option and press Enter Enter date dd/mm/yy Enter the date in the indicated format (dd = day, mm = month, yy = year) and press „ENTER“. Example: 09/01/13 Note: The date must be entered with a “/”. Otherwise, you must repeat the setting. Attention: As soon as the batteries are removed, date and time are reset.
-
Page 13: How To Read Out Data From The Memory Card
Manual How to read out data from the memory card When you want to remove the card from the device, make sure that no data are saved to the SD card at that moment, which is indicated by the LED flashing in the recording interval. In order to start data recording again, you only have to insert the memory card into the device again. -
Page 14: How To Import Records Into Excel
Manual How to import records into Excel You can find the Excel programme on the SD card, in the folder “analysis tool”. Open the Excel file by double-clicking on it and follow the instructions. Important: only suitable if the sampling rate exceeds 1 minute. If the sampling rate is lower, there will be no date column. - Page 15 Manual Import file with measurement data The import must start at row 3 (in order not to import the headings)
- Page 16 Manual Click on “Next” If required (e. g. in some European countries), select “comma” as your delimiter. Click on “Next”.
- Page 17 Manual In step 3, select “Advanced”. As decimal separator, select the point or comma, as required. As thousands separator, select the comma or point, as required. If you wish to insert the data into the existing worksheet, starting from A2, use the formula $A$2 Confirm by clicking on “OK”.
-
Page 18: Contact
PCE Instruments UK Ltd. Units 12/13 Southpoint Business Park Ensign Way, Southampton Hampshire United Kingdom, SO31 4RF By phone: 02380 987 035 PCE Americas By post: PCE Americas Inc. 711 Commerce Way Suite 8 Jupiter 33458 FL By phone: 561 320 9162...
Need help?
Do you have a question about the PCE-WL 2 and is the answer not in the manual?
Questions and answers