
Subscribe to Our Youtube Channel
Related Manuals for Curtis GEM-12D


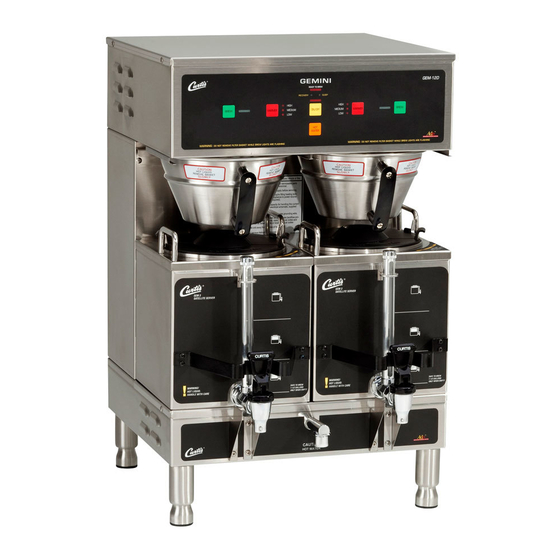
Summary of Contents for Curtis GEM-12D
-
Page 1: Installation Instructions
Installation Instructions Service & Warranty Information Revised: Jan. 2009 MODELS INCLUDED GEM-12D GEMINI DIGITAL ® COFFEE BREWING SYSTEMS WILBUR CURTIS COMPANY • MONTEBELLO, CA USA ISO 9001 REGISTERED... -
Page 2: Table Of Contents
IMPORTANT SAFEGUARDS/CONVENTIONS This appliance is designed for commercial use. Any servicing other than cleaning and maintenance SAFEGUARDS/ should be performed by an authorized Wilbur Curtis service center. CONVENTIONS • Do NOT immerse the unit in water or any other liquid •... -
Page 3: Contents & Unpacking
CONTENTS SHIPPING CARTON CONTENTS & UNPACKING UNPACKING All products manufactured by the Wilbur Curtis Company are thoroughly inspected at the factory, and are UNPACKING warrantied to be free of all defects and faulty workmanship. These brewers are packaged for maximum protection during shipping. -
Page 4: Quick Start And Set-Up
QUICK START & Your Curtis ADS System is Factory Pre-Set and Ready to Go… Right from the Carton. SET-UP ® Following are the Factory Settings for your GEMINI Coffee Brewing System: • Brew Temperature = 200°F • Brew Volume = Set to dispensing vessel requirements (36 - 5 oz. Cups) •... -
Page 5: Brewing Instructions
BREWING INSTRUCTIONS 1. Brewer should be ON (Confirm Rear Toggle Switch is on, then Press ON/OFF Button) WARNING: To avoid 2. Place an empty Satellite on the brewer deck. scalding, do NOT 3. Place Filter and Ground Coffee in Brew Cone. Position into brew rails. remove brew cone while brew indicator 4. -
Page 6: Bypass Operation & Adjustment
COFFEE Curtis ADS Systems are designed to brew any type of ground coffee except instant or concentrated liquid coffee. Because so many different types of coffee are available today, you should consult your coffee sup- REQUIREMENTS... -
Page 7: Programming
STEPS TO REMEMBER… YOUR CURTIS ADS SYSTEM HAS BEEN FACTORY PRE- SET FOR OPTIMUM PERFORMANCE. GENERALLY THERE WILL NOT PROGRAMMING BE A NEED TO CHANGE PROGRAMMING. In order to change programming you must first confirm that the Sleep Mode is DISABLED. (p8) CHANGING THE ADS™... - Page 8 SleeP moDe – Factory Pre-Set to Disabled Your Curtis ADS System features an energy saving SleeP mode. This function conserves energy by auto- matically placing the unit to sleep (reducing heating tank temperature to 140°F) when it is idle for more than 2 hours.
- Page 9 Satellite WarmerS adjuSting the temperature gemini Warmers feature three temperature settings. Warmers are rated at 90W with high (100%); med (60%); low (30%). pressing the Warmer button once will place it on high; a second time med; third time lOW as indicated by the warmer lights. a fourth press of the button turns the warmer OFF.
-
Page 10: Care & Maintenance
CARE & REGULAR AND PREVENTIVE MAINTENANCE IS ESSENTIAL IN KEEPING YOUR ADS SYSTEM LOOKING AND WORKING LIKE NEW. MAINTENANCE – PREVENTIVE MAINTENANCE 1. Remove spray head from the brewer and clean it weekly or more often in heavy lime areas. 2. -
Page 11: Troubleshooting Guide
Ready-to- with the water supply or electrical power, noT directly associated with a fault of the Curtis system itself. An example Brew light. If an... -
Page 12: High Temperature Thermostat
Water Level SYMPTOM: WATER NOT FLOWING FROM SPRAYHEAD ERROR CODE POSSIBLE CAUSE SOLUTION 14. Obstructed Sprayhead Remove and inspect sprayhead. Clean and re-install. 15. Water level is too low Check water level in tank. If water is not flowing in heating tank into the tank, review steps 1 thru 4. -
Page 13: Rough-In Drawings
ROUGH-IN DRAWING GEM-12D 18.00" 16.50" 3.75" [45.7 cm] [41.9 cm] [9.4 cm] 9.00" [22.9 cm] POWER IN 1.50" [3.8 cm] 1.00" [2.5 cm] CIRCUIT BREAKER 25.00" [63.5 cm] 12.50" [31.8 cm] 16.25" PWR SW 9.00" [41.2 cm] PWR IN [22.9 cm] 14.25"... -
Page 14: Electrical Schematics
ELECTRICAL SCHEMATICS... - Page 15 ELECTRICAL SCHEMATICS...
-
Page 16: Parts Diagrams
PARTS DIAGRAMS GEM-12D... -
Page 17: Parts List
HEAT SINK, 1PH GEM WC-5829 COVER, FRONT GEM-12D WC-1501 FUSE HOLDER ASSY W/5A FUSE WC- 102 SWITCH, TOGGLE WC-39197 LABEL, MEMBRANE CONTROL PANEL GEM-12D WC- 670 CONTROL BOARD WC- 847 VALVE, INLET WC-3765L KIT, INLET VALVE REPAIR USE ON WC-847 WC-29025... -
Page 18: Satellites & Warmer Stands
PARTS DIAGRAMS GEM-3, SATELLITE COFFEE SERVER GEM-5, SATELLITE WARMER GEM-8, SATELLITE WARMER SHORT Nº Part Nº Description WC-5622 LID, SATELLITE PLASTIC GEM3 WC-3307 LID, SATELLITE STAINLESS (OLDER UNITS) WC-2102 GAUGE GLASS ASSEMBLY 8” WC-2005* WASHER, SHIELD CAP 1/8” WC-2010C SHIELD, 8 INCH GAUGE GLASS WC-2025* GAUGE GLASS, 8 INCH WC-2006*... -
Page 20: Warranty
Curtis equipment that have not been purchased from the Wilbur Curtis Company, Inc. The Wilbur Curtis Company will not accept any responsibility if the following conditions are not met. The warranty does not cover and is void under the following circumstances: 1) Improper operation of equipment: The equipment must be used for its designed and intended purpose and function.
Need help?
Do you have a question about the GEM-12D and is the answer not in the manual?
Questions and answers