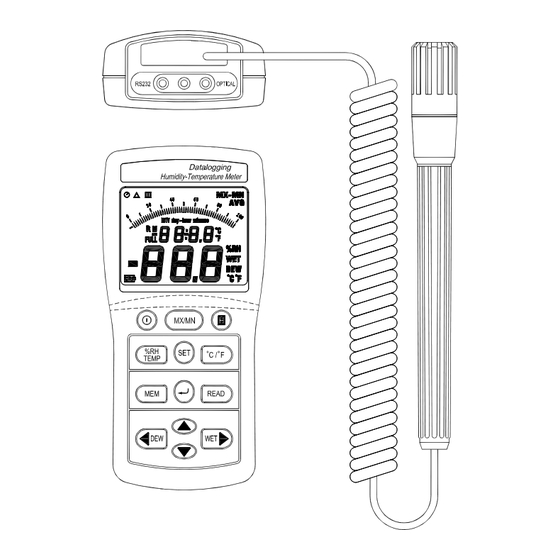
Summary of Contents for RS RS-1365
- Page 1 RS Stock No.712-6042 Instruction Manual RS-1365 Auto-timer Datalogging Temperature / Humidity Meter...
-
Page 2: Table Of Contents
TABLE OF CONTENTS / EN TABLE OF CONTENTS TITLE PAGE 1. SPECIFICATIONS............1 2. FRONT PANEL DESCRIPTION........3 3. MEASURING PROCEDURE........6 4. MAINTENANCE ............16 5. RECALIBRATION PROCEDURE ......17 10/15/10 Version No. 00... -
Page 3: Specifications
95% RH to 45% RH ≦3 min. Temperature: 10°C / 2 sec Sampling rate: 2 times per second. Manual data memory capacity: 99 sets. Auto data memory capacity: 15000 sets. RS-232 to USB optical interface jack. Auto power-off time: 30 minutes. 10/15/10 Version No. 00 EN-1... - Page 4 -10 to 60°C, below 70% RH. Power supply: Qty 6 x 1.5V size AAA batteries. Battery life: Approx. 200 hours. Weight: 235g Dimensions: 150x72x35 mm Supplied accessories: Instruction manual, Qty. 6x1.5V AAA batteries, RS-232 to USB optical cable, Software. EN-2 10/15/10 Version No. 00...
-
Page 5: Front Panel Description
FRONT PANEL DESCRIPTION / EN 2. FRONT PANEL DESCRIPTION (1) Humidity & temperature sensor probe (2) LCD display Power button: Press the button to turn the meter on or off. (4) MX/MN button: Press the MX/MN (MAX/MIN) button to read the Maximum and Minimum values alternately. Press the MX/MN button for 2 seconds to exit MX/MN mode. - Page 6 FRONT PANEL DESCRIPTION / EN (5) H Hold button: Press the H button to freeze or unfreeze the display readings. In H mode, press the %RH / TEMP, °C / °F, DEW or WET button to select the desired readings. (6) %RH/TEMP button: Press the %RH/TEMP button to display the reading of %RH and °C / °F on the main display and secondary display alternately.
- Page 7 Press the cursor key to move the cursor right to the desired postion to set the time. (15) RS-232 to USB optical output socket: PC interface. (16) AC adaptor input socket (DC 9V). 10/15/10 Version No. 00...
-
Page 8: Measuring Procedure
MEASURING PROCEDURE / EN 3. MEASURING PROCEDURE 3-1 Humidity measurement: Press the “ ” button to turn the meter on. The display will show the humidity reading value (% RH) directly on the main display. As the humidity sensor may not respond immediately to a change of humidity in the environment, allow the reading to stabilize before noting the value. - Page 9 MEASURING PROCEDURE / EN 3-5 Maximum & minimum recording measurement: Press the “MX/MN” button to enter recording mode and the auto power-off function will be disabled. If the auto-timer datalogging function is not set, the timer will be started from zero. Press the “MX/MN”...
- Page 10 MEASURING PROCEDURE / EN 3-6 Auto Power-off mode: The meter will automatically turn off if there is no function within the preceding 30 minutes. Auto power-off function is enabled each time the instrument is turned on, but is disabled automatically when the MX/MN mode is selected. Disabling the auto power-off function.
- Page 11 MEASURING PROCEDURE / EN Ⅰ. The four parameters of auto-timer datalogging settings are: A. Real-time setting B. Start- time setting C. Stop-time setting D. Interval-time setting The four times must be correctly set, otherwise the auto-timer datalogging function will not operate. In auto-timer datalogging setting mode, press "...
- Page 12 MEASURING PROCEDURE / EN Entry : (1). Press the button to turn the meter on. (2). Press the SET button for 2 seconds to enter the current time setting mode; the LCD will show the " " auto-timer mark, the " no1" mark and the flicking hours digits.
- Page 13 MEASURING PROCEDURE / EN B. Start-time setting : St1: Start time Entry : Auto-timer datalogging start-time setting; the LCD will show "St1" mark and two flickering digits (hours). Adjustment : (1). Press the " " or " " buttons to set to the hours to the desired start-time.
- Page 14 MEASURING PROCEDURE / EN C. Stop-time setting : SP1: STOP Entry : Auto-Timer Datalogging setting stop-time setting; the LCD will show " SP1 " mark and two flickering digits (hours). Adjustment : (1). Press the " " or " " buttons to set to the hours to the desired stop-time.
- Page 15 MEASURING PROCEDURE / EN D. Interval - Time setting : INTV: INTERVAL Entry : Auto-timer datalogging record interval time setting; the LCD will show "INTV" and three digits. Adjustment : Press the " " or " " buttons to set the seconds to the desired interval time (from 3 to 255 seconds).
- Page 16 Ⅴ Ⅴ Ⅴ Ⅴ . Download the auto-timer recorded data to a PC. Connect the optical RS-232 to USB cable to the PC and press the " " button to download the memory data to the Note: When the auto-timer function is enabled, the start...
- Page 17 MEASURING PROCEDURE / EN 3-8 Manual data memory and read mode: A. Clear the manual memorized data Press the “ ” button to turn the meter off. Press and hold down the "MEM" button, then press the “ ” button to turn the meter on. When the LCD shows "CLr", the memorized data has been erased.
-
Page 18: Maintenance
MAINTENANCE / EN 4. MAINTENANCE 4-1 Cleaning: Periodically wipe the case with a damp cloth and mild detergent. Do not use abrasives or solvents. Clean and dry as required. 4-2 Battery Replacement: When the LCD display shows “ ”, the batteries have insufficient power to provide accurate readings. -
Page 19: Recalibration Procedure
RECALIBRATION PROCEDURE / EN 5. RECALIBRATION PROCEDURE The instrument should be calibrated once a year to ensure its continued accuracy. Contact RS Components for further details of calibration service. The address is given at the end of these instructions. 10/15/10 Version No. 00...


Need help?
Do you have a question about the RS-1365 and is the answer not in the manual?
Questions and answers