Chapters
Table of Contents

Subscribe to Our Youtube Channel
Related Manuals for tepro Baytown


Summary of Contents for tepro Baytown
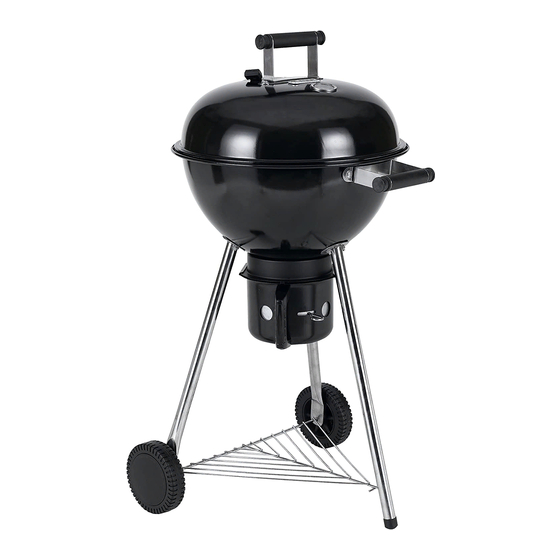
- Page 1 Bedienungsanleitung KUGELGRILL „Baytown“ Holzkohlengrill t Instruction Manual KEttLE BBQ „Baytown“ Version 2015 Charcoal grill art. nr. 1137 P150168_TEPRO_1137_Baytown_DE_GB.indb 1 14/8/15 3:12 PM...
- Page 2 P150168_TEPRO_1137_Baytown_DE_GB.indb 2 14/8/15 3:12 PM...
-
Page 3: Table Of Contents
Inhalt Bevor Sie das Gerät benutzen ..................4 Lieferumfang ......................4 - 5 Bestimmungsgemäßer Gebrauch ................. 5 Zu Ihrer Sicherheit ..................... 5 - 7 Signalsymbole ......................5 Allgemeine Sicherheitshinweise ................. 5 Sicherheitshinweise ....................6 - 7 Montage ........................8 - 11 Vorbereitung ........................ -
Page 4: Bevor Sie Das Gerät Benutzen
Bevor Sie das Gerät benutzen Prüfen Sie nach dem Auspacken sowie vor jedem Gebrauch, ob der Artikel Schäden aufweist. Sollte dies der Fall sein, benutzen Sie den Artikel nicht, sondern benachrichtigen Sie bitte Ihren Händler. Die Bedienungsanleitung basiert auf den in der Europäischen Union gültigen Normen und Regeln. -
Page 5: Bestimmungsgemäßer Gebrauch
Verwenden Sie den Artikel nur, wie in dieser Nr. Beschreibung Teil Bedienungsanleitung beschrieben. Jede zahl andere Verwendung gilt als nicht bestim- 17 Rosthalter mungsgemäß und kann zu Sachschäden oder sogar zu Personenschäden führen. 18 Deckelhaken Der Hersteller übernimmt keine Haftung für Schäden, die durch nicht bestimmungs- gemäßen Gebrauch entstanden sind. -
Page 6: Sicherheitshinweise
– Diesen Personenkreis auf die Gefah- Sicherheitshinweise ren des Geräts hinweisen und durch eine für ihre Sicherheit zuständige Per- Gefahr Brandgefahr! son beaufsichtigen. Die glühende Holzkohle und Teile des Grills werden wäh- – Jegliche Änderungen an dem Produkt rend des Betriebs sehr heiß stellen eine große Sicherheitsgefahr und können Brände entfachen. - Page 7 Gefahr Vergiftungsgefahr! – Seien Sie stets aufmerksam und ach- Beim Verbrennen von Holz- ten Sie immer darauf, was Sie tun. Das kohle, Grillbriketts etc. bildet Produkt nicht benutzen, wenn Sie un- sich Kohlenmonoxyd. Dieses konzentriert oder müde sind bzw. unter Gas ist geruchlos und kann in dem Einfluss von Drogen, Alkohol oder geschlossenen Räumen töd-...
-
Page 8: Montage
Montage Grill zusammenbauen 1. Grill auspacken Vorbereitung Den Grill auspacken und sämtliche Verpa- ckungsfolien entfernen. Das Verpackungs- Gefahr Verletzungsgefahr! Die Nichtbeachtung der An- material außer Reichweite von Kindern weisungen kann zu Problemen aufbewahren und nach dem Zusammen- und Gefahren bei der Verwen- bau des Grills den Vorschriften entspre- chend entsorgen. - Page 9 4. Thermometer befestigen 5. Feuerschalengriff befestigen Befestigen Sie das Thermometer (3) Befestigen Sie den Feuerschalen- mit der Mutter und der Unterlegscheibe griff (11) mit Schrauben (A), Unterleg- (C) am Deckel (4). scheiben (D) und Muttern (B) an der Feuerschale (10). 6.
- Page 10 7. Ablage befestigen Befestigen Sie den Aschetopfhalter Stecken Sie zuerst die gebogene Spitze (15) mit Schraube (E) und Mutter (F) der Ablage (16) in das Standbein (14). an der Feuerschale (10). Schieben Sie Stecken Sie die hinteren Enden der Ab- den Aschetopf (12) ein).
-
Page 11: Grill Aufstellen
11. Deckel auflegen und schließen • Stellen Sie den Grill vor dem Gebrauch Deckel auflegen und schließen auf einem ebenen, festen Untergrund Setzen Sie den Deckel (4) auf die Feu- im Freien auf. erschale (10). Der Kugelgrill ist fertig montiert. Sie können den Grill am Feuerschalengriff (11) leicht anheben Vor dem Grillen und zum gewünschten Grillort rollen. - Page 12 1. Nehmen Sie den Deckel (4) und den 9. Sie können den Deckel (4) auf den Grillrost (6) ab. Grill legen um Flammenbildung zu vermeiden. Regeln Sie die Luftzufuhr 2. Legen Sie 1-2 feststoffliche Anzünd- mit der Belüftungsscheibe (2) am De- hilfen in die Mitte des Kohlerosts (9).
-
Page 13: Wartung Und Reinigung
Wartung und Reinigung • Reinigen Sie den Grill regelmäßig, am besten nach jedem Gebrauch. Ihr Grill ist aus hochwertigen Materialien • Nehmen Sie den Grillrost (6) ab und gefertigt. Um die Oberflächen zu reinigen reinigen Sie ihn gründlich mit Spül- und zu pflegen, beachten Sie bitte die fol- wasser. -
Page 14: Technische Daten
Inverkehrbringer tepro Garten GmbH Garantie Carl-Zeiss-Straße 8/4 D-63322 Rödermark Sie haben einen qualitativ hochwertigen Grill gekauft. TEPRO GARTEN GmbH Email: info@tepro-gmbh.de oder garantiert für ihre Grills im Rahmen ih- backoffice@tepro-gmbh.de rer Garantiebedingungen, bei normaler, Web: www.tepro-gmbh.de freizeitmäßiger und nicht gewerblicher Nutzung für 24 (vierundzwanzig) Monate... -
Page 15: Passendes Zubehör (Nicht Im Lieferumfang Enthalten)
Passendes Zubehör (nicht im Lieferumfang enthalten) Universal Abdeckhaube Kugelgrill tepro Artikelnummer 8602 – aus hochwertig, strapazierfähigem Polyestergewebe 300 x 250D – mit wasserabweisender PVB-Be- schichtung – widerstandsfähig gegen UV Strahlen – Ventilationsöffnungen – mit Befestigungsklettband – Material: Aussenseite: PVB (Polyvinylbutyral) Innenseite: 100% Polyester –... - Page 16 (nicht im Lieferumfang enthalten) Erhältlich im stationären- und Online-Handel. Rost in Rost System - rund Hauptrost 47 cm Ø tepro Artikelnummer 8569 * – einsetzbar für handelsübliche Holz kohle- und Gasgrills – verchromtes Grillrost, ca. 43,5 cm Ø – Rostmitte herausnehmbar, ca. 21,1 cm Ø...
- Page 17 Guss-Grillrost-Einleger tepro Artikelnummer 8574 * – zum Einlegen in den Hauptrost (tepro Artikelnummer 8569) – Guss-Grillrost, ca. 23,6 cm Ø Guss-Pfanne-Einleger tepro Artikelnummer 8576 * – zum Einlegen in den Hauptrost (tepro Artikelnummer 8569) – Guss-Pfanne, ca. 23,5 Ø x 3,5 cm *Abbildung ähnlich...
- Page 18 Table of contents Before using the product ................... 19 Delivery contents ....................19 - 20 Intended use ........................ 20 For your safety ...................... 20 - 22 Signal symbols ......................20 General safety instructions ..................20 Safety instructions ..................... 20 - 22 Assembly .......................
-
Page 19: Before Using The Product
Before using the product After unpacking and before use, check the product for damages. Should the product be damaged, do not use it and contact your retailer. This user manual is based on the norms and regulations valid in the European Union. Should you be located outside of the EU, please follow all guidelines and legislation in your country of residence! Read the safety instructions and instructions for use thoroughly before using the... -
Page 20: Intended Use
For your safety No. Description Part Qty. 17 Grate bracket Signal symbols 18 Lid bracket Danger High risk! Disregarding this warning can lead to danger to life and limb. 19 Castor leg, right Attention Medium risk! 20 Wheel cap Disregarding this warning can lead to property damage. -
Page 21: Safety Instructions
Safety instructions In case of damages, repairs or other problems with the grill, contact our ser- Danger Fire hazard! vice point or a professional in your area. Live coals and BBQ compo- – Keep children and pets away from the nents get very hot during op- product. -
Page 22: Assembly
Danger Health hazard!! – Check that all screws are tightened be- Do not use any paint solvents or fore use. If necessary, tighten all screws thinners to remove stains. Such to guarantee stability. liquids are hazardous to health Attention Risk of damage!! and may not come into contact Do not use any strong or abra- with food. -
Page 23: Assembling The Grill
Assembling the grill 4. Installing the thermometer Attach the thermometer (3) to the lid 1. Unpack BBQ (4) using the nut and washer (C). Unpack the BBQ and dispose of all pa- ckaging materials. Keep the packaging materials out of the reach of children and dispose of them according to regulations after BBQ assembly. - Page 24 6. Installing the legs Mount the castor legs (13,19), leg (14) and grate bracket (17) to the fire tray (10) loosely, using washers (D), screws (A) and nuts (B). Make sure to mount the leg (14) to the same side as the fire tray handle (11). 7.
-
Page 25: Setting Up The Grill
9. Installing the cinder pot 11. Installing and closing the lid Attach the cinder pot holder (15) to the Place the lid (4) on the fire tray (10). fire tray (10) using the screw (E) and The ball handle is pre-installed. You nut (F). -
Page 26: Before Grilling
Before grilling 4. Let the barbecue burn for at least 30 minutes before first time use. See sec- • Remove the BBQ grate (6) and clean tion Before Grilling. it thoroughly in soapy water. Rinse the 5. As soon as the charcoal has heated BBQ grate with clear water. -
Page 27: Cleaning And Maintenance
Always close the lid (4) when using • Clean the BBQ regularly, at best after this method and control the air intake every use. using the ventilation sheet (2). Turning • Remove the BBQ grate (6) and clean the food is not required. The tempe- it thoroughly in soapy water. -
Page 28: Declaration Of Conformity
Subject to technical modifications and ty- pographical errors. Warranty You have purchased a high-quality prod- Distributing company uct. TEPRO GARTEN GmbH provides a warranty for its products within the frame- tepro Garten GmbH work of its warranty conditions under nor- Carl-Zeiss-Straße 8/4 mal, recreational and non-commercial D-63322 Rödermark, Germany... -
Page 29: Matching Accessories (Not Included In The Delivery Scope)
Matching accessories (not included in the delivery scope) Universal cover for kettle barbecue tepro item number 8602 – made of high-quality, resilient polyes- ter fabric 300 x 250D – with water repellent PVB layer – UV ray resistant – ventilation openings –... - Page 30 Can be obtained at stationary and online retailers. Grate in grate system – round Main grate 47 cm Ø tepro item number 8569 * – suitable for commercially available charcoal and gas barbecues – chrome-plated BBQ grate, approx. 43.5cm Ø...
- Page 31 Cast BBQ grate insert tepro item number 8574 * – for insertion into the main grate (tepro item number 8569) – cast BBQ grate, approx. 23.6cm Ø Cast pan insert tepro item number 8576 * – for insertion into the main grate (tepro item number 8569) –...
- Page 32 P150168_TEPRO_1137_Baytown_DE_GB.indb 32 14/8/15 3:13 PM...
Need help?
Do you have a question about the Baytown and is the answer not in the manual?
Questions and answers