Pronteau PROBOIL.2 User's Installation Manual
Hide thumbs
Also See for PROBOIL.2:
- Replacement manual (2 pages) ,
- Manual (3 pages) ,
- Installation manual (4 pages)
Table of Contents
Advertisement
PROBOIL.2
User & Installation Guide
www.proboil.co.uk
See top of boiler for contact details
Please read these instructions carefully
and retain for future reference.
We have a policy of continued product and quality development and improvement.
Accordingly we reserve the right to amend the specification at any time. All errors and
omissions excepted.
Advertisement
Table of Contents

Subscribe to Our Youtube Channel
Related Manuals for Pronteau PROBOIL.2


Summary of Contents for Pronteau PROBOIL.2
- Page 1 PROBOIL.2 User & Installation Guide www.proboil.co.uk See top of boiler for contact details Please read these instructions carefully and retain for future reference. We have a policy of continued product and quality development and improvement. Accordingly we reserve the right to amend the specification at any time. All errors and...
-
Page 2: Table Of Contents
Contents 1. PROBOIL User Guide 1.1. Important safety and usage considerations • Day to day considerations • Do not modify the product supplied • Sensible fire safety precautions 1.2. Using the product 1.3. Descaling the PROBOIL system 1.4. Draining the PROBOIL system 1.5. -
Page 3: Proboil User Guide
1. PROBOIL User Guide 1.1. Important safety and usage considerations The boiler unit is provided with 1.2 metres of mains cable with a moulded 3 pin UK plug. Appliance Fuse Rating – 10 Amp WARNING: This appliance can be used by children aged from 8 years and above and persons with reduced physical, sensory or mental capabilities or lack of experience and knowledge and if they have been given supervision or instruction concerning use of the appliance in a safe way and have understood the hazards involved. -
Page 4: Day To Day Considerations
Day to day considerations: If the product is going to remain unused and unattended for a prolonged period, the boiler should be switched off. If the period is extended beyond a typical holiday then we recommend the boiler is also drained. As with any appliance, the water supplies should also be isolated. -
Page 5: Using The Product
1.2. Using the product Thank you for choosing this product. Reading this guide you will ensure that the product is used safely and will give its best performance. Throughout this guide, symbols are used to highlight key points or safety considerations. = an information point or tip. = a technical or safety consideration or warning. -
Page 6: Descaling The Proboil System
1.3. Descaling the PROBOIL system The filter system provided with PROBOIL will help to prevent the calcification (scaling) of the boiler. However, it will be required, from time to time, that the PROBOIL will need to be descaled, drained and refilled to ensure the maximum energy efficiency and service life from the product, especially in hard water areas. - Page 7 4. Open drain on front of 5. Drain fully into a suitable 6. Lift away lid & knob (d) unit. container or sink. and styrene insulation (e). 7. Unscrew tank lid ring anti- 8. Lever lid upwards using 9. Lift lid and rinse out tank clockwise.
- Page 8 16. Loosely rotate 17. Push rubber hose (a) and 18. Turn on until water runs temperature knob until it pipe (b) fully onto stems through spout, then fully drops then press down. as shown. Return unit to turn off. former position. 19.
-
Page 9: Draining The Proboil System
1.4. Draining the PROBOIL system Scan here It might be necessary from time to time to drain the PROBOIL system to link to during servicing and descaling. Please follow the procedure below a video demo or watch the video, which can be found via the QR code. The water in the PROBOIL tank may be up to 98°C and as such represents a scalding risk if handled without due care. - Page 10 When adding or changing the filter a small amount of residual water will remain in the system, so have a small bowl and dry cloth to hand. Ensure the left hand (hot water) lever is fully off and that no water is passing through and out of the tap spout end before commencing. Filter installation 1. Ensure the boiler is powered off and the left hand (hot water) lever is fully off and that no water is passing through and out of the tap spout end before commencing. 2.
- Page 11 7. Each time the product is used you should flush a small amount of boiled water through before use. Typically this can be used to preheat your cup. If unused for extended periods, then flush the product for a longer time. Parts and contents Description Mixer tap...
-
Page 12: Troubleshooting & Maintenance
1.6. Troubleshooting & maintenance Servicing and maintenance of this product must be carried out by persons having knowledge and practical experience of the appliance, in particular as far as safety and hygiene are concerned. The PROBOIL system contains no user serviceable parts and should only ever be serviced by the recommended service agent. -
Page 13: Care Instructions For Your Kitchen Tap Mixer
Professional service If the previous checks fail to restore the performance, you should seek professional help. The person who installed the boiler is probably the best one to investigate and correct it and is certainly the person to contact if you have had a problem in the guarantee period. The following additional checklist is provided for the benefit of a qualified service person. -
Page 14: Proboil Warranty Terms And Conditions
1.8. PROBOIL Warranty Terms and Conditions If you believe your product has developed a fault, firstly isolate the product from the mains power and water then please contact the service agent (details shown on the top of the boiler). Do not wait to do this once you suspect a fault. Please have the model and serial numbers to hand when calling. -
Page 15: Tap Warranty Terms And Conditions
1.9. Tap Warranty Terms and Conditions In the unlikely event that you should experience any defect in the materials or workmanship of your new Abode mixer within 5 years of purchase, the purchaser’s sole remedy shall be the replacement (at the manufacturer’s discretion) of all or any part of the product that is defective. -
Page 16: Proboil Installation Guide
2. PROBOIL Installation Guide 2.1. Tap installation Important Technical Data Minimum operating pressure (hot): Minimum operating pressure (cold): 0.75 bar 1.5 bar (with filter) Maximum domestic hot water Maximum operating pressure: 5.5 bar* temperature: 70°C* Flow characteristics: Domestic Hot & Cold share outer single flow spout. Recommended domestic hot water temperature: 46°C Boiled water: Through centre spout... -
Page 17: Installation Preparation
Installation preparation Before installing the new mixer it is essential that you thoroughly flush through the supply pipes in order to remove any remaining solder, swarf or impurities from your system. Failure to carry out this simple procedure could cause problems or damage to the workings of the mixertap or boiler. -
Page 18: Parts And Contents
Parts and contents Description Mixer tap Base plinth Base plinth seal Sink or worktop (max. 50mm) White triangular plate (for steel sinks only) Lower gasket Metal horseshoe Fixing stud Fixing nut Domestic cold flexible hose (including non-return valve) 15mm olive 15mm nut 15mm pipe 15mm isolation valve Domestic hot flexible hose... -
Page 19: Tap & Filter Installation
Tap & Filter Installation This diagram This diagram shows the view of the base of the shows the tap (A1) with the boiling water handle to the markings on left of the body. boiler (E1) to indicate the inlet and outlet. See the boiler instructions for further detail. -
Page 20: After Installation
Install the Filter: 1. Find a suitable place to mount the filter cartridge (C7) under the sink. It must be mounted vertically as shown, easily accessible (to be changed periodically), away from any heat source and close enough not to exceed the available length of the ¼” plastic pipe (C4) supplied. -
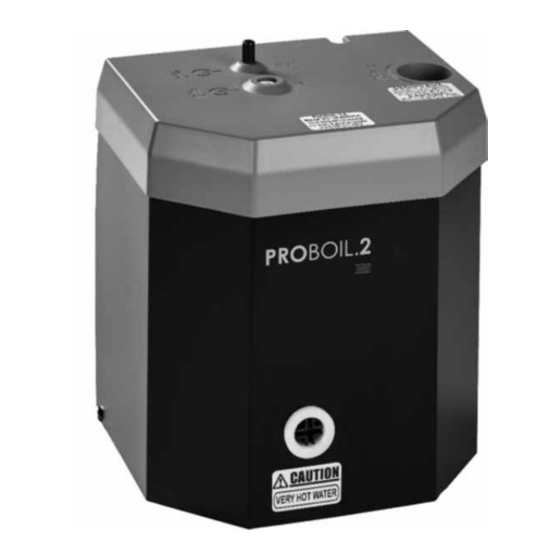
Page 21: Boiler Installation
2.2. Boiler Installation Pack contents Boiler unit Drain valve Screw fixing pack Tools you will require: • 17mm & 19mm Spanner or adjustable spanners • A drill + ø5.0 & ø5.5 masonry bits (wall mount only) • No.2 Pozi-drive screwdriver • Pencil Tube pack (Hot, Cold & Drain) •... -
Page 22: Fitting The Drain Valve
Fitting the drain valve !IMPORTANT! Connect drain valve assembly (E3) to the hot water hose (D1) ensuring fibre seal (D2) is in place. MUST BE You may wish to leave this connection loose until the LEVEL final position of the valve is known. !IMPORTANT! The drain valve (E3) needs to be fitted as high as possible. -
Page 23: Locating And Fitting The Boiler Unit
When locating the drain valve (E3) beware of the following: • Not kinking the tube (E2) from the tap. • The location of the drain on the sink waste as the tubing does need to be a clear run, not twisted. •... -
Page 24: Connecting The Tubes
If the boiler is being mounted on the wall lift off the cover complete with knob (1) and the insulation cap (2) to expose the mounting holes (3). Hold the product level in the desired position and mark the holes. The hole centres are 184mm apart. - Page 25 The lengths of the hot and cold tubes can be cut square to ensure a good seal. 1. Pull the lever forwards for approximately 2. Plug the boiler in at the mains. 1 minute or until water flows. 4. The red light will come on when the 3.
-
Page 26: Calibration Procedure
Calibration procedure 1. Loosely rotate temperature knob until it drops then press down. 2. Turn the calibration knob fully clockwise and wait for the boiler to boil freely. (Approx. 12 minutes from cold). When fully boiled the water may come from the tap spout without the handle being turned on. -
Page 27: Connection Summary
Connection Summary... -
Page 28: Spares List
Spares list 1. Control knob – 95-719821 2. Top lid – 95-719822 3. Top insulation – 95-719823 4. Tank lid complete – 95-719824 5. Tank rubber seal – 95-719825 6. Drain plug – 95-719826 7. Drain valve complete – 95-719827 8. Hose pack (3 tubes) – 95-719828 Technical data Dimensions (mm) –...
Need help?
Do you have a question about the PROBOIL.2 and is the answer not in the manual?
Questions and answers
How do I get a replacement drain plug
The document does not provide specific instructions for obtaining a replacement drain plug for the Pronteau PROBOIL.2. However, it mentions contact details for boiler service and replacement parts:
- Call: 0330 311 6585
- Email: service.request@proboil.co.uk
You can use these contact methods to request a replacement drain plug.
This answer is automatically generated