Table of Contents
Advertisement
IMPORTANT SAFETY INSTRUCTIONS
INSTALLATION, OPERATING AND SERVICE MANUAL
READ AND FOLLOW ALL INSTRUCTIONS
For Swim Jet Use Only - 400 GPM -
Swim Jet Combination Fitting
Life: 10 Years - Wall Only - Badu®Jet
2007
F
B
D
C
E
All parts are manufactured of corrosion-resistant material and combined in one single housing that can be
installed in pools of any size and shape.
Key to illustration:
A.
Flush mounted Jet Housing, 16" in diameter
B.
Rectangular, Anti-Entrapment Cover (20" x 17") for
undetectable pump suction. (Optional Round)
C.
Adjustable Water Flow Jet Nozzle
D.
Water volume control knob adjusts force of water leav-
ing jet nozzles
E.
Pneumatic on/off button guarantees complete electri-
cal separation between pool water, pump motor and
control box.
B
ADU
Counter Swimming Unit
U.S. Patent No. 3.977.027
OWNER'S MANUAL
A
I
J
®
ET
F.
Air regulator adjusts amount of air bubbles in water
flow.
G.
Control box with GFCI with tubing for pneumatic button.
H.
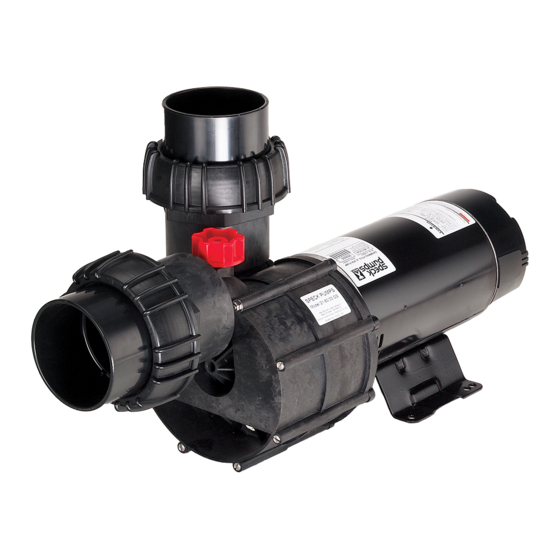
Speck 4 HP self-priming, plastic pump, single phase
with thermal overload (no motor starter required). Op-
tional three phase motor and control box available (Nor-
mal priming pump available for installation below water
level).
I.
Massage Hose with pulsator may be attached to jet noz-
zle.
Complies with UL 1563
Swimming Pool Equipment
Listing #E212148
H
G
Advertisement
Table of Contents

Related Manuals for Speck pumps BADU JET


Summary of Contents for Speck pumps BADU JET
- Page 1 IMPORTANT SAFETY INSTRUCTIONS INSTALLATION, OPERATING AND SERVICE MANUAL READ AND FOLLOW ALL INSTRUCTIONS ® Counter Swimming Unit U.S. Patent No. 3.977.027 OWNER’S MANUAL Complies with UL 1563 For Swim Jet Use Only - 400 GPM - Swimming Pool Equipment Swim Jet Combination Fitting Listing #E212148 Life: 10 Years - Wall Only - Badu®Jet 2007...
-
Page 3: Table Of Contents
TABLE OF CONTENTS Important Safety Instructions Page 2 Introduction and Planning Page 2 Plumbing for B Pages 2-3 ® Concrete or Gunite Installation Page 4 Installing B in Existing Gunite or Concrete Pool Page 5 ® Liner and/or Fiberglass Pool Installation Page 6 Removal of Liner Page 6... -
Page 4: Important Safety Instructions
1. Important Safety Instructions When installing and using this electrical equipment, basic safety G. DO NOT store or use gasoline or other flammable vapors precautions should always be followed, including the following: or liquids in the vicinity of this equipment. DO NOT store pool chemicals near the equipment. - Page 5 CAUTION: The suction line should run below water level CAUTION: In areas with soft soil conditions or with frequent earth movement, a flexible section of 4” hose should be attached right up to the pump location. to the back of the jet housing to prevent plumbing breakage. CAUTION: The center of the housing (the nozzle) should be 10”...
-
Page 6: Concrete Or Gunite Installation
4. Concrete or Gunite Installation A. Pre plumb B around the housing approximatley 1 1/2” deep to allow marcite housings. to seal against the housing. 1. Install the two PVC SCH 80 couplings 110mm/4” slip (part 4. Recheck location of Jet housing when gunite is being applied. #2a) on the PVC SCH 80 fittings 110mm (part #2) which are The force of the gunite may move the jet location. - Page 7 4a. Installing in Existing Concrete or Gunite PooI Materials: 1 piece of Plywood 2’ x 3’ x 1/4” Now place this assembly into position in the pool wall and align 8 Lag screws 1/4” x 1 1/2” (minimum) the water line marks. With a level on the two horizontal studs, 8 Plastic lag anchor shields level the assembly and mark the 8 holes for the 1/4”...
-
Page 8: Liner And/Or Fiberglass Pool Installation
5. Liner and/or Fiberglass Pool Installation CAUTION: Locate pressure connector exactly NOTE: The list below shows all parts that ARE NOT USED above the suction connection. Pressure and suction con- IN A FIBERGLASS/VNYL LINER INSTALLATION: nectors must be exactly vertical or the rectangular cover will be uneven in appearance. -
Page 9: Installation Of Nozzle Housing
6. Installation of Nozzle Housing Insert preassembled nozzle housing with jets and control Make sure housing and threaded inserts are spindle counter-clockwise into the regulator disk. clean. Nozzle housing can be mounted once pool is com- plete. Pull the volume control knob off the spindle (snap Important: Make sure the end of the 1/2”... -
Page 10: Installation Of The Pump And The Control Box
8. Installation of the Pump and the Control Box This section concerns the electric motor and control box The wiring of the pool motor and control box should only since all other parts, the pump, the jet unit, etc. have be done by a licensed electrician in accordance with complete and absolute separation from the pool water. -
Page 11: Nozzle Adjustment Instructions
10. Nozzle Adjustment Instructions When setting the nozzles for basic swimming, it is recom- Note: Hose adaptor 1 ” MPT x hose and female adaptor mended that you set the nozzles in such a way that each ” FPT x 1 ”... -
Page 12: Frequently Asked Questions
12. Frequently Asked Questions Does it matter if the housing is installed higher or What size pool do I need? The can be in- lower than the manual states? Yes, the center of the stalled in any size pool. However, we recommend a mini- housing must be 10”... - Page 13 2. Concrete or Gunite Installation The screws used to mount the ring cover are M6 instead of M8. 0.25" NOTE: Encase jet housing and at least 2 to 3 inches of Air Line Air Control 1.70" M8x40 plumbing with concrete. 0.5"...
-
Page 14: Parts List For The Badu
Classic 14. Parts List for the B ® Part # Part # Description Description 43/1 Jet Housing Cover - Nozzle Adaptor - Male, Housing PVC 2” x 75mm/3” Clamp - Hose, Pneumatic Button 8.7mm Adaptor - Male, Housing PVC 1/2” Air Tube 4 x 1.5mm (per meter) Nipple - Hose, Air Regulator, Plastic 1/4”... - Page 15 15. Parts List for the B ® super-sport Part # Description Part # Description Air Tube 4 x 1.5mm (per meter) Jet Housing Tapping Screw - Nozzle Cover, Phil. 4.8 x 19 A4 Adaptor - Male, PVC 2-1/2” x 90mm/4” Volume Control Knob Coupling - Housing, PVC 110mm/4”...
-
Page 16: Limited Warranty
(12) 6. Speck Pumps will charge customers for all non war- months from the date that the is originally ranty work which it may perform. Warranty work will not installed.
Need help?
Do you have a question about the BADU JET and is the answer not in the manual?
Questions and answers