Advertisement
OSG STRIKER OWNER'S MANUAL
ALWAYS WEAR A COAST GUARD APPROVED FLOTATION DEVICE
WHEN OPERATING THE OSG STRIKER.
Know the limits of your abilities and the limits of your equipment.
Changes in air temperature and elevation may cause the air inside the OSG
Striker to expand which could cause a tube to burst. Always release some air
when these conditions occur.
Never leave your boat sitting in direct sunlight when it is out of the water.
This owner's manual will help you with initial set-up of your new raft, provide basic safety information and
maintenance tips, and cover simple field repair.
Advertisement
Table of Contents

Related Manuals for Outcast Sporting Gear OSG striker


Summary of Contents for Outcast Sporting Gear OSG striker
- Page 1 OSG STRIKER OWNER’S MANUAL ALWAYS WEAR A COAST GUARD APPROVED FLOTATION DEVICE WHEN OPERATING THE OSG STRIKER. Know the limits of your abilities and the limits of your equipment. Changes in air temperature and elevation may cause the air inside the OSG Striker to expand which could cause a tube to burst.
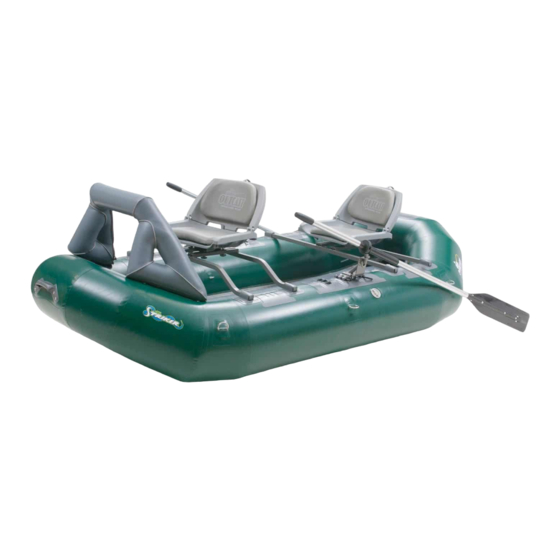
- Page 2 BEFORE YOU BEGIN, Check for damaged or missing parts. 1 - OSG Striker with inflatable lean bar 2 - Seat bottoms 2 - Seat backs 1 - Seat swivel 2 - Seat mounts 4 - Straight seat bars 2 - Oar locks...
-
Page 3: Step 1: Seat Assembly
Step 1: Seat Assembly Items needed: 2 - Seat backs 2 - Seat bottoms 1. Attach the seat backs to the seat bottoms with the seat hinge pins. 2. Tighten the hinge pins with a flathead screwdriver. Flathead screwdriver Step 2: Attach Rower’s Seat to Seat Mount Items needed: 1 - Assembled seat Rower’s seat mounting... - Page 4 Step 3: Attach the Seat Swivel to the Front Seat Items needed: 1 - Assembled seat Seat swivel mounting hardware pack 1. Place the flat side of the seat swivel onto the seat and align the holes. Wrench 2. Place the locking washer and the washer onto the bolts. 3.
- Page 5 Step 5: Assemble the Rower’s Frame Items needed: 1 - Assembled seat with seat mount 1. Slide the straight seat bars onto the seat mount. 4 - Straight seat bars 2. This is a slip fit, no tool required. Step 5: Assemble the Front Frame Items needed: 1 - Assembled seat with swivel and...
- Page 6 Step 7: Install the Oar Stands Items needed: Striker with frames 2 - Oar Stands 1. Insert the oar stands in between the knuckles. 2. Lock into place with the L-pins. 4 - L-pins 3. Secure the L-pins with the split-rings. with split-rings 4.
- Page 7 Step 9: Assemble the Oars Items needed: Inflated Striker 2 - Oar blades 2 - Oar handles 2 - Oar stops 1. Slide the oar locks into the oar stands and secure into place with the o-rings. 2. Snap the oar blades and the oar handles together. 2 - Oar locks 3.
-
Page 8: Cleaning And Maintenance
Solo Use Position Stern The Striker can be rowed solo. Position the rower’s frame backwards in the front frame sleeves. Adjust the seat and move the oar stands to your preferred position. This solo position keeps the boat balanced on the water. Storage Short Term Storage - Allow to air dry, deflate and roll loosely. -
Page 9: Basic Troubleshooting
Basic Troubleshooting Valve does not retain air when pump is removed. • Clear any debris that might be preventing the valve from sealing. This can be accomplished by either pumping quick bursts of air into the valve or removing the core valve assembly and cleaning the valve with a cotton swab and denatured alcohol. -
Page 10: Warranty
The Period of Coverage: Your boat is covered from the original purchase date for a period of five years. Outcast Sporting Gear ~ 844-243-2473 ~ 2021 E Wilson Lane. Meridian, ID 83642 ~ info@outcastboats.com...
Need help?
Do you have a question about the OSG striker and is the answer not in the manual?
Questions and answers