Table of Contents
Advertisement
ENC-200™ H.264 Encoder
User Guide V1.8
Teracue GmbH
Schlossstr. 18
85235 Odelzhausen
Germany
Tel:
+49 (0)8134-555-10
Fax:
+49 (0)8134-555-199
info@teracue.com
www.teracue.com
Document Version 1.8/120327
E
N
C
-
2
0
0
™
H
E
N
C
-
2
0
0
™
H
User Guide V1.8
.
2
6
4
E
.
2
6
4
E
N
C
O
D
E
R
N
C
O
D
E
R
1
Advertisement
Table of Contents

Related Manuals for Teracue ENC-200


Summary of Contents for Teracue ENC-200
- Page 1 ENC-200™ H.264 Encoder User Guide V1.8 ™ ™ User Guide V1.8 Teracue GmbH Schlossstr. 18 85235 Odelzhausen Germany Tel: +49 (0)8134-555-10 Fax: +49 (0)8134-555-199 info@teracue.com www.teracue.com Document Version 1.8/120327...
- Page 2 Thank you! Mail to: documentation@teracue.com All information within this document is confidential to Teracue GmbH costumers and should not be copied or distributed to non Teracue GmbH customers. ENC-200™ and all of its components are registered trademarks licensed to RADEMARKS Teracue GmbH.
- Page 3 ENC-200™ H.264 Encoder User Guide V1.8 Information about the manual This document is designed to help users setup, configure and work with the H.264 encoders. If you received this publication as a PDF, then it's a good idea to print it out for future reference.
- Page 4 New default settings e.g.: IP 172.16.20.100, Destination IP 239.252.20.100. XPlayer-Link added. For viewing and monitoring of the ENC-200 Stream. If the Standalone XPlayer is installed on the client PC, running the web-config pages, the XPlayer can directly be launched by a mouse click from the user interface.
- Page 5 ENC-200™ H.264 Encoder User Guide V1.8 Version 0.9.25 – 08/05/2010 11:03 Full SNMP remote control added and MIB files. All settings can be remotely configured by 3rd party SNMP manager. SNMP status traps added Support for AAC and MPEG1 audio.
-
Page 6: Table Of Contents
ONTROL ........................47 UDIO ALKBACK TCP S ........................49 TREAMING 4.3.1 TCP configuration when ENC-200™ is the Server ............49 4.3.2 TCP configuration when DEC-200™ is the Server ............50 ................... 51 ESETTING TO ACTORY EFAULT BNC C ......52... -
Page 7: Overview
ENC-200™ encoders incorporate low-latency compression technology and professional signal processing, creating full resolution and smooth motion DVD-quality video streams. Connect LAN Ethernet and a video/audio input signal and the ENC-200™ encoder will turn into a true video networking ‘port’, transmitting your video in digital form over IP networks. -
Page 8: General Information
User Guide V1.8 General Information You can operate the ENC-200™ blades in the FR-110 single blade chassis, in the FR-210 dual blade chassis or in the FR-2000 multi-channel rack chassis. For example when only a small amount of encoders is required, or if single channel encoders need to be set up at dispersed network locations. -
Page 9: Connecting The Encoder (Fr-110 Chassis)
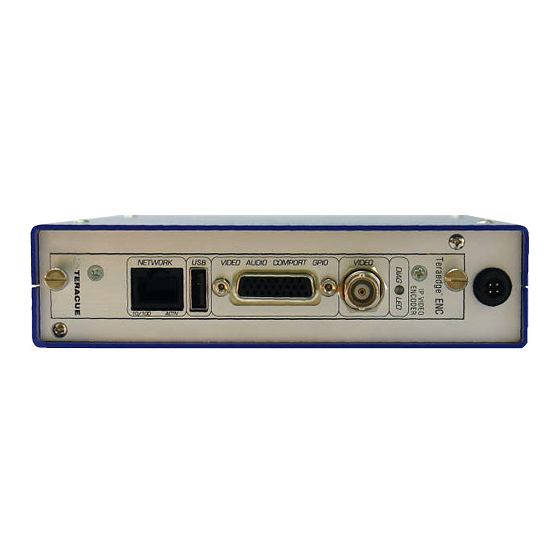
As next, please connect the network cable to the network interface and connect your video source unit to the video input of the ENC-200™. Concerning of the video input you have the choice between different video signal types. The ENC-200™ supports SDI (with embedded audio), Composite, S- Video, YP signals. -
Page 10: Assignment Of The Sub-D 26-Pin Connector
3V3 (See also chapter 6, page 57) Gen Lock In** Table 2: Assignment of the Sub-D 26-pin Connector CVBS = FBAS = Composite Signal YC = S-Video Signal * = Is not supported at the moment ** = Is not supported by the ENC-200... -
Page 11: Breakout Cable 'S
User Guide V1.8 Breakout Cable ‘S’ For the ENC-200™ it exists two different breakout cables which are called Breakout cable ‘S’ and Breakout cable ‘P’. The Breakout cable ‘S’ is the standard breakout cable and Table 3 describes the provided signals. -
Page 12: Breakout Cable 'P
User Guide V1.8 Breakout Cable ‘P’ For the ENC-200™ it exists two different breakout cables which are called Breakout cable ‘S’ and Breakout cable ‘P’. The Breakout cable ‘P’ is the professional breakout cable and Table 4 describes the provided signals. -
Page 13: Enc-200™ User Guide
ENC-200™ H.264 Encoder User Guide V1.8 ENC-200™ User Guide This chapter gives you an overview over ENC-200™ and demonstrates the encoder's main functions. Before proceeding please be sure that the encoder is setup correctly and all necessary connections are established. -
Page 14: Login
ENC-200™ H.264 Encoder User Guide V1.8 Login After typing the IP-address of your ENC-200™ into the browser and hitting enter, a login screen should appear. See Figure 4. Enter your username and password and click on ‘login’. Figure 4: ENC-200™ web interface 'Login Page' Default IP-address: 172.16.20.100... -
Page 15: Graphical User Interface Of The Enc-200
ENC-200™ H.264 Encoder User Guide V1.8 Graphical User Interface of the ENC-200™ 3.3.1 Navigational Menus After successful login you have access to the encoder's configuration. All of the settings can be adjusted via web-browser. Main Menu: The main menu contains the ‘ENCODER’, ‘NETWORK’, ‘COMPORT’, ‘SYSTEM’, ‘HELP’ and ‘LOGOUT’... -
Page 16: Apply' And 'Save' Buttons
ENC-200™ H.264 Encoder User Guide V1.8 3.3.2 ‘APPLY’ and ‘SAVE’ Buttons A change or multiple changes of the configuration settings will only take effect after the ‘> APPLY’ button is pressed. The encoder will then start working with the new parameters, but the parameters will not be saved to the encoder. -
Page 17: Encoder Configuration
Menu: Encoder / Settings Under the menu option ‘ENCODER/SETTINGS’ you define the main operational state of the encoder. Here you can set encoding process to ‘On’ or ‘Off’. See Figure 6. Figure 6: 'Encoder / Settings' page of the ENC-200™ encoder Settings: Description: Page Refresh: Enables / Disables the refreshing of webpage every 10 seconds. - Page 18 TCP with a sendbuffer size of 250.000 and your round-trip time is not bigger than 60 msec., the ENC-200 absorbs packet losses of 3%. If you use TCP with a sendbuffer size of 250.000 and your round-trip time is not bigger than 300 msec., the ENC-200 absorbs...
-
Page 19: Menu: Encoder / Video
ENC-200™ H.264 Encoder User Guide V1.8 3.4.2 Menu: Encoder / Video Figure 7 shows the ‘Encoder / Video’ page of the ENC-200™ encoder and Table 7 describes it. Figure 7: ‘Encoder / Video’ page of the ENC-200™ encoder Settings: Description: Codec: Displays the video codec of the output stream. - Page 20 Enables / Disables the deblocking function. You can choose between: AUTO Encode Mode: Specifies the encoding mode. You can choose between: AUTO (Decision via visual conten) PROGRESSIVE INTERLACED Table 7: Description of the ‘ENCODER/VIDEO’ webpage of the ENC-200™...
-
Page 21: Menu: Encoder / Audio
User Guide V1.8 3.4.3 Menu: Encoder / Audio Figure 8 shows the ‘Encoder / Audio’ page of the ENC-200™ encoder. Figure 8: ‘Encoder / Audio’ page of the ENC-200™ encoder Table 8 describes the ‘Encoder / Audio’ page of the ENC-200™. -
Page 22: Menu: Encoder / Sap
– due to their description. Please see the figure below to get an overview of all the properties that can be defined. Figure 9: ‘Encoder / SAP’ page of the ENC-200™ encoder Table 9 describes the ‘Encoder / SAP’ page of the ENC-200™. Settings: Description: Transmit Enable: Enables/Disables the transfer of the SAP messages. -
Page 23: Menu: Encoder / Destination
3.4.5 Menu: Encoder / Destination ENC-200™ is capable to encode a video either as a unicast stream or a multicast stream. According to the entered destination IP-address, the encoder will automatically recognize whether it should be a unicast or multicast stream. - Page 24 ‘Sendbuffer Size’ field. For more information, please see chapter 4.3 on page 49. This field is only available when TCP is chosen as transport protocol. Table 10: Description of the 'ENCODER/DESTINATION' webpage of the ENC-200™ Figure 11: Unicast connection between ENC-200™ and DEC-200™...
-
Page 25: Menu: Encoder / Gpio
The General Purpose Input/Output (GPIO) supports a GPI function for the pass-through mode to control devices which are connected with another ENC-200™ encoder or DEC-200™ decoder. Furthermore it supports a GPO function for the manual mode to send a signal to a device which is directly connected to the encoder via the GPIO D-Sub connector of the breakout cable ‘P’. - Page 26 GPI source must be entered in the destination. Furthermore, as long as the GPIO mode is set to ‘Manual’ the GPI is blocked. The ENC-200 board version is directly printed at the ENC-200 serial number label. NC = Not Connected...
-
Page 27: Menu: Encoder / Xplayer
The menu ‘XPlayer’ starts the ‘Standalone XPlayer’, if an ‘XPlayer’ is installed on the client PC. You can start the ‘XPlayer’ by clicking the XPlayer-Link inside the ‘Encoder’ menu. Afterwards the ‘XPlayer’ automatically displays the stream of the ENC-200. Figure 13: 'Encoder / XPlayer' page with opened XPlayer If the XPlayer is not installed on the client PC, the XPlayer-Link will have no function. -
Page 28: Menu: Network / Settings
3.4.3 Menu: Network / Settings Figure 14 shows the ‘Network / Settings’ page of the ENC-200™ encoder. Here you are able to set the encoder's own IP-address, subnet mask, gateway address and define the encoder's host name. Figure 14: 'Network / Settings' page of the ENC-200™ encoder Table 13 describes the ‘Network / Settings’... -
Page 29: Menu: Network / Snmp (Simple Network Management Protocol)
Start the Trap receiver in your SNMP manager to get alerts of the managed system. E.g. the encoder was started / stopped. To use the ENC-200™ SNMP features, you have to set up the encoder, to establish access with your SNMP manager. - Page 30 ENC-200™ H.264 Encoder User Guide V1.8 Figure 15: 'Network / SNMP' page of the ENC-200™ encoder Settings: Description: Manager IP: Specifies the IP-address of the Client PC on which the SNMP manager (TRAP Receiver) is installed. This field must be configured, to receive TRAPs.
-
Page 31: Setting Up The Snmp Manager 'Mib Browser
The ENC-200™ has the following trap alerts: Trap Name: Description: enc200VideoLockStatus: This trap is sent when the ‘Video locked’ status of the ENC-200™ has changed. The trap contains the new status variable (yes/no). enc200EncodingStatus: This trap is sent when the ‘Encoding’ status of the ENC-200™... - Page 32 The opened sub-tree shows you all the adjustable options, which you also have with the ENC-200™ web interface. See Figure 19. If you want to control the ENC-200™ via the MIB Browser, right-click at one data tree item, e. g. ‘videoBitrate’ and select your desired SNMP command (Table 17).
- Page 33 ENC-200™ H.264 Encoder User Guide V1.8 Figure 19: Control the ENC-200™ via MIB Browser The MIB-Browser shows you also details of your selected data tree item, see Figure 20. This info section is in the left bottom of the MIB-Browser. Figure 20 shows the details of the data tree item ‘videoBitrate’.
-
Page 34: Menu: Comport / Settings
Menu: Comport / Settings The ‘comport / settings’ webpage defines the parameters for the ENC's integrated comport/serial port. ENC-200™ encoders are always comport servers and DEC-200 decoders are always comport clients. Figure 21: 'Comport / Settings' page of the ENC-200™ encoder... - Page 35 ENC-200™ H.264 Encoder User Guide V1.8 ‘even’. Stopbits: Specifies the value of used stopbits. You can choose between ‘1’ and ‘2’. Table 19: Description of the 'COMPORT/SETTINGS' webpage of the ENC-200™...
-
Page 36: Menu: System / Settings
Furthermore the system uptime, the MAC address and the used link mode is shown in the ‘System/Settings’ menu. See Figure 22. You can also make a factory reset via the ENC-200 webpage. Therefor it exist two possibilities: Factory reset, without network settings. Therefor please click the ‘FACTORY RESET’ button. -
Page 37: Menu: System / Date/Time
User Guide V1.8 3.4.7 Menu: System / Date/Time You can set the time and date for the encoder in the menu ‘System/Date/Time’. See Figure 23. Figure 23: 'System / Date/Time' page of the ENC-200™ encoder Settings: Description: Date (MM/DD/YYYY): Specifies the current date. Please enter the date in the following syntax MM/DD/YYYY. -
Page 38: Menu: System / Update (Upgrading Firmware Version)
Menu: System / Update (Upgrading firmware version) Teracue's goal is customer satisfaction and constant product improvement. Please check regularly to see if the most recent firmware version is installed on your ENC-200™. Please visit the IPTV Support area on: www.teracue.com. -
Page 39: Menu: System / Password
3.4.9 Menu: System / Password Figure 25 shows the ‘System / Password’ page of the ENC-200™ encoder. If you do need to change the password due to security issues, then simply click on the submenu ‘PASSWORD’ and enter the new password twice in the provided boxes. Then hit the ‘APPLY’ button. -
Page 40: Menu: System / Remote
3.4.10 Menu: System / Remote Figure 26 shows the ‘System / Remote’ page of the ENC-200™ encoder. Enables / Disables the port 2323 for remote controlling. If you want use the remote control function, you must enable the ‘Remote Configuration’ field. Then hit the ‘APPLY’ and ‘SAVE’ button. For more information about remote control, please see chapter 4.1 on page 43. -
Page 41: Help
User Guide V1.8 Help Clicking on the ‘HELP’ button will open the Teracue website where you can get to the ‘Support’ link. This will only work if the encoder is situated in a network in which internet access is provided. Otherwise ‘page not found’ may be displayed. -
Page 42: Logout
ENC-200™ H.264 Encoder User Guide V1.8 Logout After having made adjustments to the encoder, please be sure to logout, see Figure 27. Figure 27: Logout form the ENC-200™ Logging out prevents misuse and unauthorized access to the ENC-200™. -
Page 43: Extended Function
Remote Control This chapter describes the remote control of the ENC-200™ for media controls like Crestron or AMX. To control the ENC-200™, the telnet protocol is used at the port number 2323. Furthermore here is no login necessary. If you want to block the remote control via the port number 2323, you can disable the remote configuration port 2323 via the webpage ‘System / Remote’... - Page 44 The IP-address should correspond to the ENC's IP-address. Figure 30: Starting a telnet session for the remote control test Figure 31: Session to test the remote control of the ENC-200™ After you have start the session, you got the display, see Figure 31: SDECRP The command ‘help’...
- Page 45 ENC-200™ H.264 Encoder User Guide V1.8 ╠►configuration/ ║ ╠═══════► encoder/ ║ ║ ╠════►enable_config_port Enable Config Port 2323 (yes, no) ║ ║ ╚════►0/ ║ ║ ╠═════════► page_refresh Page Refresh (yes/no) ║ ║ ╠═════════► start Encoder Start (yes/no) ║ ║ ╠═════════► stream_mode Stream Mode (TS, TS/VIDEO, VES) ║...
- Page 46 ENC-200™ H.264 Encoder User Guide V1.8 ║ ║ ║ ║ ║ ╠═══════► network/ ║ ║ ╠════►dhcp DCHP (yes/no) ║ ║ ╠════►ip_addr ENC-200 IP-address ║ ║ ╠════►subnet_mask Subnet Mask ║ ║ ╠════►broadcast_addr Broadcast address; Read-only ║ ║ ╠════►gateway_addr Gateway address ║ ║...
-
Page 47: Audio Talkback
To use the talkback function on the ENC-200™ in connection with the DEC-200™, please be sure that your encoder has the firmware version 0.9.20 or higher, because this firmware is necessary for the talkback function. - Page 48 ENC-200™ webpage. Now, you must select in the field ‘Talkback Rate’ your desired sample rate, which should be used from the decoder. The set talkback rate must also be set in the ENC-200™ webpage. Select in the drop-down-field ‘Audio Input’ of the DEC-200™ webpage the corresponding audio input for the talkback function.
-
Page 49: Tcp Streaming
TCP connection. 4.3.1 TCP configuration when ENC-200™ is the Server Please make the following steps, to create a TCP connection at which the ENC-200™ is the server: Please open the ENC-200™ webpage, go to the ENCODER > SETTINGS webpage and select in the ‘Transport Protocol’... -
Page 50: Tcp Configuration When Dec-200™ Is The Server
‘Transport Protocol’ drop-down field the variable ‘TCP/CLIENT’. Go to the ENCODER > DESTINATION webpage of the ENC-200™ and enter in the ‘IP address’ field the IP-address of the DEC-200™ (e. g. 172.16.20.200). Note: TCP supports only unicast. -
Page 51: Resetting To Factory Default
User Guide V1.8 Resetting to Factory Default The ENC-200™ can easily be returned to its factory default values. In order to do these please power down the encoder chassis and remove the blue top cover of the chassis. The Factory-Reset feature is available as from the ENC-200™... -
Page 52: Input Signal Switching Of The Bnc Connector On The Front Panel
If the BNC connector of the front panel should be a COMP input, please place the mini-jumper in vertical direction of the left mini-pin pairs, based on the fact that the ENC-200 pointing with the video input to the left, see Figure 38. For Composite input you must also change the video signal input parameter on the ENC-200 webpage, please see chapter 3.4.2 on page 19. - Page 53 ENC-200™ H.264 Encoder User Guide V1.8 Figure 38: Mini-Jumper position for CVBS input...
-
Page 54: Restarting The Enc-200
Restarting the ENC-200™ If an ENC-200™ is not approachable anymore, you can restart the ENC-200™ by using the restart switch. The restart button is placed in a hole on the front panel and it is located into the ‘O’ of the lettering ‘NETWORK’, see Figure 39. -
Page 55: Technical Specification
The BNC connector on the front panel can be configured as Composite- or as SDI-input via jumper. The ENC-200™ is delivered with the BREAK-OUT cable S as standard. Teracue also offers a professional BREAK-OUT cable P which must be ordered separately. - Page 56 ENC-200™ H.264 Encoder User Guide V1.8 Chassis: FR-110: Single channel chassis, 5V DC, 10W, 100-240V AC ext. power supply included; Dimensions (H/W/D): 45mm x 145mm x 240mm, Weight: 650 grams; No forced cooling required (fan less) FR-210: Dual channel chassis, 5V DC, 10W, 100-240V AC ext. power supply included;...
-
Page 57: Known Issues
172.16.20.201. A range of ENC-200™ have the +3.3 V at Pin 24 which is protected with a 1k resistor. The listed serial numbers below specifies the ENC-200™ with this resistor. At these encoder boards, the +3.3 V can not be used as a supply voltage. At all other ENC-200™, which are not listed here, the auxiliary supply can be used as a fused supply voltage with max. - Page 58 ENC-200™ H.264 Encoder User Guide V1.8 IV. List of figures 1: ENC-200™ ......................9 IGURE FRONT SIDE 2: B 'S' ....................... 11 IGURE REAKOUT CABLE 3: B 'P' ....................... 12 IGURE REAKOUT CABLE 4: ENC-200™ ' ................14 IGURE WEB INTERFACE...
- Page 59 ENC-200™ H.264 Encoder User Guide V1.8 List of tables 1: D ENC-200™ ..........9 ABLE ESCRIPTION OF THE CONNECTORS ON THE FRONT SIDE 2: A -D 26- ................ 10 ABLE SSIGNMENT OF THE ONNECTOR 3: B 'S' ......................... 11 ABLE...
Need help?
Do you have a question about the ENC-200 and is the answer not in the manual?
Questions and answers