Table of Contents
Advertisement
Quick Links
Advertisement
Table of Contents

Related Manuals for LuxHome LHK110EK


Summary of Contents for LuxHome LHK110EK
- Page 1 LHK110EK/LHK110EE 2.4GHz Smart Home Security System with 7-inch Touch Control Panel Instruction Guide * This product belongs to part of a security system that monitors/operates 24 hours nonstop. ** The contents in this manual are subject to modifications without notice.
- Page 2 Safety Notice 1. Do not drop, puncture or disassemble the panel or camera; otherwise the warranty will be voided. 2. Avoid all contact with water, and dry hands before using. 3. Never tug on the power cords. Use the plug to unplug it from the wall outlet. 4.
- Page 3 Lithium-Polymer Battery Warning 1. This equipment contains a rechargeable lithium-polymer battery. 2. Do not charge the battery in temperatures below 0° C (32° F) or higher than 45° C (113° F). 3. Do not open or disassemble the battery. 4. The rechargeable batteries contained in this equipment may explode if put in or near a fire. 5.
-
Page 4: Table Of Contents
Table of Contents Introduction Setting Alarm Mode and Viewing Eventlog Package Contents Setting Lighting Fixtures Product Overview System Info Getting Started Specifications Screen Display and Indicators Operations Layer Diagram List of Compatible Devices Operation - Cameras Appendix A - Replay Arm Mode Flowchart Record All Appendix B -... -
Page 5: Introduction
Introduction The touch control panel is designed to be the security center of your home. The system consists of a touch screen control for system operation, cameras that monitor the surroundings of your residence, various wireless sensors that provide perimeter and interior intruder protection, and lighting fixtures. -
Page 6: Package Contents
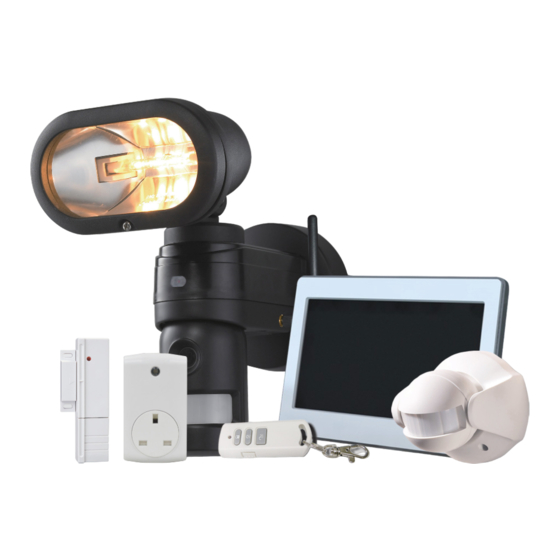
Package Contents • 2.4GHz 7” Touch Control Panel x1 • 2.4GHz Lighting Camera x1 • Wire Free PIR Motion Sensor x1 • Wire Free Magnetic Contact x1 • Wire Free Remote Control x1 • Plug Through Receiver x1 • 4GB micro SD card x 1 •... -
Page 7: Getting Started
Getting Started Unpack the kit contents and follow the steps below to set up your panel: Connect the AC adapter’s connector to the panel and the adapter plug to a wall outlet. Connect the RJ45 connector to the panel and the other end of the network cable to a “LAN” port of your router. - Page 8 Pairing with the accessory lighting camera: 1) Tap on the “Setting” button on the function bar to enter the camera setting screen. 2) Select the “Light Cam” icon on the left side and highlight an available slot on the right side of the screen.
-
Page 9: Screen Display And Indicators
, which is also the only condition that someone in a remote location can access the system via “LuxHome Guard” - the smartphone APP. Note that whenever someone is operating the panel, the icon will switch to and any attempt of remote access will be denied. - Page 10 : Tap to go back to previous display : Tap to go back to home display Message bar Main operation area Group operation buttons Camera view: Active camera/Signal strength indicator : Tap to digitally magnify the screen : Toggle recording on/off : Tap to adjust screen brightness : Tap to adjust sound volume...
-
Page 12: Operation - Cameras
Operation - Cameras In this display you can view the camera images in several ways: Quad view: Tap on the “Quad” button to switch to quadruple cameras view. All four cameras live images will display on the screen. You can then tap on any of the camera view to switch to full- screen display. -
Page 13: Record All
Record All Tap on the “Record All” button and all cameras will start recording immediately. The recording will last for 2 minutes. Schedule Up to 5 scheduled recording sessions are available in a single day. You are limited to the size of the micro SD card for how long a total of recording time you will have. -
Page 14: Operation - Lights
Operation - Lights This display is for controlling all lighting fixtures connected in the system. Fixture status: : The lighting fixture is off. : The lighting fixture is on. Controlling the Lights 1. Tap on the intended lighting fixture to turn it on or off. 2. -
Page 15: Operation - Alarms
Operation - Alarms This display is for controlling all alarm devices connected in the system. Setting Alarm Mode The panel provides 3 alarm modes for you to choose from: • Arm: This is the most comprehensive protection mode (equals Full Arm). When the system is triggered, a full alarm condition will be initiated. -
Page 16: Viewing Logs
1) All cameras will start recording. 2) The “bound” lighting fixtures will turn on for 3 minutes. PIR or Contact Detector 3) The siren will NOT sound. 4) The email alert and APP notice will be sent. 5) Writes to “Event Log” of the panel. Silent Arm Same as above except that only the triggered camera will Lighting Camera... -
Page 17: Setting - Cameras
Setting - Cameras Note: 1) Set the system to Disarm mode before pairing/unpairing. 2) When only one camera is connected, the resolution of video is 480x272 and sound is recorded. However, when 2 or more cameras are connected, the recorded video will become QVGA (320x240) with no sound. -
Page 18: Setting - Lighting Fixtures
Setting - Lighting Fixtures Note: Set the system to Disarm mode before adding/removing lighting fixtures. This display is for learning and setting lighting fixtures. The panel can connect with up to 8 lighting fixtures. Adding: 1. Select the type of the light. There are 6 types of lighting items for selection: 1) On/Off Plug: A plug that provides only on/off operation. -
Page 19: Setting - Alarms
Setting - Alarms Note: Set the system to Disarm mode before adding/removing alarm devices. This display is for learning and setting alarm devices. The panel can connect with up to 8 alarm devices. Adding: 1. Select the type of the alarm. There are 7 types of alarm items for selection: 1) PIR: A passive infrared occupancy detector. -
Page 20: Setting - Network
Setting - Network Internet Setup 1. Static IP: If you are familiar with the settings of your network or the “DHCP” setting does not work in your environment, you can select this option to set up the IP manually. The screen will display the following items for settings: Please consult with your internet service provider on how to configure the IP settings. -
Page 21: Setting - Advanced Options
Setting - Advanced Options This display is for setting/viewing advanced system options. The items are described as the following table: Item Description Two standby modes are available for selection: Standby Mode Menu: The screen will display menu interface when idling: Camera Picture: The screen will display live camera image when idling. - Page 22 This item allows you to configure if the screen will lock up after a period of idleness. Password setup would be required if you enable this function. The default password is “0000”. If you forget your password after change, you can use the “Factory Default”...
-
Page 23: Using App On A Mobile Device
1. Android system: If you are using an Android system device, you can search and download the “LuxHome Guard” APP from “Google Play”. 2. iOS system: For i-device users, search and download the “LuxHome Guard” APP in the “APP Store”. -
Page 24: Main Functions Display
Main Functions Display After adding a new panel, the title of the device will display on the list screen. Tap on the connected device to enter the main functions display: Single tap: go to main functions display. Tap & hold: bring up options menu: View: go to main functions display. -
Page 25: Playback
Playback The Playback function allows you to specify a period of time and view any recorded videos during that period. On the main functions display, tap on the (Playback) icon to enter the playback display. Follow the steps below to playback recorded videos on the specified date: 1. -
Page 26: Setting Alarm Mode And Viewing Eventlog
Setting Alarm Mode and Viewing Eventlog Use the Alarm function and you can set up the alarm mode of your system and view the event log as well. On the main functions display, tap on the (Alarm) icon to enter the alarm function display. Icon image changes according to the Alarm mode that... -
Page 27: Setting Lighting Fixtures
Setting Lighting Fixtures The lighting control function allows you to control the on/off statuses of the lighting fixtures in your residence. The “dim” function is available for dimmable lighting fixtures. On the main functions display, tap on the (Light) icon to enter the lighting control display. On the screen you can see that all configured lighting fixtures are listed. -
Page 28: System Info
System Info The Setting function allows you to view the system info. On the main functions display, tap on the (Setting) icon to enter the system info display. The system info is displayed here. - 28 -... -
Page 29: Specifications
Specifications Touch Control Panel 7” Resistive Touch Panel Resolution 800 x 400 Power Jack DC5V Adapter DC5V 2A from AC100-240V Switching Adapter Storage Micro SD Card (FAT/FAT32) / Max. 32GB Rechargeable Battery Li-polymer 3.7V 2000mAh Internet Output Ethernet Port RJ45 Speaker Built-in Operating Temperature... -
Page 30: Faq
• Q: How large is a recorded video? • A: The average size of a video is about 5MB (2 minutes, 150KB/sec.). A 4GB card can hold about 400 videos. The maximum size of a video is about 15MB (15 minutes, 150KB/sec.). A 4GB card can accommodate about 266 large video files. -
Page 31: Appendix A - Arm Mode Flowchart
Appendix A - Arm Mode Flowchart Appendix B - Silent Arm Mode Flowchart - 31 -... -
Page 32: Panic&Tamper Mode Flowchart
Appendix C - Panic&Tamper Mode Flowchart Appendix D - Disarm Mode Flowchart - 32 -... -
Page 33: Disposal And Recycling
A copy of your original invoice/receipt. b. A covering letter giving your full contact details, including email address (if applicable). c. A description of the fault or problem. LuxHome Alarm Systems Copyright © 2014. All Rights Reserved. Website: www.myluxhome.com Service Support: service.uk@myluxhome.com...
Need help?
Do you have a question about the LHK110EK and is the answer not in the manual?
Questions and answers