
Related Manuals for Extech Instruments RH10


Summary of Contents for Extech Instruments RH10
- Page 1 99 Washington Street Melrose, MA 02176 Phone 781-665-1400 Toll Free 1-800-517-8431 Visit us at www.TestEquipmentDepot.com USER GUIDE Model RH10 Hygro‐Thermometer Humidity and Temperature Meter ...
- Page 2 Introduction Congratulations on your purchase of the Extech Hygro‐Thermometer Model RH10. This device measures relative humidity and air temperature using the attached probe. The large, easy‐to‐read backlit LCD includes primary and secondary displays plus status indicators. To conserve battery energy the meter switches OFF automatically after a 30 minute period of inactivity. This device is shipped fully tested and calibrated and, with proper use, will provide years of reliable service. Please visit our website (www.extech.com) to check for the latest version of this User Guide, Product Updates, and Customer Support. Safety The probe extending from the top of the meter houses the sensitive measurement sensors, do not mishandle, shock, or allow liquids to come into contact with it. The probe sensor can cause personal injury if it is misused or mishandled. Use caution when handling this device. Do not allow children to handle this device or the accessories and packing materials supplied with it. The meter uses a 9V battery (installed in the rear battery compartment). Please remove the battery from the meter if the meter is not to be used for a long period of time. Spent batteries that remain in the meter could potentially leak and cause damage to the meter. RH10-en-GB_V1.1 4/15...
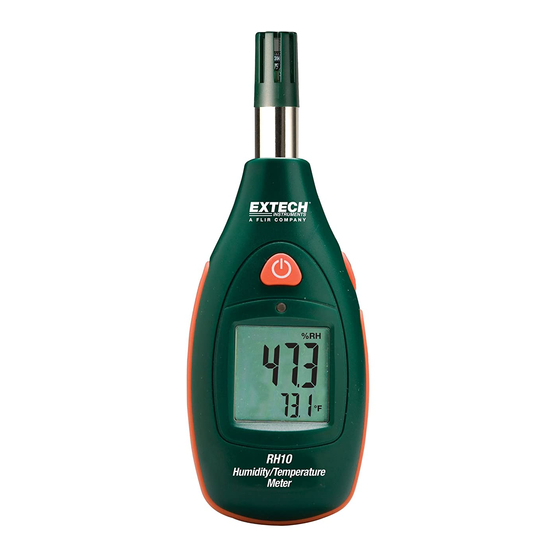
- Page 3 Meter Description Front side of meter 1. Relative Humidity and Air Temperature Probe 2. Power ON/OFF button 3. Backlight ambient light sensor 4. Relative Humidity reading on LCD 5. Air Temperature reading on LCD 6. MAX‐MIN button Rear side of meter 7. Threaded Tripod mount 8. Temperature units select switch access 9. Battery compartment RH10-en-GB_V1.1 4/15...
- Page 4 Display Layout Temperature reading digits Relative Humidity reading digits Low Battery symbol Maximum air temperature and relative humidity measurements Minimum air temperature and relative humidity measurements Relative Humidity unit of measure Temperature units of measure Auto Power OFF reminder clock symbol RH10-en-GB_V1.1 4/15...
- Page 5 6. Place the battery back in the compartment as detailed in the battery replacement section. 7. Switch the meter ON and verify that the LCD display shows the desired unit of measure. MAX‐MIN Recording 1. Press the MAX‐MIN button to display the highest readings (maximum) recorded. The readings shown will be the highest readings measured since the meter was switched ON. The MAX icon will appear at the top of the LCD. 2. Press the MAX‐MIN button again to display the lowest readings (maximum) recorded. The readings shown will be the lowest readings measured since the meter was switched ON. The MIN icon will appear at the top of the LCD. 3. Press the MAX‐MIN button again to switch the display back to real time measurement indicator mode. The MAX and MIN icons will switch OFF. LCD Backlight The LCD backlight switches ON automatically when the ambient light dims below the threshold. The ambient light sensor is located directly above the LCD window. To test the backlight, cover the ambient light sensor and the LCD backlight should immediately switch ON. RH10-en-GB_V1.1 4/15...
- Page 6 1. Meter housing only: Clean with a damp cloth and mild detergent when necessary. Do not use solvents or abrasives. 2. Do not attempt to introduce liquid into the probe access holes when cleaning. The probe head can be cleaned using a dry, lint free cloth to dust and to free debris from the probe openings. 3. Store the meter in an area with moderate temperature and humidity. Battery Replacement The battery symbol appears on the LCD when the 9V battery needs to be replaced. Note that the meter automatically switches OFF after 30 minutes of inactivity to conserve battery energy. Replace the 9V battery as follows: 1. Switch the meter OFF if necessary. 2. Remove the rear battery compartment cover by sliding the compartment cover downward. 3. Replace the 9V battery carefully. 4. Place the red and black wires cautiously in the battery compartment to avoid crimping when closing the compartment cover. 5. Always re‐assemble the meter before operating. Never dispose of used batteries or rechargeable batteries in household waste. As consumers, users are legally required to take used batteries to appropriate collection sites, the retail store where the batteries were purchased, or wherever batteries are sold. Disposal: Do not dispose of this instrument in household waste. The user is obligated to take end‐of‐life devices to a designated collection point for the disposal of electrical and electronic equipment. Other Battery Safety Reminders o Never dispose of batteries in a fire. Batteries may explode or leak. o Never mix battery types. Always install new batteries of the same type. WARNING: To avoid electric shock, do not operate the meter until the battery cover is in place and fastened securely. RH10-en-GB_V1.1 4/15...
-
Page 7: Specifications
Accuracy is specified for the following ambient temperature range: 18 to 28°C (64 to 82°F) Sampling Rate 2 samples per second Auto Power OFF Meter automatically switches OFF after 30 minutes of inactivity Operating Conditions 0 to 50 C (32 to 122 F); < 80% RH non‐condensing Storage Conditions ‐10 to 60 C (14 to 140 F); <80% RH non‐condensing Power Supply 9V Battery Battery Life Approx. 150 hours Dimensions / Weight 135 x 229 x 46mm (5.3 x 9 x 1.8”); 200g (7.0 oz.) RH10-en-GB_V1.1 4/15 Test Equipment Depot - 800.517.8431 - 99 Washington Street Melrose, MA 02176 TestEquipmentDepot.com...
Need help?
Do you have a question about the RH10 and is the answer not in the manual?
Questions and answers