
Related Manuals for Extech Instruments RH210


Summary of Contents for Extech Instruments RH210
- Page 1 User Guide Hygro‐Thermometer Model RH210 GlobalTestSupply www. .com nd Quality Products Online at: sales@GlobalTestSupply.co...
- Page 2 Introduction Thank you for selecting the Extech RH210 Hygro‐Thermometer which simultaneously displays Relative Humidity, Temperature, and Dew Point. Measurements are made with a remote electrode. This device is shipped fully tested and calibrated and, with proper use, will provide years of reliable service. Please visit our website (www.extech.com) for product registration, support, and to check for the latest version of this User Guide. Features Air Temperature, Relative Humidity, and Dew point measurements Detachable probe for ease of use in a variety of measurement environments Fast humidity measuring response time Auto‐off feature to save battery life LCD display shows Temperature and %RH or Dew point simultaneously DATA HOLD for holding displayed reading Record and View Min/Max readings Programming mode for selecting F temperature units and enabling/disabling the auto power off utility Low battery indicator RH210-en-GB_V1.0 12/14 GlobalTestSupply www. .com nd Quality Products Online at: sales@GlobalTestSupply.co...
-
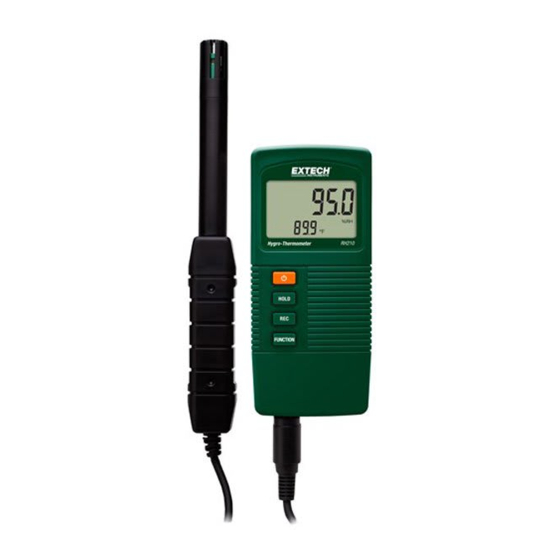
Page 3: Meter Description
5. Record button 6. Function button 7. Probe connection 8. SET button (under flap) 9. Probe NOTE: Battery compartment on back of meter Meter Power The meter is powered by one 9V battery; press the Power button to switch the meter ON. Press and hold the Power button for at least 2 seconds to switch the meter OFF. When powering ON, the meter performs a self‐test whereby the LCD display counts down to zero before stabilizing at the normal operation screen. If the meter does not switch ON when prompted, or if the low battery icon is showing on the LCD, please replace the battery. Refer to the battery installation section for detailed information. The Auto Power OFF feature switches the meter OFF after a 10‐minute period of inactivity. To defeat this feature please refer to the Setup Mode section. RH210-en-GB_V1.0 12/14 GlobalTestSupply www. .com nd Quality Products Online at: sales@GlobalTestSupply.co... -
Page 4: Min-Max Recording
Press the Hold button to freeze the current values on the display. Press the REC button to access the MIN‐MAX Recording mode. See detailed information in the MIN‐MAX Recording section. Press and hold the Power button for 2 seconds to turn the meter OFF. Data Hold Press the HOLD button to freeze the displayed value. The LCD will display HOLD along with the held reading. Press the HOLD button again to release the data hold function. The HOLD display icon will switch OFF. MIN‐MAX Recording When selected, the Data Recording function records the MIN (lowest) and MAX (highest) readings: Press the REC button once to start recording MIN and MAX readings. The REC indicator will appear on the display. Press REC again and REC MAX will display on the screen along with the maximum value. Press REC again and the display will show REC MIN along with the minimum value. To view the real time readings while continuing to track the MIN and MAX values, press the HOLD button while either the REC MAX or REC MIN icons are visible; now only the REC icon will be visible. The meter is now continuing to monitor the highest (MAX) and lowest (MIN) readings but is displaying real time measurements. To view the MAX and MIN values again use the REC button as described earlier. To exit the Record mode and reset the MIN and MAX values, press and hold the REC button for at least 2 seconds. The display will return to the normal operating mode and the REC/MAX/MIN icons will all disappear. RH210-en-GB_V1.0 12/14 GlobalTestSupply www. .com nd Quality Products Online at: sales@GlobalTestSupply.co... -
Page 5: Setup Mode
Note: The SETUP Mode cannot be accessed if the HOLD or the MIN‐MAX function is active. Open the flap on the meter’s right side to access the recessed SET button. Use a paper clip or small screwdriver to press and hold the SET button for at least 3 seconds until the meter beeps twice. The ‘Code 1000’ prompt should appear on the display. Proceed with the steps below: Change the Temperature Units of Measure (F/C) With ‘Code 1000’ showing on the display (as explained above), follow the steps below: Press REC and the lower display line will show two units of measure icons. The smaller digits indicate the unit of measure that will be adopted when these programming steps are complete. To select F, press the Function button so that the number “1” appears and then press REC. To select C, press the Function button so that the number “0” appears and then press REC. Press the HOLD button to save the setting and return to the normal operating mode. The display should now be indicating the programmed unit of measure. Enable‐Disable the Auto‐Power OFF utility With ‘Code 1000’ showing on the display (as explained above), follow the steps below: Press the REC button and then press the SET button (briefly) to access the Auto‐Off mode. To enable the Auto‐OFF mode, press the Function button to indicate a “1” on the display, and then press the REC button. To disable the Auto –OFF mode, press the Function button to indicate a “0” on the display, and then press the REC button. Press the HOLD button to save the setting and return to the normal operating mode. RH210-en-GB_V1.0 12/14 GlobalTestSupply www. .com nd Quality Products Online at: sales@GlobalTestSupply.co... -
Page 6: Battery Replacement
Battery Replacement The 9V battery that powers the instrument requires replacing when the battery icon flashes on the display. To replace the battery follow the steps below: Switch the meter OFF. Disconnect the probe from the instrument. Open the rear battery compartment using a screwdriver to remove the two Phillips head screws that secure the compartment. Carefully remove the old battery from the compartment and gently unsnap the battery’s terminals from the wired (red/black) connectors. Install a new 9V battery by snapping the battery terminals onto the wired connectors (observing correct polarity) and inserting the battery into the compartment. Install the battery chamber into the meter housing and secure with the two screws. Never dispose of used batteries or rechargeable batteries in household waste. As consumers, users are legally required to take used batteries to appropriate collection sites, the retail store where the batteries were purchased, or wherever batteries are sold. Disposal: Do not dispose of this instrument in household waste. The user is obligated to take end‐of‐life devices to a designated collection point for the disposal of electrical and electronic equipment. RH210-en-GB_V1.0 12/14 GlobalTestSupply www. .com nd Quality Products Online at: sales@GlobalTestSupply.co... -
Page 7: Specifications
Resolution Accuracy > 70%RH: +/‐(3%rdg+1%RH) Relative humidity 10% to 95% RH 0.1% RH < 70% RH: +/‐3% RH ‐25.3°C to 48.9°C 0.1°C Calculated from Dew Point Temperature and %RH ‐13.5°F to 120.1°F 0.1°F 0°C to 50°C 0.1°C ±0.8°C Temperature 32°F to 122°F 0.1°F ±1.5°F Note: Above specification tests conducted under an RF field strength less than 3 V/M and frequency less than 30 MHz Copyright © 2014 FLIR Systems, Inc. All rights reserved including the right of reproduction in whole or in part in any form www.extech.com RH210-en-GB_V1.0 12/14 GlobalTestSupply www. .com nd Quality Products Online at: sales@GlobalTestSupply.co...
Need help?
Do you have a question about the RH210 and is the answer not in the manual?
Questions and answers