Table of Contents
Advertisement
Lowes.com/harborbreeze
Harbor Breeze ® is a registered trademark of LF,
LLC. All Rights Reserved.
ATTACH YOUR RECEIPT HERE
Serial Number
Purchase Date
Questions, problems, missing parts? Before returning to your retailer, call our customer
service department at 1-866-473-4537, 8 a.m. - 7 p.m., EST, Monday - Friday,
9 a.m. - 6 p.m., EST, Saturday.
EB1617
ITEM #0699630
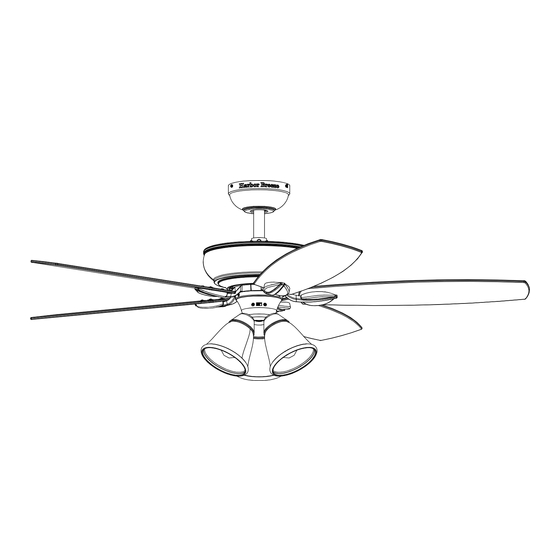
BEACH HAVEN
CEILING FAN
MODEL #00881
UL MODEL #52-BCH
Español p. 19
Lowes.com/harborbreeze
1
Advertisement
Table of Contents

Related Manuals for Harbor Breeze 00881


Summary of Contents for Harbor Breeze 00881
-
Page 1: Ceiling Fan
ITEM #0699630 BEACH HAVEN CEILING FAN MODEL #00881 UL MODEL #52-BCH Harbor Breeze ® is a registered trademark of LF, LLC. All Rights Reserved. Español p. 19 ATTACH YOUR RECEIPT HERE Serial Number Purchase Date Questions, problems, missing parts? Before returning to your retailer, call our customer service department at 1-866-473-4537, 8 a.m. -
Page 2: Table Of Contents
TABLE OF CONTENTS WARNING • ELECTRIC SHOCK HAZARD - To reduce the risk of electric shock, make sure the electricity Safety Information......2 Wiring .......... 10 has been turned off at the circuit breaker or fuse box before beginning installation. •... -
Page 3: Package Contents
PACKAGE CONTENTS HARDWARE CONTENTS (shown actual size) Blade Screw Wire Qty. 15 + 1 extra Connector Qty. 3 + 1 extra Blade Bracket Screw Rubber Gasket Qty. 10 + 1 extra Qty. 1 (NOT TO SCALE) PART DESCRIPTION QUANTITY PREPARATION Mounting Bracket (preassembled to Canopy (B)) Before beginning assembly of product, make sure all parts are present. -
Page 4: Initial Instructions
INITIAL INSTRUCTIONS INITIAL INSTRUCTIONS 1. Determine mounting method to use. 4. Install the mounting bracket (A) to the outlet box A - Downrod Mount (normal or angled ceiling) (not included) using the two screws provided B - Closemount (normal ceiling only) with the outlet box. -
Page 5: Closemount Style Fan Mounting
DOWNROD STYLE FAN MOUNTING CLOSEMOUNT STYLE FAN MOUNTING 1. Remove the canopy cover (C) from the bottom EXTENDED DOWNROD INSTALLATION: If you of the canopy (B). are installing the fan with a longer downrod (sold separately), insert it through the canopy (B) and canopy cover (C). -
Page 6: Wiring
CLOSEMOUNT STYLE FAN MOUNTING FINAL INSTALLATION 4. Temporarily hang the canopy (B) onto the hook If you installed the fan with “Closemount Style Fan on the mounting bracket (A) using one of the Hook Mounting”, continue to Steps 1 and 2. If you installed Screws Outlet non-slotted holes in the canopy (B). - Page 7 FINAL INSTALLATION FINAL INSTALLATION 7. To install the fan WITH the light kit (H), 4. Attach blade (G) to a blade bracket (F) using three blade screws (BB). connect the MALE plug from motor assembly (E) to the FEMALE plug from light kit (H). Repeat for remaining blade assemblies.
-
Page 8: Operating Instructions
FINAL INSTALLATION OPERATING INSTRUCTIONS REMOTE CONTROL: 10. To install the fan WITHOUT the light kit (H), you NOTE: If you have more than one remote controlled fan installed in the same location, you may must special order a switch cup from our customer service department at want to change the frequency of the remote control to avoid any possible interference between remote controls. -
Page 9: Care And Maintenance
OPERATING INSTRUCTIONS CARE AND MAINTENANCE • Important: Shut off main power supply before beginning any maintenance. For the DIMMER function, press and hold the light button. Light will dim. Release the button when light is at desired level. • Do not use water or detergents when cleaning the fan or fan blades. A dry dust cloth or lightly dampened cloth will be suitable for most cleaning. -
Page 10: Warranty
8 a.m. - 7 p.m., EST, Monday - Friday, 9 a.m. - 6 p.m., EST, Saturday. PART DESCRIPTION PART # Downrod 102200-0212BN Blade Bracket 104000-0354BN Blade 108001-6073A4 Switch Cup 105300-0162BN Printed in China Harbor Breeze ® is a registered trademark of LF, LLC. All Rights Reserved. Lowes.com/harborbreeze...
Need help?
Do you have a question about the 00881 and is the answer not in the manual?
Questions and answers