Table of Contents
Advertisement
Quick Links
Download this manual
See also:
Owner's Manual
Advertisement
Table of Contents

Related Manuals for Alecto DBX-99


Summary of Contents for Alecto DBX-99
- Page 1 USER’S MANUAL DBX-99 DBX99-manual-GB-v1.0.indd 1 31-3-2016 10:11:22...
-
Page 2: Overviews
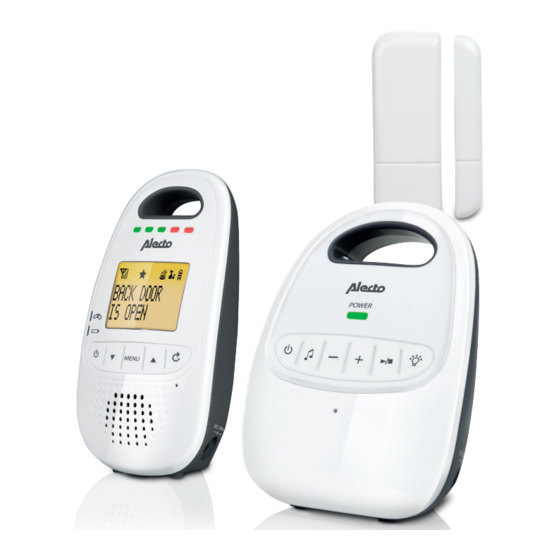
1 OVERVIEWS 5. Ke 6. Ke YGT1- 00 7. Be 1.1 OVERVIEW PARENT UNIT: Display: - Connection 8. Ke (flashes when 9. Ke there is no con- 2015. 01. 14 YGT1- 00 10. Ba nection); 11. Co - Illuminates when the loud- YGT1- 00 2015. -
Page 3: Overview Baby Unit
5. Key : volume down key. 6. Key MENU: to enable or disable user functions. 7. Belt clip (see backside of the parent unit) to carry the parent unit with you. 8. Key : key to go back at set up. 9. -
Page 4: Installation Parent Unit
2 INSTALLATION The pa You ca pendin 2.1 PARENT UNIT: or off; w Parent unit is powered by the 2 included rechargeable batteries. These batter- fully ch ies are charged through the included power adaptor. ATTENTION: ONLY INSTALL THE SUPPLIED BATTERY PACK! 2.2 BA INSTALLING DIFFERENT MODELS CAN CAUSE DAMAGE OR EVEN The ba... -
Page 5: Placement Tips
The parent unit can be used immediately. You can see the progress of charging the batteries in the display (de- pending on the setting of the baby monitor (is the parent unit switched on or off; what is the volume level, does the baby cry a lot), the batteries are batter- fully charged after 12 to 24 hours). - Page 6 Don’t fo device ent or b 3.1 TU Example for fixing to a door The door-/window sensor shall be fixed on the door and the magnet unit on the doorframe. If desired, you can also fix the door/window sensor on 3.2 CO the frame, and the magnet unit on the door.
-
Page 7: Baby-Unit
3 USE Don’t forget that this baby intercom is merely an extra piece of mind. The device can never replace the physical and monitoring presence of a par- ent or babysitter. 3.1 TURNING ON/OFF: 3 sec. Keep the power key pressed until the concerning unit is switched on. -
Page 8: Listening
3.3 LISTENING: 3.5 LU 5 differ Reception volume: lullaby You can set the volume (5 levels + sound off) with the keys on the parent unit. • The set level is indicated by illuminating indica- tor lights, as well as on the display. YGT1- 00 2015. -
Page 9: Lullabies
POWER 3.5 LULLABIES: 5 different lullabies have been programmed in the baby unit. The selected POWER lullaby will be plaid during 15 minutes. off) On the baby unit, press shortly on the key start or stop the playback of the lullaby. ndica- m vol- n you... -
Page 10: On. Night Light
3.7 NIGHT LIGHT: 3.9 DA The night light can be switched on and off on the baby unit itself, as well as remotely through the parent unit. When i unit. On the baby unit: Press short on the key on the baby unit to This da switch the night light on or off. -
Page 11: Date And Time Display
3.9 DATE AND TIME DISPLAY: s well When idle, the date and time are displayed on the display of the parent unit. This date is saved when the baby unit or the parent unit is switched off. However, if both units are switched off, this shall be set again. Press on the key MENU. -
Page 12: Alarm
3.10 ALARM: 3.11 SE On the parent unit, you can set a time alert through a stopwatch function. The se With this the feeding times can be determined. you can Menu Press on the key MENU. Search the option: [ ALARM ] with the keys and . -
Page 13: Sensitivity
3.11 SENSITIVITY: nction. The sensitivity of the baby unit can be set on the parent unit. This way you can determine from which volume the sound can be heard. Menu Press on the key MENU. Search the option: [ SENSITIVITY ] with the keys and . -
Page 14: Temperature Display And Alarm
3.13 TEMPERATURE DISPLAY AND ALARM: Operat As soo The temperature of the nursery is displayed in degrees Celsius (°C) on peratur the parent unit as well as the baby unit, when they are idle. illumina 2015. 01. 14 YGT1- 00 With this function you can program the upper and lower limit. - Page 15 Operation temperature alarm: As soon as the set minimum or maximum value is exceeded, the tem- ) on perature indication in the display will flash, and the indicator icon will illuminate. If the alarm is enabled beside that, then 3 beeps sound every 2015.
-
Page 16: Sensor
3.14 SENSOR In the sensor menu, you can register additional wireless sensors, view the notifications, and set other settings. See chapter 2.4 for installing the included magnet sensor. Registration of sensors: Menu Press on the key MENU. Search the option [ SENSOR ]. Menu Press on the key MENU. - Page 17 [SETTINGS]: to rename the sensors (per loca- tion), enable verbal notifications, register sensors or delete sensors. MOVEMENT DETECTOR: ar on at you ], also An optional movement detector for the DBX-99 is also available through our website. See for more information: http://www.alecto.nl DBX99-manual-GB-v1.0.indd 17 31-3-2016 10:11:34...
-
Page 18: Reset Settings
3.15 RESET SETTINGS: If you have lost the overview concerning the settings, then you can restore the factory settings in a simple way. Menu 4.1 GE Press on the key MENU Search the option [ RESET ] with the keys and . -
Page 19: General (Safety) Instructions And Tips General
DBX-99 signals from other baby intercoms or for other baby intercoms to receive the sound from your baby. It is not possible to expand your DBX-99 with individual baby-units or parent-units. DBX99-manual-GB-v1.0.indd 19... -
Page 20: Range
4.3 RANGE: 4.6 MA This baby intercom has a range of 300 meters in an open field and up to 50 meters indoors; this range depends on local conditions (concrete walls, other baby intercoms, wireless phones, etc.). 4.4 BATTERY USAGE: 4.7 EN With fully charged NiMH batteries with a capacity of 400mAh, you can use the parent unit more than 12 hours without the power adap-... -
Page 21: Maintenance
Never discard batteries as normal domestic waste. 5 DECLARATION OF CONFORMITY The Alecto DBX-99 meets all essential requirements and provisions as described in the European Directive 1999/5/EC. The declaration nect of conformity is available on the website WWW.ALECTO.NL... -
Page 22: Troubleshooting
De power supply for the parent unit is provided weakly, but the parent by the batteries; the adapter only takes care of unit cannot be switched charging the batteries). For additional information, visit: www.alecto.nl DBX99-manual-GB-v1.0.indd 22 31-3-2016 10:11:35... -
Page 23: Table Of Contents
CONTENTS OVERVIEWS OVERVIEW PARENT UNIT ..........2 OVERVIEW BABY UNIT ............. 3 can be INSTALLATION a while PARENT UNIT ..............4 BABY-UNIT ................5 unit PLACEMENT TIPS.............. 5 duce DOOR/WINDOW SENSOR ..........5 baby TURNING ON/OFF ............. 7 CONNECTION CHECK ............7 LISTENING ................. -
Page 24: Warranty
9 WARRANTY For the Alecto DBX-99 you have a warranty of 24 months from the date of purchase. During this period, we guarantee the free repair of defects caused by material and workmanship errors. All this subjected to the final assessment of the importer.
Need help?
Do you have a question about the DBX-99 and is the answer not in the manual?
Questions and answers