Table of Contents
Advertisement
Please read all instructions before installing
SPECIFICATIONS
Voltage.......................... ....................................................... 120VAC, 60Hz
Load (Single Pole)
@120VAC............. ......................... 0-800W tungsten or ballast, 1/6HP
Environment.................... ................................................ Indoor Use Only
Operating Temperature...... ...................... 32˚ to 131˚ F (0˚ to 50˚ C)
Humidity....................... ............................... 95% RH, non-condensing
Tools Needed
Insulated Screwdriver
Wire Strippers
ONLINE LONGITUDE/LATITUDE
DESCRIPTION AND OPERATION
The RT-200 is an astronomic time clock that controls the connected light or fan
either manually or through user programmed times.
Upon installation the user enters the correct longitude/latitude coordinates,
date, and local time. (See SETUP.) This ensures that once the schedules are
programmed, the load turns ON/OFF at the correct local times.
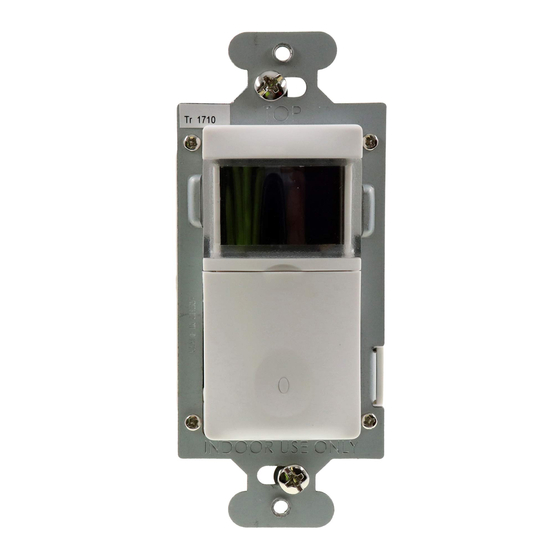
Lighted Switch
To help locate the switch button in a dark room, an amber LED illuminates the
ON/OFF button while the controlled load is OFF. When the load is ON, the LED is
OFF.
INSTALLATION & WIRING
1. Prepare the switch box
After the power is turned OFF at
the circuit breaker box, remove
the existing wall plate and
mounting screws. Pull the old
switch from the wall box.
2. Identify the type of circuit
In a single pole circuit, two single
wires connect to two screws on
the existing switch. A ground
wire may also be present and
connected to a ground terminal
on the old switch. A neutral wire
should also be present in the
wall box.
LOCATOR TOOL - GO TO
www.wattstopper.com/RT-200
Disconnect power at the circuit breaker
before installing this product.
www.wattstopper.com
Astronomical
Santa Clara, CA 95050
WARNING
Black > HOT (power
from circuit box)
Industry standard
switch cover plate
(not provided)
RT-200
Time Switch
Red > LOAD (power
Green > GROUND
Terminal
to lamp or fan)
White > NEUTRAL
Advertisement
Table of Contents

Related Manuals for wattstopper RT-200

Summary of Contents for wattstopper RT-200
-
Page 1: Specifications
Santa Clara, CA 95050 DESCRIPTION AND OPERATION The RT-200 is an astronomic time clock that controls the connected light or fan either manually or through user programmed times. Upon installation the user enters the correct longitude/latitude coordinates, date, and local time. (See SETUP.) This ensures that once the schedules are programmed, the load turns ON/OFF at the correct local times. - Page 2 “Strip Gage” (approximately ½ inch). 4. Wire the time switch. Twist the existing wires together with the wire leads on the RT-200 as indicated in the table below. Cap them securely using the wire nuts provided. Power wire from the circuit (hot)
-
Page 3: Set Time And Date Menu
Start – Week. End – Month Follow same steps for START - Month. To exit SET TIME AND DATE menu, press the ↓ button to highlight PREVIOUS menu. Press the CENTER button to select and return to the SETUP menu. www.wattstopper.com... -
Page 4: Location Menu
MAIN PAGE when sound is enabled. Flash – When FLASH is enabled the RT-200 turns OFF the load for 1 second and then turns it back ON to warn the user that the load is turning OFF in 1 minute. -
Page 5: Viewing Settings
Press the CENTER button to select and return to the SETUP menu. VIEWING SETTINGS Once the RT-200 has been completely set up, it is possible to see the various programs without needing to enter the SETUP menu. From the MAIN PAGE press and hold the ON/OFF button. -
Page 6: Troubleshooting
POWER FAILURE In the event of a loss of power to the RT-200, the unit will maintain the correct time, location and settings for 72 hours. PRODUCT RESET The RT-200 has a reset button located under the ON/OFF button. -
Page 7: Set Time And Date
APPENDIX: NAVIGATION, USER OPTIONS & PROGRAMMING Standard display, aka: When first powered up, MAIN PAGE when the the Watt Stopper logo RT-200 is powered and appears. running: Tue 03/31/2009 12:04 PROG Press and hold the ↓ button to see sunset, sunrise,... -
Page 8: Daylight Savings Time (Dst)
Repeat the same process as setting the DST start date for setting the DST end date. Once the DST end date is set, press the ↓ button to highlight PREVIOUS menu. Press CENTER button to return to the SETUP menu. www.wattstopper.com... -
Page 9: Setting The Time Zone
LOCATION If the location information is unknown, visit our website at www.wattstopper.com/ RT-200 for detailed information. Setting the TIME ZONE Press the CENTER Press the CENTER button to highlight button to highlight Press the ↓ button to highlight LOCATION. TIME ZONE. -
Page 10: Setting The Time Format
FLASH: DISABLED FLASH: DISABLED FLASH: DISABLED PREVIOUS MENU PREVIOUS MENU PREVIOUS MENU Once sound preference is set, press the CENTER button to save the setting. PREFERENCES TIME FMT: 12 HOURS DATE FMT: MM/DD/YY SOUND: DISABLED FLASH: DISABLED PREVIOUS MENU www.wattstopper.com... - Page 11 Setting the FLASH Press the CENTER Press the ↓ or the Press the ↓ button to button to highlight ↑ button to choose highlight FLASH. DISABLED. ENABLED or DISABLED. PREFERENCES PREFERENCES PREFERENCES TIME FMT: 24 HOURS TIME FMT: 12 HOURS TIME FMT: 12 HOURS DATE FMT:...
-
Page 12: Warranty Information
01:15 PROG WARRANTY INFORMATION WattStopper warranties its products to be free of defects in materials and workmanship for a period of five (5) years. There are no obligations or liabilities on the part of WattStopper for consequential damages arising out of, or in connection with, the use or...
Need help?
Do you have a question about the RT-200 and is the answer not in the manual?
Questions and answers
An Wattstopper Legrand RT 200 is installed for my out door lights. It is set to "Manual" for On/Off functions. How do I get it out of the "Manual" mode so that it operates in the Program #1 mode which I set up to control On/Off hours?