Table of Contents
Advertisement
Please read this owner's manual carefully before operating,
and keep it for reference.
Mini portable
Air Conditioner
OWNER'S MANUAL
MODELS
F001-MP8K
(13-04500)
Sunrise Tradex Corp.
St-Mathieu-de-Beloeil (Québec) Canada
© Copyright, Sunrise Tradex Corp., 2016
Toll-Free : 1 866 680-4733
00760-19/05/2016
Advertisement
Table of Contents

Related Manuals for ForestAir F001-MP8K


Summary of Contents for ForestAir F001-MP8K
- Page 1 Please read this owner's manual carefully before operating, and keep it for reference. Mini portable Air Conditioner OWNER’S MANUAL MODELS F001-MP8K (13-04500) Sunrise Tradex Corp. St-Mathieu-de-Beloeil (Québec) Canada © Copyright, Sunrise Tradex Corp., 2016 Toll-Free : 1 866 680-4733 00760-19/05/2016...
-
Page 3: Table Of Contents
Operation Notices SafETy Waring..................1 SafETy inSTruCTiOn................2 inSTaLLaTiOn inSTruCTiOnS ............3 inDOOr & OuTDOOr uniT SEparaTiOn inSTruCTiOnS ....5 WinDOW KiT inSTaLLMEnT METHOD ..........6 parTS naMES..................7 BuTTOnS / DiSpLay / rEMOTE COnTrOLLEr........8 MainTEnanCE ..................12 TrOuBLESHOOTing & ErrOr CODES..........13 WarranTy ..................14 This appliance is not intended for use by persons (including children) with reduced physical, sensory or mental capabilities, or lack of experience and knowledge, unless they have been given supervision or instruction concerning use of the appliance by a person responsible for their safety. -
Page 4: Safety Waring
Safety Warning ● please follow these instructions carefully in order to avoid damages or accidents. Warning: failure to follow these instructions could cause severe harm or death. Caution: failure to follow these instructions could lead to danger or harm. 1.Do not use the same outlet for two or more home appliances in conjunction with this unit. -
Page 5: Safety Instruction
SAfety INStruCtION Caution 1. Do not place objects on top of the unit. 2. Do not use the unit near flammable or oily substances. 3. Do not place the unit in direct sunlight, high humidity environments or highly dusty environments. 4. -
Page 6: Installation Instructions
INStAllAtION INStruCtIONS NOte: Since cool air is denser than warm air and moves downwards, it is recommended that the indoor unit be installed high up in order to get the most out of the air conditioning unit. Indoor unit ● Do not install on an uneven, unstable or tilted surface. -
Page 7: Indoor Unit
INStAllAtION INStruCtIONS Indoor unit Installation on wall 1. Mark the installation standard where you’d like to place the unit. 2. Measure each side accurately. 3. Mark the 4 corners of the unit where the fixed points will be. 4. insert screws into the wall leaving between 4-9 mm out. 5. -
Page 8: Indoor & Outdoor Unit Separation Instructions
INdOOr & OutdOOr uNIt SePArAtION INStruCtIONS Separation 4. insert the rubber cap in the 3.gently lift the quick connector to connector to avoid refrigerant separate. Do not keep both parts leaks. This should be used tempo- separate for extended periods of rarily, as both units should be time. -
Page 9: Window Kit Installment Method
WINdOWS KIt INStAllMeNt MethOd Window Kit Extension Panels Rubber Connector Screw Kit 1. insert the T-bolt into extension panel a (and panel C if necessary, depends on the height of the window); then slide theT-bolt into the groove of panel B. 2. -
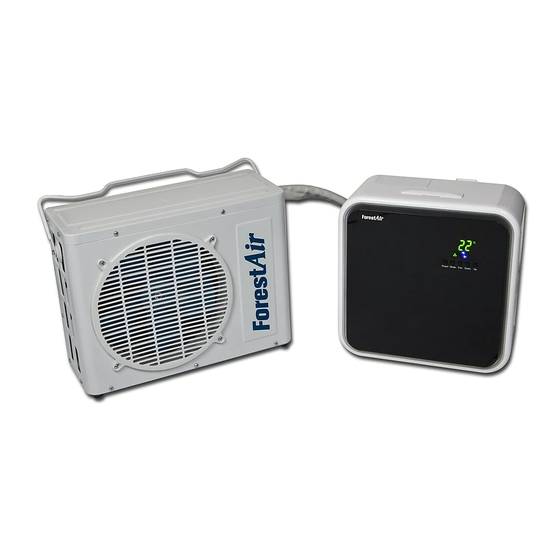
Page 10: Parts Names
PArt NAMeS INdOOr uNIt 1. front panel 2. filter 3. Handle 4. Operation and display 5. fixed loops: remote control holder 6. air outlet: emitting cooling air 7. Connecting cable: connecting indoor & outdoor 8. fixed loops: to fix indoor unit onto wall 9. -
Page 11: Buttons / Display / Remote Controller
ButtONS / dISPlAy / reMOte CONtrOller timer and temperature control can only be controlled by the remote. power Display window auto mode cent.light auto, mode light cooling mode fahren.light cooling light reservation light dehu. mode down dehumidifying light wind level light blowing light wind level blow mode... - Page 12 CAutION ● Do not press two buttons simultaneously. ● Do not use force on the unit as this will lead to malfunction. ● avoid using in excessive heat (fire) or humidity (water). ● remove the battery in the remote control if it is not used regularly to avoid battery leaks.
-
Page 13: Dehumidifying Mode
dehuMIdIfyINg MOde ● Unit will remove moisture from the air. 1. press power button 2. press the selection button until the indicator is set on Dehum Mode. A. if on the remote, press the Dehum button. 3. When in auto mode on low fan Speed, the Dehum mode will automatically start. - Page 14 tIMer ● Setting the Power-On Time Can only be set with the remote Control in setting reserve operation (air conditioner switches off after 2 hours.) ensure that the unit is turned on, but not functioning (stand-by mode) 1. press the Timer button. The Timer indicator should turn on. 2.
-
Page 15: Maintenance
MAINteNANCe • Cleaning the Air Filter Ensure that the unit is unplugged in order to avoid electric shocks. 1. pull off the front panel in arrow direction. 2. pull out the filter in arrow direction. gently clean the filter with warm soapy water. Let air dry in a cool place. -
Page 16: Troubleshooting & Error Codes
troubleshooting Problem Check list Solution 1. power is switched on 1. Switch on main power. 2. Check another electrical 2. The electricity is on appliance 3. inlet or discharge port is 3. Check if inlet or unit does not unobstructed discharged port operate 4. -
Page 17: Warranty
During the warranty period, if the portable air conditioner fails under normal use, ForestAir will, at its option, either repair the unit or replace it, free of charge, within a reasonable period of time after the portable air conditioner is returned. - Page 18 otes...
Need help?
Do you have a question about the F001-MP8K and is the answer not in the manual?
Questions and answers