Table of Contents
Advertisement
Your new tool has been engineered and manufactured to WEN's highest standards for dependability,
ease of operation, and operator safety. When properly cared for, this product will supply you years
of rugged, trouble-free performance. Pay close attention to the rules for safe operation, warnings,
and cautions. If you use your tool properly and for intended purpose, you will enjoy years of safe,
reliable service.
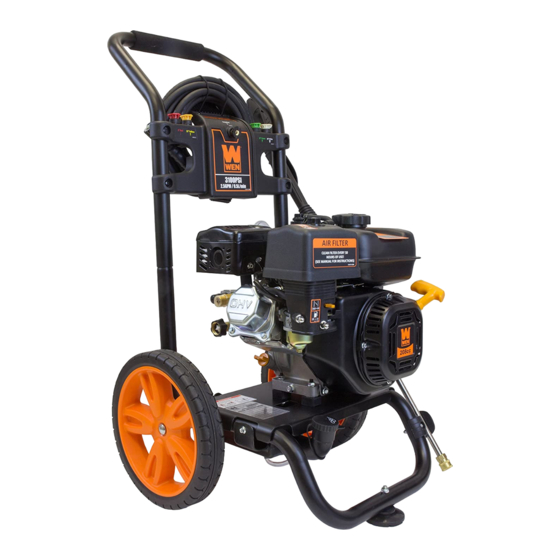
PRESSURE WASHER
IMPORTANT:
NEED HELP? CONTACT US!
Have product questions? Need technical support?
Please feel free to contact us at:
800-232-1195
techsupport@wenproducts.com
WENPRODUCTS.COM
3100 PSI
Model # PW31
bit.ly/WENvideo
(M-F 8AM-5PM CST)
Advertisement
Table of Contents

Related Manuals for Wen PW31


Summary of Contents for Wen PW31
-
Page 1: Pressure Washer
IMPORTANT: Your new tool has been engineered and manufactured to WEN’s highest standards for dependability, ease of operation, and operator safety. When properly cared for, this product will supply you years of rugged, trouble-free performance. Pay close attention to the rules for safe operation, warnings, and cautions. -
Page 2: Table Of Contents
TABLE OF CONTENTS Pressure Washer Identification Service Record Introduction Safety Information General Safety Procedures Important Safety Instructions Pressure washer Components Pressure washer Preperation Operation Maintenance & Care Storage & Transport Specifications Troubleshooting Exploded View and Parts List Warranty Statement For video instructions on setting up your pressure washer, visit: http://bit.ly/wenPW31... -
Page 3: Pressure Washer Identification
PRESSURE WASHER IDENTIFICATION If assistance for information or service is required, please contact the Customer Service Help Line by calling 800-232-1195; customer will be asked to provide pressure washer information when calling. Refer to the illustration below for the location of the serial number. Record pressure washer information in the spaces provided below. -
Page 4: Introduction
Thank You for Purchasing a WEN® Pressure Washer. This manual provides information regarding the safe operation and maintenance of this product. Every effort has been made to ensure the accuracy of the information in this manual. WEN® reserves the right to change this product and specifications at any time without prior notice. -
Page 5: General Safety Procedures
GENERAL SAFETY PROCEDURES For any questions regarding the hazard and safety notices listed in this manual or on the product, please call (800)-232-1195 M-F 8-5 CST before using the pressure washer. DANGER: CARBON MONOXIDE Using a pressure washer indoors CAN KILL YOU IN MINUTES. Pressure washer exhaust contains carbon monoxide (CO). -
Page 6: Important Safety Instructions
Always wear safety goggles to protect from possible mishaps with the stream or detergents. Always be aware of the dangers associated with the detergents and chemicals that you are working with. Attach all hoses before starting the engine. SAVE THESE INSTRUCTIONS – This manual contains important instructions for the WEN Pressure ®... -
Page 7: Pressure Washer Components
PRESSURE WASHER COMPONENTS Use the illustrations below to become familiar with the locations and functions of the various components and controls of this pressure washer. 30’ High Pressure Hose Locking Trigger Fuel Tank and Cap Recoil Starter Choke Lever Engine ON/OFF Switch Fuel Valve Lever Oil Fill and Dipstick Soap Tank... -
Page 8: Pressure Washer Preperation
PRESSURE WASHER PREPARATION PACKING LIST • Spray nozzles (5) - 0°, 15°, 25°, 40° and soap nozzle • Pressure washer • Spray gun hook (upper) • Quick start guide • Spray gun hook (lower) • Operator’s manual and product registration card •... - Page 9 PRESSURE WASHER PREPARATION ATTACHING FOOT ASSEMBLY (Fig. 1) PARTS NEEDED: 1 foot, 1 M8 lock nuts. 1. Raise or tilt pressure washer so you can line up foot with the hole located at the centre of the frame. 2. Align the rubber foot with the hole in the frame where the foot is to be located.
- Page 10 PRESSURE WASHER PREPARATION ATTACHING THE SPRAY GUN (Fig. 5 & 6) 1. Screw the spray wand and the trigger handle together until they are secure. 2. Insert the inlet coupler of the spray hose into the threaded fitting on the high pressure spray gun and thread the black nut on by turning clockwise until it is hand tight.
- Page 11 PRESSURE WASHER PREPARATION ADD GASOLINE WARNING: This pressure washer may emit highly flammable and explosive gasoline vapors, which can cause severe burns or even death if ignited. A nearby open flame can lead to explosion even if not directly in contact with gasoline. Use fresh (within 30 days from purchase), lead-free gasoline with a minimum of 87 octane rating.
-
Page 12: Operation
PRESSURE WASHER PREPARATION CONNECTING GARDEN HOSE TO PRESSURE WASHER (Fig. 9) 1. Run water through the hose for a few seconds to flush any debris from the hose. 2. Inspect the inlet screen and remove any debris. 3. Connect hose to water inlet and tighten by hand. There must be a mini- mum of 10 feet of unrestricted hose between pressure washer and faucet or shut off valve. - Page 13 OPERATION STARTING PRESSURE WASHER (Fig. 11 & 12) 1. Place pressure washer on a level surface. Turn on water. 2. Purge the system’s pump of air by releasing the safety and squeez- ing the trigger of the spray gun. Attach wand/lance to spray gun. 3.
-
Page 14: Applying Detergent
OPERATION USING THE SPRAY GUN (Fig. 14 & 15) Flip the lock tab behind the trigger up or down until it clicks to apply or remove the safety. Pull back on the trigger to begin operating pressure washer. To stop water flow, release trigger. Fig. - Page 15 MAINTENANCE/CARE Proper routine maintenance of the pressure washer will help prolong the life of the machine. Please perform maintenance checks and operations according to the schedule in Fig. 17. If there are any questions about the maintenance procedures listed in this manual, please call: (800)-232-1195 M-F 8-5CT.
-
Page 16: Maintenance & Care
MAINTENANCE & CARE AFTER EACH USE Follow these procedures after each use: 1. Shut off engine and turn off water supply. Release water pressure by pointing spray gun in a safe direction and squeezing the trigger. Fig. 18 - Oil Fill Opening, 2. - Page 17 MAINTENANCE & CARE AIR CLEANER MAINTENANCE Routine maintenance of the air cleaner helps maintain proper airflow to the carburetor. Occasionally check that the air cleaner is free of excessive dirt. Refer to Recommended Maintenance Schedule in Fig. 17. 1. Unscrew the cover bolt, then remove the air cleaner cover. 2.
- Page 18 MAINTENANCE & CARE SPARK PLUG MAINTENANCE The spark plug is important for proper engine operation. A good spark plug should be intact, free of deposits, and properly gapped. Refer to Recommended Maintenance Schedule in Fig. 17. To inspect the spark plug: 1.
-
Page 19: Storage & Transport
MAINTENANCE & CARE SPRAY NOZZLE If a pulsing sensation is felt while squeezing the trigger, the spray nozzle may be dirty or clogged and should be cleaned immediately. To clean the nozzle: 1. Shut off the engine and turn off the water. 2. -
Page 20: Specifications
SPECIFICATIONS Pressure Washer Max. Pressure 3100 PSI Max. Flow 2.5 GPM - 3100 PSI Nozzles 0°, 15°, 25°, 40°, Soap Nozzle Gun to Lance Connection M22 Threaded Gun to Hose Connection M22 Threaded Lance Length 20” Stainless Lance to Nozzle Connection Quick Change Pump Axial Cam Detergent Tank Capacity... -
Page 21: Troubleshooting
TROUBLESHOOTING IMPORTANT: If trouble persists, please call our customer help line at (800) 232-1195 M-F 8-5 Central Time. Problem Cause Solution Engine switch is set to "OFF". Set engine switch to "ON". Fuel valve is turned to "OFF". Turn fuel valve to "ON" position. Choke is open. -
Page 22: Exploded View And Parts List
EXPLODED VIEW AND PARTS LIST... - Page 23 EXPLODED VIEW AND PARTS LIST No. Part Number Description PW31-001 Engine PW31-002 M6 x 40 Bolt PW31-003 Detergent Tank Cap PW31B-004 Detergent Tank PW31B-005 Lower "A" Frame Assembly PW31-006 M8 Lock Nut PW31-007 Foot PW31-008 M6 Screw PW31-009 Lower Gun Hook...
- Page 24 EXPLODED VIEW AND PARTS LIST Engine:...
- Page 25 EXPLODED VIEW AND PARTS LIST NO. Part Number Product Description Qty. NO. Part Number Product Description Qty. PW31-101 Crankcase PW31-147 Shroud PW31-102 Ball Bearing PW31-148 Bolt PW31-103 Oil Seal PW31-149 Headcover Gasket PW31-104 Governor Arm PW31-150 Cylinder Head Cover PW31-105...
-
Page 26: Warranty Statement
WEN® will repair or replace, at its discretion, any part that is proven to be defective in materials or workmanship under normal use during the two (2) years warranty period. Warranty repairs or replacements will be made without charge for parts or labor.
Need help?
Do you have a question about the PW31 and is the answer not in the manual?
Questions and answers