Table of Contents
Advertisement
Advertisement
Table of Contents

Related Manuals for PowerTec wb-ms14


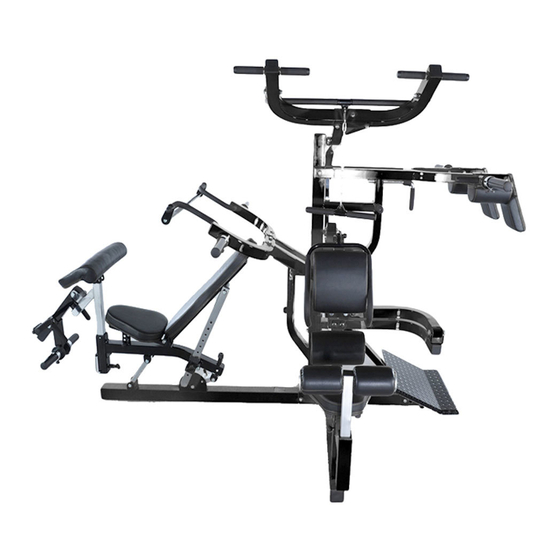
Summary of Contents for PowerTec wb-ms14
- Page 2 Thank you for purchasing your new Powertec equipment. To maximize the use of this equipment, please take a moment to study, understand and familiarize with the assembly instructions and follow the sequence of steps as provided in the manual. Because of our products unique features, this manual was created to provide you with information on how to assemble and properly maintain your equipment.
- Page 3 SAFETY INSTRUCTIONS, WARNINGS AND CAUTIONS It is recommended that users of this equipment receive a thorough medical exam before commencing any exercise program. This is especially important if you have never Exercised and or are over the age of 35, are pregnant or suffer from any health issues. Read All Warnings and Cautions on this Manual and on the Product This product should only be used after a thorough review of the Owner’s Manual.
- Page 4 Inspect Daily / Before Each Use! Inspect system. Make sure it is in good condition and operates smoothly. If you find damage, DO NOT USE. Contact your authorized Powertec dealer or Powertec Customer Service Center for assistance. Inspect Daily / After Each Use! Clean system with a clean, dry cloth.
- Page 5 Tools Required for Assembly M6 Allen Wrench Wrenches 13 mm = 1/2" 19 mm = 3/4” 21 mm = 13/16” 8” Adjustable Wrench...
- Page 17 WARRANTY Serial No. Thank you for purchasing one of Powertec’s products. Powertec warrants that the Product you have purchased is free from defects in materials and workmanship. Powertec offers a Lifetime Warranty on Structural Frame.(Excludes Surface Finish). 5 year warranty on Moving Frames (Press Arms and other unspecified moving components).
- Page 19 Powertec WB-MS14 Workbench Multi System Assembly Walkthrough The Multi System comes in 3 cartons the dimensions are: Carton 1 Carton 2 Carton 3 Length Width Depth Length Width Depth Length Width Depth 1.53 0.21 1.68 0.65 0.21 1.43 0.65 0.18 The hardware comes in separate bags, and they should be numbered with stickers.
- Page 20 NOTE: Do not tighten the nuts and bolts until the end, unless told otherwise. Also all the ½” bolts use the same nuts and bolts. Get out the bench press base and the lat pulldown base. Place the bench press base over the bolts that come out of the lat pulldown base.
- Page 21 Bolt #72 Bolt #72 Using 2 x #72 bolts, with washers each side. Please note the direction the bolts go in. This will help clearance on the next step. Bolt #72 Bolt #72 Put the main upright in place, using the #72 bolts with washers.
- Page 22 Bolt #72 Bolt #72 Bolt #72 The brace that supports the main upright and squat footplate goes on next, using #72 bolts . Bolts #67 Bolt #61 Bolt #71 The brace which ties the main upright to the lat pulldown station goes on next.
- Page 23 The footplate is next to go on. Bolt #71 Bolt #65...
- Page 24 Bolt #37.3 Bolt #62 Time to build the squat station. You put in the squat start/stop bar, plus the squat safety stopper. The start/stop bar is the one with hole drilled in the end. The squat arm goes on next. You will need the steel axis that has the two holes in it. If you have trouble sliding it through DO NOT HIT WITH A STEEL HEAD HAMMER.
- Page 25 The steel axis is secured in place with 2 x #62 bolts. To help find the hole, just put on the nuts and washers and rotate the axis. The easiest way to put the weight horns on the squat arm is simple, slip them in place, and just put in 1 x #64 bolt. The horn will stay in place.
- Page 26 Put the rear supports on the squat arm. Drop in another #64 bolt to hold it in place. Bolt #67 Bolt #61 Bolt #61 Put in the rest of the bolts. The #61 bolts can be a little tricky to line up, but just adjust the weight horn and rear support. It will slide right in when they line up.
- Page 27 Time put on the squat pads. There are options for spacing, I have pointed to the holes that we use. Put the rear support pad on, with bolts #62.
- Page 28 Bolts #67 We move on to building the ab crunch. Drop it into place. Lift up the ab crunch arm. You need to put in bolt #63. Now tighten up bolts #67 and #63 on the ab crunch arm.
- Page 29 Bolts #66 Slide the weight horn/lat pull back support on the crunch station. Ball Head Pin #58 The frame for the lat pulldown seat comes pre-assembled. You just have slide the rear bolt through tube that is on the frame.
- Page 30 Put the seat pad on, and secure with 4 x #62 bolts. The mid support is also secured in place with #62 bolts.
- Page 31 Put the backrest pad in place, secure in place with #61 bolts. Time to put on the lat pulldown arms. First you will need to tighten the bolts that secure the bearings in place. You need to do this for both arms.
- Page 32 Now put the lower lat pull arm. Then put on the upper arm.
- Page 33 Once the arms are in place, slip on #38 chrome bushings. Then put on a washer and nut. Bolts #66 Part#24 connects the two arms. Use 2 x #66 Bolts.
- Page 34 Bolts #68 Bolts #67 Put the Lat Pulldown handles on. Get the backrest support frame for the bench, and the smallest of the steel axis.
- Page 35 Then slide the seat frame sections over the steel axis. Note that the tubes are on top. Ball Head Pin #58 Using Ball Head Lock Pin #58, put the seat angle adjuster in place.
- Page 36 Bolt #75 To complete the seat frame, slide the longest of the long bolts #75, through the frame and angle adjuster. Bolt #73 Get the chrome angle adjuster for the back rest of the bench. Plus the shortest of the long bolts, #73. Put the bolt through the top hole.
- Page 37 Bolt #74 Bolt #62 To finish off the bench frame, put the remaining long bolt through the bench frame. Time to put on the bench press arms. First slide the solid steel axis through the main upright. Secure in place using #62 bolt.
- Page 38 Before you put the press arms on, you will need to fit the start/stop arm. It is the shorter of the two. Please note, the press arms are secured in place using the two large chrome washers.
- Page 39 Bolt #62 Bolt #62 Bolt #62 To put on the seat pad, using #62 bolts, remove the ball head pin and just tilt up. It is easy to find the hole that way. Bolt #61 Bolt #61 Now put on the backrest pad with 4 x #61 bolts.
- Page 40 Ball Head Pin #60 Secure the Ab Crunch handle with the small ball head pin #60. Build the leg lock for the lat pull station. You can now tighten up all the nuts and bolts. It is best to tighten the gym in the position where you will be using it, so now is the time to move it.
Need help?
Do you have a question about the wb-ms14 and is the answer not in the manual?
Questions and answers