
Related Manuals for PowerTec WB-LS14


Summary of Contents for PowerTec WB-LS14
- Page 2 Thank you for purchasing your new Powertec equipment. To maximize the use of this equipment, please take a moment to study, understand and familiarize with the assembly instructions and follow the sequence of steps as provided in the manual. Because of our products unique features, this manual was created to provide you with information on how to assemble and properly maintain your equipment.
- Page 3 SAFETY INSTRUCTIONS, WARNINGS AND CAUTIONS It is recommended that users of this equipment receive a thorough medical exam before commencing any exercise program. This is especially important if you have never Exercised and or are over the age of 35, are pregnant or suffer from any health issues. Read All Warnings and Cautions on this Manual and on the Product This product should only be used after a thorough review of the Owner’s Manual.
-
Page 4: Maintenance
Inspect Daily / Before Each Use! Inspect system. Make sure it is in good condition and operates smoothly. If you find damage, DO NOT USE. Contact your authorized Powertec dealer or Powertec Customer Service Center for assistance. Inspect Daily / After Each Use! Clean system with a clean, dry cloth. - Page 5 Tools Required for Assembly M6 Allen Wrench Wrenches 13 mm = 1/2" 19 mm = 3/4” 21 mm = 13/16” 8” Adjustable Wrench...
-
Page 20: Warranty
WARRANTY Serial No. Thank you for purchasing one of Powertec’s products. Powertec warrants that the Product you have purchased is free from defects in materials and workmanship. Powertec offers a Lifetime Warranty on Structural Frame.(Excludes Surface Finish). 5 year warranty on Moving Frames (Press Arms and other unspecified moving components). - Page 22 WB-LS13 Workbench LeverGym Additional Instructions The Powertec WB-LS13 LeverGym comes in two cartons. One carton is 152cm x 77cm x 19cm and the other is 147cm x 64cm x 19cm. Here is the hardware laid out. The count may differ from the hardware list in the manual because some parts are pre-assembled...
- Page 23 Lay out the parts and hardware for the base. Just put the parts together finger tight. If you tighten now you will have trouble lining up other parts in the assembly process. Add on the chrome docking tube – no it is not bent, it is meant to be that way! Then get out your side supports and attach them to the base holes - do not attach to the upright section just yet.
- Page 24 Now it is time to put the top section of the gym on. The cable is stuffed up the inside of the top section. Just reach in and pull it out like above. Ideally you should have two people for this part of the assembly, but if you don’t here is how you do it. Put the top part on your shoulder and feed the cable through the top of the base.
- Page 25 Once the top is in place, secure the side supports with the bolts on the side and back. Now put the steel spindle that the bench press arms pivot on, through the frame and secure with the bolt. We are now going to complete the cable section. First up put the bottom pulley in the cable outlet and secure with the bolt. Then build your weight arm for the lat pulldown.
- Page 26 Completing the cable is really easy. Just bolt the arm that holds the weight to the pivot point at the back of the gym. Then just pull some slack on the cable between the two back pulleys. Insert the pulley that will attach to the arm, and just simply pull it down and bolt to the weight arm.
- Page 27 Now put the put the bench press arms on the steel spindle. Then put the washer and nut on. The larger of the two L-Shaped bars is used for locking the press arms. It can be put in or pulled out as desired.
- Page 28 Let’s start building the bench. As you can see from the picture above, the bench is partially assembled. First up grab the rear support with the wheels and bolt it into position. Put the spine that the back rest is bolted to in place.
- Page 29 The chrome tube and bracket that adjust the angle of the back rest is the next part to go on. The shorter of the two bolts goes on the top. There is a little handle that is used to move the bench from the bench press to shoulder press position. People often finish the assembly and have it left over and scratch their heads wondering where it went.
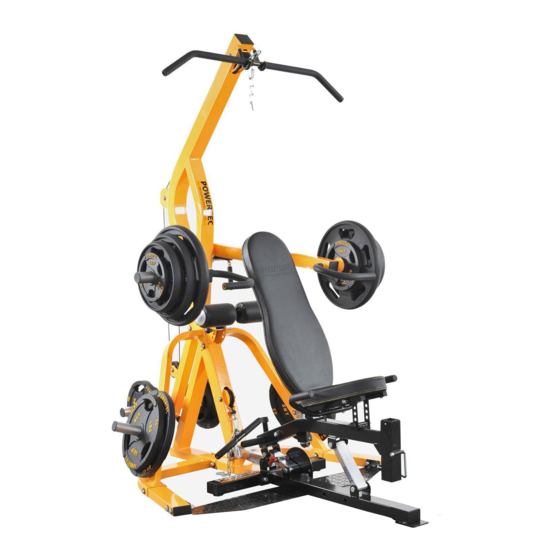
- Page 30 Once you have got the seat pad on, the back rest just bolts straight up and your bench is complete. The last thing you have to do is bolt on the weight horns on the press arm and weight storage area. Tighten up all your nuts and bolts and your LeverGym is ready.
- Page 31 WB-LS13 Workbench LeverGym Additional Instructions The Powertec WB-LS13 LeverGym comes in two cartons. One carton is 152cm x 77cm x 19cm and the other is 147cm x 64cm x 19cm. Here is the hardware laid out. The count may differ from the hardware list in the manual because some parts are pre-assembled...
- Page 32 Lay out the parts and hardware for the base. Just put the parts together finger tight. If you tighten now you will have trouble lining up other parts in the assembly process. Add on the chrome docking tube – no it is not bent, it is meant to be that way! Then get out your side supports and attach them to the base holes - do not attach to the upright section just yet.
- Page 33 Now it is time to put the top section of the gym on. The cable is stuffed up the inside of the top section. Just reach in and pull it out like above. Ideally you should have two people for this part of the assembly, but if you don’t here is how you do it. Put the top part on your shoulder and feed the cable through the top of the base.
- Page 34 Once the top is in place, secure the side supports with the bolts on the side and back. Now put the steel spindle that the bench press arms pivot on, through the frame and secure with the bolt. We are now going to complete the cable section. First up put the bottom pulley in the cable outlet and secure with the bolt. Then build your weight arm for the lat pulldown.
- Page 35 Completing the cable is really easy. Just bolt the arm that holds the weight to the pivot point at the back of the gym. Then just pull some slack on the cable between the two back pulleys. Insert the pulley that will attach to the arm, and just simply pull it down and bolt to the weight arm.
- Page 36 Now put the put the bench press arms on the steel spindle. Then put the washer and nut on. The larger of the two L-Shaped bars is used for locking the press arms. It can be put in or pulled out as desired.
- Page 37 Let’s start building the bench. As you can see from the picture above, the bench is partially assembled. First up grab the rear support with the wheels and bolt it into position. Put the spine that the back rest is bolted to in place.
- Page 38 The chrome tube and bracket that adjust the angle of the back rest is the next part to go on. The shorter of the two bolts goes on the top. There is a little handle that is used to move the bench from the bench press to shoulder press position. People often finish the assembly and have it left over and scratch their heads wondering where it went.
- Page 39 Once you have got the seat pad on, the back rest just bolts straight up and your bench is complete. The last thing you have to do is bolt on the weight horns on the press arm and weight storage area. Tighten up all your nuts and bolts and your LeverGym is ready.
Need help?
Do you have a question about the WB-LS14 and is the answer not in the manual?
Questions and answers