Table of Contents
Advertisement
Advertisement
Table of Contents

Related Manuals for Doro PhoneEasy 623


Summary of Contents for Doro PhoneEasy 623
- Page 1 Doro PhoneEasy ® Quick Start Guide English...
- Page 2 The items supplied with your phone might vary depending on the software and accessories available in your region or offered by your service provider. You can obtain additional accessories from your local Doro dealer. The supplied accessories provide the best performance with your phone.
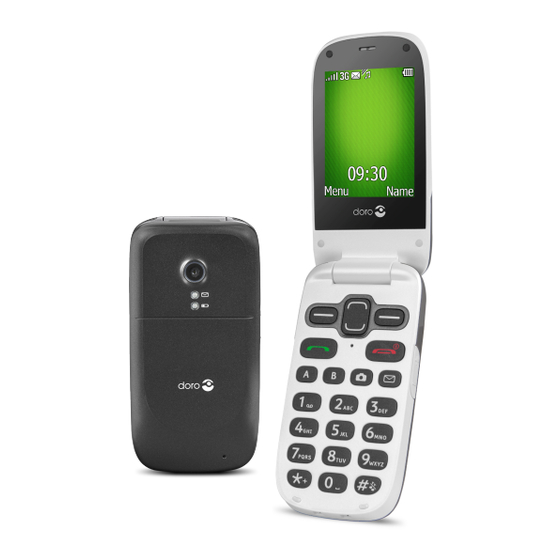
- Page 3 Silent/Input method 21. Red light=Battery level Camera shortcut low/Charging 10. Message shortcut 22. Charging stand 11. Volume control 23. Lanyard 12. End call/Power on/off 13. Microphone Complete manual For the complete user guide please visit www.doro.co.uk/Support/ or contact our Helpline.
-
Page 4: Installation
1. INSTALLATION Important! Turn off the phone and disconnect the charger before removing the battery cover. Installing the SIM card, memory card and the battery The SIM and memory card holders are located inside the battery compartment. Remove the battery cover and the battery if it is already installed. - Page 5 Insert the SIM card by gently sliding it into the holder. Make sure that the SIM card’s contacts are facing inwards and that the cut off corner is pointing downwards. Take care not to scratch or bend the contacts on the SIM card. Insert the battery by sliding it into the battery compartment with the contacts facing downwards to the left.
-
Page 6: Get To Know Your Phone
3. GET TO KNOW YOUR PHONE Turn the phone on and off Press and hold the red button on the phone to Yes to power off. If the SIM card is valid but protected with a PIN code PIN is displayed. Enter the PIN code and press OK ( upper left corner Clear (... -
Page 7: Enter Text
Change the language, time and date The default language is determined by the SIM card. See Settings on how to change language, time and date in the full manual. Enter text Press a numerical key repeatedly until the desired character is shown. Wait a few seconds before entering the next character. -
Page 8: Volume Control
Make a call from the phonebook Press Name to open the phonebook. Use the arrow buttons to scroll through the phonebook, or quick search by pressing the key Press Call to dial the selected entry, or press Back. Receive a call To answer an incoming call when you have set Open to answer to Off, see Settings/Calls/Answer mode in the full manual. -
Page 9: Call Information
Call information During a call, the outgoing or incoming phone number and the elapsed call time is displayed. If the identity of the caller is withheld, Unknown is displayed. Speed dial Use A – B , 0 and 2 – 9 to speed dial an entry from standby. -
Page 10: Assistance Button
5. ASSISTANCE BUTTON The assistance button allows easy access to contact you need help. Press and hold the assistance button for 3 seconds, or press it twice within 1 second. The assistance call begins after a delay of 5 seconds. recipients. -
Page 11: Add Contact
CAUTION When an assistance call is activated the phone is pre-set to handsfree/speakerphone mode. Do not hold the device near your ear when the handsfree mode is in use, because the volume may be extremely loud. 6. PHONEBOOK The phonebook can store 500 entries with 3 phone numbers to each entry. -
Page 12: Create And Send Text Messages
7. ICE (IN CASE OF EMERGENCY) First responders can access important information such as medical information from the victim’s phone in case of emergency. In the event of a trauma, it is critical to have this information as early as possible optional, but the more information provided the better. -
Page 13: Create And Send Picture Messages
Create and send picture messages Press shortcut button Alternatively press Menu Messages. Select Create new MMS. Write your message, see Entering text. Press Options Add picture: My pictures less than 600kB. Take picture to use the camera to take a picture. You can also Add sound and Add video using the Options menu. -
Page 14: Retrieving And Dialling
9. CALL LOG Received, missed and dialled calls are saved in a combined call log. 20 calls of each type can be stored in the log. For multiple calls relating to the same number, only the most recent call is saved. Retrieving and dialling Press Alternatively, press Menu... -
Page 15: Video Camera
10. CAMERA To get sharp photos, wipe the lens clean with a dry cloth. Take photos Press shortcut Alternatively press Menu Camera Camera. Press to take photo. Press Options or Back (if you do not make any Video camera Press Menu Camera Video camera. -
Page 16: Set The Time And Date
11. SETTINGS settings described in this chapter are carried out in standby mode. Press to return to standby mode. Set the time and date Press Menu Settings General. Select Time & date: Set time to enter the time (HH:MM Set date to enter the date (DD/MM/YYYY Press OK Tone setup Press Menu... -
Page 17: Safety Instructions
12.SAFETY INSTRUCTIONS CAUTION The unit and the accessories can contain small parts. Keep all of the equipment out of the reach of small children. The mains adapter is the disconnect device between the product and mains power. The mains socket outlet must be close to the equipment and easily accessible. Network services and costs Your device is approved for use on the WCDMA 850/2100 MHz, GSM 900/1800/1900 MHz networks. -
Page 18: Areas With Explosion Risk
If you have any reason to suspect that interference is taking place, turn the phone off immediately. If you have any questions about using your wireless device with an implanted medical device, consult your health care provider. Areas with explosion risk Always turn off the unit when you are in an area where there is a risk of explosion. -
Page 19: Care And Maintenance
Emergency calls Important! Mobile phones use radio signals, the mobile phone network, the terrestrial network and user-programmed functions. This means that connection cannot be guaranteed in all circumstances. Therefore, never rely only on a mobile phone for very important calls such as medical emergencies. -
Page 20: Specifications
Doro reserves the right to revise this document or withdraw it at any time without prior notice. -
Page 21: Content Copyright
To the maximum extent permitted by applicable law, under no circumstances shall Doro or any of its licensors be responsible for any loss of data or income or any special, incidental, consequential or indirect damages howsoever caused. - Page 22 RF exposure information (SAR) Bands WCDMA 850 MHz, GSM 1900 MHz This model phone meets the government’s requirements for exposure to radio waves. This phone is designed and manufactured not to exceed the Communications Commission of the U.S. Government and by the Canadian regulatory authorities.
- Page 23 FCC/Industry Canada notice This device complies with part 15 of the FCC Rules and Industry Canada license- any interference received, including interference that may cause undesired operation. This equipment has been tested and found to comply with the limits for a Class B digital device, pursuant to part 15 of the FCC Rules/Canadian ICES-003.
- Page 24 FCC ID: WS5DORO623 Version 1.0 ©2014 Doro AB. All rights reserved 0700...
Need help?
Do you have a question about the PhoneEasy 623 and is the answer not in the manual?
Questions and answers