Table of Contents
Advertisement
Advertisement
Table of Contents

Related Manuals for Doro PHONEEASY 610


Summary of Contents for Doro PHONEEASY 610
- Page 1 Doro PhoneEasy ® English...
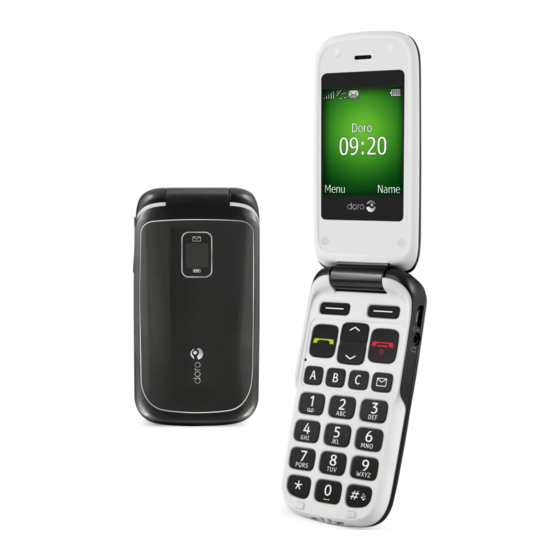
- Page 3 English Earpiece 11. Right soft key Left soft key 12. LED light, Battery level low/charging Call key 13. LED light, New Microphone message/Missed call Speed dial 14. Emergency button 1 / Voice mail 15. Charging socket # / Silent / Input method 16.
-
Page 4: Table Of Contents
Contents Installation ................1 Installing the SIM card and the battery ........1 Charging ..................2 Symbols ..................2 Helpful settings ..............2 Phone indicators ..............3 Display status symbols ............3 Display main symbols............4 Operation................... 5 Activating the phone ............5 Making a call............... - Page 5 General ................20 Sound .................23 Display................25 Calls ...................26 Messages ................30 Emergency ..............33 Bluetooth ................35 ® Security ................36 Additional functions..............39 Alarm..................39 Calendar ................40 Calculator................40 FM radio ................41 Instructions for the REMOTE USER........43 Troubleshooting ................48 Common Questions and Answers..........51 Safety instructions..............52 Network services and costs ...........52 Operating environment ............52 Medical units ..............52 Areas with explosion risk ............53...
-
Page 7: Installation
English Installation IMPORTANT! Turn off the phone and disconnect the charger before removing the battery cover. Installing the SIM card and the battery The SIM card holder is located behind the battery. Remove the battery cover and the battery if it is already installed. Insert the SIM card by gently sliding it into the holder. -
Page 8: Charging
English Charging CAUTION Only use batteries, charger and accessories that have been approved for use with this particular model. Connecting other accessories may be dangerous and may invalidate the phone's type approval and guarantee. When the battery is running low, is displayed and a warning signal is heard. -
Page 9: Phone Indicators
English Visibility Hearing Handling Safety Phone indicators 5 flash when you have a new message or a missed call. After reading the new message/missed call, the envelope will stop flashing. ] flash when the battery is running low and during charging. Display status symbols Network signal strength strong. -
Page 10: Display Main Symbols
English Display main symbols Insert SIM Charger connect SIM card damaged or not Charger removed valid. Mute Headset in Message sending success Headset out Message sending failed Speaker on Error Speaker off Warning Incoming call Query Outgoing call Done (confirmed) Call ended Missed call. -
Page 11: Operation
English Operation Activating the phone Press and hold the red button on the phone to turn it on/off. Confirm with Yes to power off. The following messages may be displayed: SIM card missing or incorrectly inserted. SIM card damaged or not valid. If the SIM card is valid but protected with a PIN code (Personal Identification Number), PIN: is displayed. -
Page 12: Making A Call
English Changing the language, time and date The default language is determined by the SIM card. See Settings/General, p.20 on how to change language, time and date. Making a call Enter the phone number including the area code. Delete with Clear. -
Page 13: Volume Control
English Volume control Use the side keys +/– to adjust the sound volume during a call. The volume level is indicated on the display. If you use hearing aid or have hearing difficulties when using the telephone in noisy environment, you can customize the phone's audio settings, see Settings/Sound/Audio setup p.23. - Page 14 English Entering text with predictive text In some languages you can use the Smart ABC (eZiType™) input method which uses a dictionary to suggest words. See Settings/Messages/Predictive text , p.31 on how to activate predictive text. Press each key once, even if the displayed character is not the one you want.
-
Page 15: Call Options
English Call options During a call the soft keys ) give access to additional functions: Options (left soft key) A menu with the following options is displayed: Hold single Hold/retrieve the current call. call/Retrieve single End single call End the current call (same as New call Call another number (Conference). -
Page 16: Call Information
English Tip: Call waiting must be activated, see Settings/Calls/Call setup, p.28. Call information During a call, the outgoing or incoming phone number and the elapsed call time is displayed. If the identity of the caller is withheld, Unknown is displayed. Speed dial You can use keys A , B B and C and you can also use the numerical... -
Page 17: Emergency Key
English Some networks accept calls to emergency numbers without a valid SIM card. Contact your service provider for more information. Emergency key CAUTION Do not hold the device near your ear when the handsfree mode is in use, because the volume may be extremely loud. The Emergency key allows you easy access to contact predetermined numbers should you need help. - Page 18 English Note! When an emergency call is activated the phone is pre-set to handsfree mode. Automatic calls to emergency numbers (e.g. 112, 999, 911 or other official emergency numbers) are normally not allowed. Do not save emergency numbers in the list of numbers to be called automatically.
-
Page 19: Phonebook
English Phonebook The phonebook can store 300 entries with 3 phone numbers in each entry. Creating a phonebook entry Press Menu, scroll to and press OK. Select -New contact- and press Add. Enter a Name for the contact, see Entering text , p. - Page 20 English Edit to move the cursor. Delete with Clear. Press Save. Add new Creating a phonebook entry, p.13. Call Press OK to call the contact. Send SMS Press OK to write a SMS message, see Creating and sending SMS, p.17. Delete Press OK to delete the selected phonebook entry.
-
Page 21: Ice (In Case Of Emergency)
English Select Via Bluetooth and press OK to send the selected phonebook entry as a vCard via Bluetooth . See Settings/Bluetooth , p.35 ® ® how to connect with Bluetooth. ICE (In Case of Emergency) With this additional information and medical information, first responders can access this information from the victim's phone in case of emergency. - Page 22 English Condition: Enter any existing medical conditions/medical devices (e.g. coronary artery disease, pacemaker, diabetic, etc.). Allergies: Enter any known allergies (e.g. penicillin, bee stings). Blood type: Enter your blood type. Vaccination: Enter any relevant vaccination. Medication: Enter any medication that you are treated with. Other info: Enter your other info.
-
Page 23: Messages
English Messages Creating and sending SMS Press Menu, scroll to and press OK. Select Write message and press OK. , then press To. Type your message, see Entering text , p. 7 Select receiver from Phonebook and press OK. Alternatively, select Enter number to add recipient manually. Enter the phone number and press OK. - Page 24 English Press Menu, scroll to and press OK. Select Outbox and press OK. Select a message and press Read. to scroll the message up/down. Press Options. Send Send again to the same receiver. Reply Type your reply, then press Done. Message is sent immediately. Call Press OK to call the contact.
-
Page 25: Call Log
English Call log Received, missed, and dialled calls are saved in a combined call log. 20 calls of each type can be stored in the log. For multiple calls related to the same number, only the most recent call is saved. Retrieving and dialling Press Alternatively, press Menu, scroll to... -
Page 26: Settings
English Settings Note! The settings described in this chapter are carried out in standby mode. Press to return to standby mode. General Time & date Setting the time and date Press Menu, scroll to and press OK. Select General and press OK. Select Time &... - Page 27 English To set the phone to automatically update the time and date according to the current time zone, select On. Automatic update of date and time does not change the time you have set for the alarm clock or the calendar.
- Page 28 English Network setup If Automatic (default) is selected, your service provider is selected automatically, if this is within range/available in your area. If you select Manual, you can select a network that has a roaming agreement with your service provider. Contact your service provider for more information.
-
Page 29: Sound
English Sound Note! Silent needs to be set to Off to access Tone setup, Volume, Alert type and Extra tone. See Silent, p.23. Audio setup If you use a hearing aid or have hearing difficulties when using the telephone in a noisy environment, you can customize the phone's audio settings. - Page 30 English Select Ring tone and press OK. Scroll to select one of the available melodies, the melody will be played. Press OK to confirm, or press Back to discard changes. Set up the Alarm, Message tone, Opening tone, Closing tone, Keypad tone, Power on and Power off in the same way.
-
Page 31: Display
English Display Wallpaper You can select different display backgrounds. Press Menu, scroll to and press OK. Select Display and press OK. Select Wallpaper and press OK. Scroll to display available wallpapers. Press OK to confirm or Back to discard changes. Text size You can customize the text size for messages and the phonebook. -
Page 32: Calls
English LCD backlight Select the delay time for the display backlight. Press Menu, scroll to and press OK. Select Display and press OK. Select LCD backlight and press OK. Select 15 sec., 30 sec. or 1 min. and press OK. Brightness You can customize the phone's brightness settings. - Page 33 English Select Calls and press OK. Select Voice mail and press OK. Select Options and press OK. Select Connect and press OK to call the voice mailbox. Tip: Press and hold shortcut key 1 to call your voice mail. Speed dial A , B , C and the numerical keys 0 and 2 –...
- Page 34 English Select one of the empty entries and press Add. to scroll through the phonebook, or quick search by pressing the key corresponding to the first letter of the entry. Press OK to save the selected entry, or press Back to return to the menu.
- Page 35 English Caller ID Display or hide your phone number on the recipient's phone when you call. Press Menu, scroll to and press OK. Select Calls and press OK. Select Call setup and press OK. Select Caller ID and press OK. Select one of the following options and press OK: Set by network Use default setting by the network.
-
Page 36: Messages
English Select Call divert and press OK. Select one of the following options and press OK: Voice calls Diverts all voice calls. Unreachable Diverts incoming calls if the phone is turned off or out of range. No reply Diverts incoming calls if unanswered. If busy Diverts incoming calls if the line is busy. - Page 37 English Select Messages and press OK. Select one of the following options and press OK: Predictive text Select On and press OK to enable Predictive text/eZiType , see ™ Entering text , p. 7 Write speed You can change the speed at which keyboard characters repeat (before the cursor moves onto the next character).
- Page 38 English Function on/off To turn information On or Off. Read Select Read and press OK to read the message. Languages Select language On/Off and press Done. Settings Select from which channels you want to receive/subscribe messages. Use the options Select, Add, Edit and Delete to define your channels.
-
Page 39: Emergency
English Note! If you choose Delivery report On, some operators will charge you for that message. Emergency Settings for the Emergency key function. Press Menu, scroll to and press OK. Select Emergency and press OK for the following settings: Activation Select one of the following options and press OK: On Normal To activate, press and hold key for approximately 3... - Page 40 English The phone sends a text message before dialling. The phone dials without sending a message first. Message Press Edit and enter the message and then press OK to confirm. Note! You must write a message if you activate the SMS function. Confirm with "0"...
-
Page 41: Bluetooth
English Note! This information is not applicable if Confirm with "0" is set to On. Bluetooth ® IMPORTANT! When you are not using Bluetooth connectivity, select Function on/off / Off or Visibility / Off. Do not pair with an unknown device. You can connect wireless to other Bluetooth compatible devices such as headsets. -
Page 42: Security
English Connect/Di- Connect/disconnect selected device. Select required sconnect profile, usually a headset. Set default Select the connected device as default. Rename Change the name of the device. Delete Delete the device from the list. Delete all Delete all devices from the list. Audio path Select one of the following options and press OK: Phone... - Page 43 Remote configuration enabled. Remote configuration disabled. Numbers list You need to add the name and number of the people who are allowed to send information from their phone to your Doro PhoneEasy 610. ® Select Numbers list and press OK.
- Page 44 English Mode Select On/Off and press OK. Enter PIN2 and press OK to confirm. Fixed Press Add to enter the first allowed number. numbers Alternatively, select an entry and press Options for the following settings: Add, Edit or Delete and press OK. Enter PIN2 and press OK to confirm.
-
Page 45: Additional Functions
English Additional functions Alarm Press Menu, scroll to and press OK. Select On and press OK. Enter the alarm time using the keypad, then press OK. For a single occurrence, select Single and press OK. For a repeated alarm, select Repeated and press OK. Scroll through the list of weekdays and press On/Off to enable/disable the alarm for each weekday, then press Save. -
Page 46: Calendar
English Calendar Press Menu, scroll to and press OK. Select Options. Select one of the following options and press OK: View tasks Show tasks for the selected date. Add task Enter a date for the task, then press Enter a time for the task, then press Enter a description for the task, see Entering text , p. -
Page 47: Fm Radio
English Enter the first number. Use # to enter decimal points. Use the arrow keys to select an operation (+, -, x, ÷) and press OK. Enter the next number and press OK. Repeat steps 2–4 as necessary. Select = and press OK to calculate the result. FM radio The FM radio has a frequency range from 87.5 to 108.0 MHz and 9 preset channels. - Page 48 English Select Options. Select Channel list and press OK. Select the channel you wish to edit and press Options or Add. Select one of the following options and press OK: Play Play the selected channel. Delete Delete the channel. Press Yes to confirm or No to return to the channel list.
-
Page 49: Instructions For The Remote User
English Instructions for the REMOTE USER Sending remote control commands by text message. Activation must be set to On and the remote user must be entered in Numbers list on the Doro PhoneEasy 610. ® Menu Security Remote config. All contacts sent to Doro PhoneEasy 610 by remote configuration are ®... - Page 50 Example: You want to send Jeff Jackson’s mobile number, home number and his office number to Doro PhoneEasy 610. The mobile number is: ® 0700-393939. Home number: 046-280 50 11. Office number: 046-280 50 83. *#phonebook#Jeff Jackson#0700393939#0462805011#046280...
- Page 51 English Setting the emergency function Command alert 0/1/2 activation 0=Off 1=On Normal 2=On (3) alert 1–5 Name number number location in max. max. Numbers length=30 length=40 list alert Text message 0=Off max. length=70 1=On alert confirm 0=Off with “0” 1=On alert 0/1/2 signal type...
- Page 52 C key max length max length = 40 = 30 Example: You want to set Jeff Jackson’s mobile number in memory key A in Doro PhoneEasy 610. ® Martha Thomson in memory key B and Steve Lewis in memory key C.
- Page 53 Date Time description of task. max. length = 35 Example 1: You want to send a new calendar task to Doro PhoneEasy 610. It is ® for a dentist appointment in December 1, 2010 at 10:30. *#task#20101201#1030#dentist appointment#...
-
Page 54: Troubleshooting
English Troubleshooting Phone cannot be switched on Battery charge low Connect the power adapter and charge the battery for 3 hours. Battery incorrectly Check the installation of the battery. installed Failure to charge the battery Battery or charger Check the battery and charger. damaged Battery should Improve the charging environment. - Page 55 English PIN code not accepted Wrong PIN code Enter the PUK code to change the PIN entered too many code, or contact your service provider. times SIM card error SIM card damaged Check the condition of the SIM card. If it is damaged, contact your service provider.
- Page 56 English Failure to set a function Function not Contact your service provider. supported or subscribed from network...
-
Page 57: Common Questions And Answers
Can I use a SIM card from any mobile phone company? The Doro mobile phone is what is termed as an open SIM card phone and so it is not restricted to any particular service provider or mobile phone company. -
Page 58: Safety Instructions
English Safety instructions CAUTION The unit and the accessories can contain small parts. Keep all of the equipment out of the reach of small children. The mains adapter is the disconnect device between the product and mains power. The mains socket outlet must be close to the equipment and easily accessible. -
Page 59: Areas With Explosion Risk
English Pacemakers The Health Industry Manufacturers Association recommends that a minimum separation of 15 cm be maintained between a handheld wireless phone and a pacemaker to avoid potential interference with the pacemaker. Persons with pacemakers: Should always keep the phone more than 15 cm from their pacemaker when •... -
Page 60: Care And Maintenance
English Do not keep or transport flammable liquids, gases or explosives together with the unit or its accessories. For vehicles equipped with air bags: Remember that air bags fill with air with considerable force. Do not place objects, including fixed or portable radio equipment in the area above the airbag or the area where it might expand. -
Page 61: Warranty
As a matter of precaution, we recommend disconnecting the charger during a thunderstorm. Batteries are consumables and are not included in any guarantee. This guarantee does not apply if batteries other than DORO original batteries are used. Specifications... - Page 62 English LAST PAGE Version 1.0 0700 © 2011 Doro AB. All rights reserved. www.doro.com 1137...
Need help?
Do you have a question about the PHONEEASY 610 and is the answer not in the manual?
Questions and answers