Table of Contents
Advertisement
Advertisement
Table of Contents

Related Manuals for Doro PhoneEasy 621


Summary of Contents for Doro PhoneEasy 621
- Page 1 Connevans.info Solutions to improve the quality of life This product may be purchased from Connevans Limited DeafEquipment.co.uk secure online store at www.DeafEquipment.co.uk...
- Page 2 ® Doro PhoneEasy English...
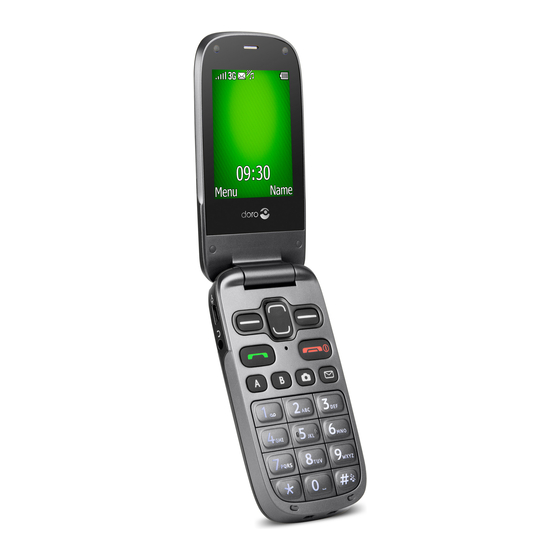
- Page 3 English Earpiece 14. Right selection button 15. Charging socket Display Arrow buttons 16. Headset socket 17. Assistance button Left selection button Call button 18. Camera lens 19. Loudspeaker Speed dials Voice mail 20. Green light = New message / Missed call Input method/Silent 21.
- Page 4 The items supplied with your phone might vary depending on the soft- ware and accessories available in your region or offered by your service provider. You can obtain additional accessories from your local Doro deal- er. The supplied accessories provide the best performance with your...
-
Page 5: Table Of Contents
English Contents Installation ..................... 1 Install the SIM card, memory card and the battery ......1 Charging......................2 Get to know your phone ................3 Assistive functions................. 3 Turn the phone on and off ..............3 Phone indicators ................... 4 Navigate the phone ................ - Page 6 English Camera......................17 Camera (take photos) ................. 17 Video camera..................18 Picture gallery and Video gallery ............19 Connect the phone to a computer .............19 Drag and drop content between phone and a computer ....20 Disconnect the USB cable safely............20 Settings ......................20 General....................20 Sound ....................23 Display....................25...
- Page 7 English Declaration of Conformity ..............54...
-
Page 8: Installation
English Installation IMPORTANT! Turn off the phone and disconnect the charger before removing the battery cover. Install the SIM card, memory card and the battery The SIM and memory card holder’s are located inside the battery compartment. Remove the battery cover and the battery if it is already installed. Optional: Insert the memory card into the slot under the SIM card holder. -
Page 9: Charging
English IMPORTANT! Use only compatible memory cards for use with this device. Compatible card type: microSD, microSDHC. Incompatible cards may damage the card itself, the device and corrupt data stored on the card. Depending on the market some phones may have a pre-installed memory card. -
Page 10: Get To Know Your Phone
English Get to know your phone Assistive functions The following symbols indicate information in the manual about assistive functions for: Seeing Handling Hearing Safety Turn the phone on and off Press and hold the red button on the phone to turn it on/off. Con- firm with Yes to power off. -
Page 11: Phone Indicators
OK. Example: • Press Menu Phonebook -New contact- Add. ® To perform the example on your Doro PhoneEasy 621 you should do the following: Press Menu, scroll to Phonebook and press OK. Select -New contact- and press Add. -
Page 12: Entering Text
English Entering text Entering text manually Select character • Press a numerical key repeatedly until the desired character is shown. Wait a few seconds before entering the next character. Special characters Press * for a list of special characters. Select the desired character with and press OK to confirm. -
Page 13: Call Functions
English Input mode Press # to change input mode. The icon on the top left of the display in- dicates the input mode. Sentence case with predictive text UPPER CASE with predictive text lower case with predictive text Sentence case UPPER CASE lower case Numerals... -
Page 14: Volume Control
English Tip: Press and hold +/– to temporarily switch off the ringsignal without opening the flip. Volume control Use the side buttons +/– to adjust the sound volume during a call. The volume level is indicated on the display. If you use a hearing aid or have hearing difficulties when using the telephone in a noisy environment, you can customise the phone's audio settings, see Audio setup , p.23. -
Page 15: Call Options
English Call options During a call the selection buttons ) give access to additional functions. Options (left selection button) • Hold single call/Retrieve single to hold/retrieve the current call. • End single call to end the current call (same as •... -
Page 16: Speed Dial
English Speed dial Use A – B , 0 and 2 – 9 to speed dial an entry from standby. • Press and hold the corresponding key. See Speed dial , p.27. Silent Silent is a fixed profile with Keypad tone, Message tone and Ringtone dis- abled, while Vibration, Tasks, Daily reminder and Alarm are unchanged. - Page 17 English The assistance button allows easy access to contact your predefined help numbers (Number list) should you need help. The assistance function may need to be activated before use. See Assistance , p.33 on how to activate as described or with 3 button presses, how to enter recipients in the numbers list and how to edit the text message.
-
Page 18: Phonebook
English Phonebook phonebook can store 500 entries with 3 phone numbers in each entry. Add contact Press Menu Phonebook -New contact- Add. Enter a Name for the contact, see Entering text , p.5. Delete with Clear. to select Mobile, Home or Office and enter the phone number(s) including the area code. -
Page 19: Owner Number
English • Top 10 to set the entry as one of the first 10 contacts listed in the phonebook. See Top 10 , p.27. • Send SMS to create text message. See Create and send text message (SMS), p.14. • Send MMS to create picture message, see Create and send pic- ture message (MMS), p.14. -
Page 20: Ice (In Case Of Emergency)
English ICE (In Case of Emergency) First responders can access additional information such as medical infor- mation from the victim's phone in case of emergency. In the event of a trauma, it is critical to have this information as early as possible to in- crease the chances of survival. -
Page 21: Messages
English Messages You can create and send text messages (SMS), picture messages (MMS) and voice messages using the Messages menu. Create and send text message (SMS) Note! Before you can send any text messages, you need to save your message centre number. The number to your service centre is supplied by your service provider and is usually set on the SIM card. -
Page 22: Create And Send A Voice Message
English Select Create new MMS. Write your message, see Entering text , p.5. Press Options Add picture: • My pictures to select a file. The picture size must be less than 600kB. • Take picture to use the camera to take a picture. You can also Add sound and Add video using the Options menu. -
Page 23: Inbox, Outbox And Sent
English Inbox, Outbox and Sent Text message/Picture mes- Text message/Picture sage unread message sent Text message/Picture mes- Text message/Picture sage read message unsent Press shortcut button Alternatively press Menu Messages. Select Inbox, Outbox or Sent. Select a message and press Read. Use to scroll up/down. -
Page 24: Call Log
English Call log Received, missed and dialled calls are saved in a combined call log. 20 calls of each type can be stored in the log. For multiple calls related to the same number, only the most recent call is saved. Retrieve and dial Press Alternatively, press Menu... -
Page 25: Video Camera
English • Send Send by Bluetooth to send to a Bluetooth device, see ® Bluetooth , p.36. • Delete to delete. Press Yes to confirm or No to return. • Wallpaper to save as display background. • Phonebook picture to save as phonebook contact. Press Back to take a new photo. -
Page 26: Picture Gallery And Video Gallery
English Picture gallery and Video gallery View your saved pictures or videos Press Menu Camera Picture gallery or Video gallery. or the side buttons +/– to select a picture or video. Press Options: • View for single view. Press Back to return. to play and stop the video (video only). -
Page 27: Drag And Drop Content Between Phone And A Computer
Computer instructions may vary depending on your operating system. See the documentation of your computer's operating system for more information. Settings ® Use the Settings menu to personalise your Doro PhoneEasy 621. General Time & date Set the time and date Press Menu Settings General. - Page 28 English Press OK to confirm. Set the time/date format Press Menu Settings General Time & date. Select Set format: • Select Time format 12 hours/24 hours. • Select Date format and select the desired date format. Press OK to confirm. Set auto time To set the phone to automatically update the time and date according to the current time zone, select On.
- Page 29 English Network setup Your phone automatically selects your (service providers) home network if this is within range. If not within range, you may use another network, provided your network operator has an agreement that allows you to do so. This is called roaming. Contact your service provider for more information.
-
Page 30: Sound
English • SIM to save 1 phone number per contact. Number and length of the phone numbers/contacts that can be stored will vary de- pending on SIM card/service provider preferences. • Phone to save 500 contacts with 3 phone numbers each Mo- bile, Home, Office or Phonebook picture. - Page 31 English to select one of the available melodies, the melody will be played. Press OK to confirm or Back to discard changes. Set up the Alarm, Message tone, Opening tone, Closing tone, Key- pad tone, Power on and Power off in the same way. Ringtone volume Press Menu Settings...
-
Page 32: Display
English Press Done to save. Display Main menu You can select different styles for the main menu. Settings Display. Press Menu Select Main menu Large/List. Press OK to confirm. Wallpaper You can select different display backgrounds. Press Menu Settings Display Wallpaper: •... -
Page 33: Calls
English LCD backlight Select the delay time for the display backlight. Press Menu Settings Display. Select LCD backlight: • 15 sec. • 30 sec. • 1 min Press OK to confirm. Brightness You can customise the phones brightness settings. Press Menu Settings Display Brightness. - Page 34 English Tip: Press and hold shortcut button 1 to call your voice mail. If activated reminder in the Messages settings, a reminder signal will be heard after 10 minutes if not listening to new voice mail messages. Speed dial A , B , 0 and 2 – 9 can be used for speed dialling. To speed dial an entry from standby, press and hold corresponding button.
- Page 35 English Call time During a call, the duration of the call is shown. You can check the dura- tion of your calls. Press Menu Settings Calls. Select Call time: • Last call to show the elapsed time of the most recent call. •...
- Page 36 English You can handle more than one call at a time. An alert tone will be heard if there is an incoming call while talking. To put the current call on hold and answer the incoming call, press Options Answer. Press Menu Settings Calls...
-
Page 37: Messages
English • Int. except home unable to call international numbers except to the country associated with the SIM card. Press OK to confirm. Select Incoming calls: • All calls to dial out but not receive incoming calls. • When roaming unable to receive incoming calls while roaming (operating in other networks). - Page 38 English Storage Press Menu Settings Messages SMS settings. Select Storage: • SIM (default) to store messages on the SIM card. • Phone to store messages in the phone memory. Press OK to confirm. SMS centre The SMS centre number is needed to use the message function. The number to your service centre is supplied by your service provider and is usually set on the SIM card.
- Page 39 English Select Memory status to display the memory space used in the phone memory. Press Back to return. Storage Picture messages are saved by default in the phone memory. When the memory becomes full you will need to either delete a picture message (see Inbox, Outbox and Sent, p.16) or select to save your picture mes- sages on the memory card.
-
Page 40: Camera
English Note! If Alert type is set to Ring only the phone will not vibrate. Delivery report You can select if you want the phone to notify you when your text mes- sage or picture message has reached the receiver. Press Menu Settings Messages. - Page 41 English Activation Select how to activate the assistance function using the assistance button. Press Menu Settings Assistance. Select Activation: • On Normal to activate by pressing and holding the button for approximately 3 seconds, or press it twice within 1 second. •...
- Page 42 English Message Press Menu Settings Assistance SMS. Select Message Edit to write the message. Press OK to confirm. Note! You must write a message if you activate the SMS function. Confirm with "0" When the assistance function is activated the phone dials the first num- ber on the list.
-
Page 43: Bluetooth
English Note! This information is not applicable if Confirm with "0" is set to On. ® Bluetooth IMPORTANT! When you are not using Bluetooth connectivity, select Function on/off/ Off or Visibility/Off. Do not pair with an unknown device. Function on/off Press Menu Settings Bluetooth. -
Page 44: Security
English Select device from the list and press Options: • Connect/Disconnect to connect/disconnect with the selected device. This may require a profile, usually a headset. • Set default to set the connected device as default. • Rename to change the name of the device. •... - Page 45 Select On/Off to enable/disable. Press OK to confirm. Number list You need to add the name and number of the people who are allowed to ® send information from their phone to your Doro PhoneEasy 621. Press Menu Settings Security Remote config.
-
Page 46: File Manager
English • Fixed numbers Add and enter the first allowed number. Alternatively, select an entry and press Options Add/Edit/ Delete. If needed, enter PIN2 and press OK to confirm. Note! You can save parts of phone numbers. For example, if you save 01234, allows calls to all numbers starting with 01234. -
Page 47: Additional Functions
English Select Phone/Memory card Open. Select a folder, eg Photos and press Open. Select a file and press Options: • Play (audio/video/music), press to Play or to Stop. • View (photos/images) for single view. • Send Send by MMS to send as picture message (Create and send picture message (MMS), p.14)/Send by Bluetooth to ®... - Page 48 English Alarm Press Menu Organizer Alarm Enter the alarm time using the keypad. Press OK to confirm. For a single occurrence, select Single. For a repeated alarm, select Repeated. Scroll through the list of days and press On/Off to enable/disable the alarm for each day. To edit an alarm, press Edit.
- Page 49 English Press Options: • Edit to edit selected task. • Delete to delete selected task. • Delete all to delete all tasks. Press OK to confirm. Note! The calendar will work even when the phone is switched off. Do not press Yes to power on if wireless phone use is prohibited or when it may cause interference or danger.
-
Page 50: More
English Notes Press Menu Organizer Notes. Select Add to enter your note using the keypad. Press OK to save. Options Press Menu Organizer Notes. Select a note, then press Options: • Add to add new note. • Edit to edit selected note. •... - Page 51 English Press OK to confirm. Save frequency Press Menu More FM radio Options Save frequency. Enter a name for the new channel, see Entering text , p.5. Press Save. Switch off • Press Menu More FM radio Options Switch off. Tip: Disconnecting the headset will also turn off the radio.
-
Page 52: Status
Instructions for the REMOTE USER Send remote control commands by text message Make sure activation is set to On and that the remote user is saved ® in the Number list on the Doro PhoneEasy 621. Press Menu Settings Security Remote config. - Page 53 The mobile number is: 0700-393939. Home number: 046-280 50 11. Office number: 046-280 50 83. • *#phonebook#Jeff Jackson#0700393939#0462805011#0462805083# ® The number is saved in the Doro PhoneEasy 621 phonebook as: Jeff Jackson 0700393939 0462805011 0462805083 Note! Only use numerals for parameters 2, 3 and 4. If you use letters in these parameters it will be stored as empty/blank in the phonebook.
- Page 54 English alert Text message max. length= 0=Off 1=On alert confirm with 0=Off “0” 1=On alert 0/1/2 signal type 0=High 1=Low 2=Silent Example: Activate the assistance function. • *#alert#a#1# Example: Store Jeff Jackson in Number list as position one (1) with phone number: 0700-393939.
-
Page 55: Troubleshooting
English Example: Set Jeff Jackson’s mobile number in memory key A in Doro ® PhoneEasy 621 and Martha Thomson in memory key B. • *#memorykey#a#Jeff Jackson#0700393939# • *#memorykey#b#Martha Thomson#0768991014# Add task to calendar Command note task yyyymmdd hhmm description of task. - Page 56 English Failure to place or receive calls Call barring activated Deactivate call barring. If this does not solve the problem, contact your service provider. PIN code not accepted Wrong PIN code entered Enter the PUK code to change the PIN code, or too many times contact your service provider.
-
Page 57: Safety Instructions
English Unable to send or receive Picture Messages / MMS with the SIM card The MMS profile is not For some operators the MMS profile has to be set automatically and it selected manually. Activate the correct profile to is not possible to send suit your SIM card or network used. -
Page 58: Medical Units
English Medical units The use of equipment that transmits radio signals, for example, mobile phones, can in- terfere with insufficiently protected medical equipment. Consult a doctor or the manu- facturer of the equipment to determine if it has adequate protection against external radio signals, or if you have any questions. -
Page 59: Protect Your Hearing
English WARNING Danger of explosion if battery is incorrectly replaced. To reduce risk of fire or burns, do not disassemble, crush, puncture, short external contacts, expose to temperature above 60° C (140° F), or dispose of in fire or water. Recycle or dispose of used batteries according to the local regulations or reference guide supplied with your product. -
Page 60: Care And Maintenance
As a matter of precaution, we recommend disconnecting the charger during a thunderstorm. Batteries are consumables and are not included in any guarantee. This guarantee does not apply if batteries other than DORO original batteries are used. -
Page 61: Specifications
The maximum limit according to ICNIRP is 2.0 W/kg measured over 10 g tissue. Declaration of Conformity ® Doro hereby declares that Doro PhoneEasy 621 conforms to the essential require- ments and other relevant regulations contained in the Directives 1999/5/EC (R&TTE) and 2011/65/EC (RoHS). - Page 62 English...
- Page 63 PhoneEasy 621 (1031,1041) English Version 1.2 0700 ©2013 Doro AB. All rights reserved. www.doro.com REV 9931 — STR 20130426...
Need help?
Do you have a question about the PhoneEasy 621 and is the answer not in the manual?
Questions and answers