Table of Contents
Advertisement
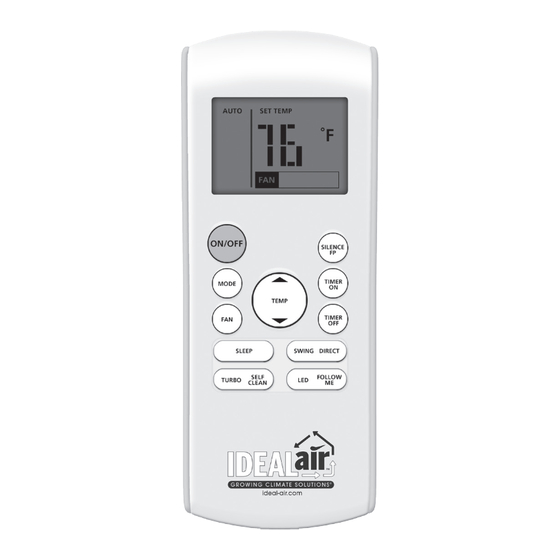
R E M O T E C O N T R O L
PRO | DUAL MINI-SPLIT
APPLIES TO THESE MODELS:
700021 • 700023 • 700024 • 700025 • 700026 • 700027 • 700028 • 700029 • 700807 • 700808
REMOTE MANUAL
All the illustrations in the manual are for explanation purpose only.
Your machine may be slightly different. The actual shape shall prevail.
Advertisement
Table of Contents

Related Manuals for Ideal Air DUAL MINI-SPLIT

Summary of Contents for Ideal Air DUAL MINI-SPLIT
- Page 1 R E M O T E C O N T R O L PRO | DUAL MINI-SPLIT APPLIES TO THESE MODELS: 700021 • 700023 • 700024 • 700025 • 700026 • 700027 • 700028 • 700029 • 700807 • 700808 REMOTE MANUAL All the illustrations in the manual are for explanation purpose only.
-
Page 2: Table Of Contents
CONGRATULATIONS... on your purchase of Ideal Air’s Pro | Dual Mini-Split Air Conditioner/Heat Pump. We’re proud to offer this product and believe it’s the very best in its class. READ THIS MANUAL Thank you for purchasing this air conditioner. This manual will provide you with information on how to operate, maintain, and troubleshoot your remote control. -
Page 3: Operation Buttons
OPERATION BUTTONS ON/OFF BUTTON This button turns the air conditioner ON and OFF. MODE BUTTON Press this button to modify the air conditioner mode in a sequence of following: AUTO COOL HEAT FAN BUTTON Used to select the fan speed in four steps: MEDIUM HIGH AUTO... - Page 4 UP BUTTON ( Push this button to increase the indoor temperature setting by 1º F increments to 86º F. DOWN BUTTON ( Push this button to decrease the indoor temperature setting by 1º F increments to 62º F. NOTE: Temperature control is not available in FAN mode.
- Page 5 TIMER OFF BUTTON Press this button to initiate the auto-off time sequence. Each press will increase the auto -timed setting in 30 minutes increments. When the setting time displays 10.0, each press will increase the auto-timed setting 60 minutes increments. To cancel the auto-timed program, simply adjust the auto-off time to 0.0.
-
Page 6: Indicators On Lcd
INDICATORS ON LCD Information is displayed when the remote control is powered up. MODE DISPLAY Displayed when data transmitted. Displayed when remote control is ON. Battery display (low battery detection). ON/OFF SILENCE ON/OFF ON/OFF SILENCE SILEN Not available for this unit. ON/OFF SILENCE TIMER... -
Page 7: How To Use The Buttons
HOW TO USE THE BUTTONS AUTO OPERATION Ensure the unit is plugged in and power is available. The OPERATION indicator on the display panel of the indoor unit starts flashing. 1. Press the MODE button to select AUTO. 2. Press the UP/DOWN button to set the desired temperature. -
Page 8: Dehumidifying Operation
DEHUMIDIFYING OPERATION Ensure the unit is plugged in and power is available. The OPERATION indicator on the display panel of the indoor unit starts flashing. 1. Press the MODE button to select DRY mode. 2. Press the UP/DOWN buttons to set the desired temperature. - Page 9 CAUTION • When you select the timer operation, the remote control automatically transmits the timer signal to the indoor unit for the specified time. Therefore, keep the remote control in a location where it can transmit the signal to the indoor unit properly. •...
- Page 10 COMBINED TIMER (SETTING BOTH ON AND OFF TIMERS SIMULTANEOUSLY) TIMER OFF TIMER ON Stop Start operation) This feature is useful when you want to stop the air conditioner after you go to bed, and start it again in the morning when you wake up or when you return home. Start EXAMPLE To stop the air conditioner 2 hours after setting and...
-
Page 11: Handling The Remote Control
HANDLING THE REMOTE CONTROL LOCATION OF THE REMOTE CONTROL Use the remote control within a distance of 8 meters/26 feet from the appliance, pointing it towards the receiver. Reception is confirmed by a beep. CAUTION • The air conditioner will not operate if curtains, doors or other materials block the signals from the remote control to the indoor unit. - Page 12 IMPORTANT Product not working properly? DO NOT return this product to the store where you purchased it. Contact Ideal-Air support directly at support@ideal-air.com or call 1-877-943-3251 For answers to most common questions and a complete technical support library please visit www.ideal-air.com All design and specifications herein are subject to change without notice for product improvement.
Need help?
Do you have a question about the DUAL MINI-SPLIT and is the answer not in the manual?
Questions and answers