Table of Contents
Advertisement
Quick Links
900 Series Wireless Headsets: Third and Fourth Generation
1.0 GENERAL
Before using your wireless headset, read these instructions carefully.
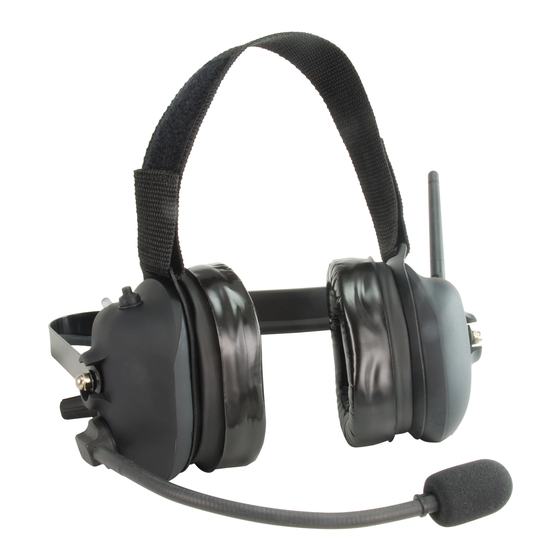
Each 900 Series Wireless Headset comes as a kit which includes the following components:
wireless headset (Fig. 1);
-
Base Station (Fig. 2);
-
two power cables, one to charge the headset and one to power the Base Station (part number: 25-1004);
-
one headset hanger for the headset (part number: 14-7014);
-
four mounting screws for the Base Station (part number: 21-8006);
-
two screw-on Headset Antennas (one is included with headset, one with base – Fig. 1 [g]; part number: 28-2017)
-
Please confirm that you have received all of these components.
Confirm that the headset is fully charged (See 2.1 below) and that the Base Station is powered.
Note: these instructions cover Setcom's third generation of 900 Series wireless headsets. If you received your headset prior to
April 2012, you have Setcom's second generation wireless headset, which functions identically to the third generation, only
without the Cell Phone Button (Fig. 1 [h]) and optional cell phone interface capability.
Note: if you received your headset prior to March 2011, you have Setcom's first generation wireless headset, which functions
differently than the second and third generations and has its own user guide. Please refer to this document for further information
on its use and operation.
2.0 HEADSET OPERATION
2.1 Charging
Plug Charging Cable (25-1004) into the headset's Charging Jack (Fig. 1 [a]).
To fully charge the headset takes approximately 3.5 hours.
While the headset is being charged, its LED Indicator (Fig. 1 [b]) will show a steady amber color. The LED Indicator will go
off when the headset is fully charged.
The headset may be used while charging. In this case, the LED Indicator will show a steady amber color while also slowly
flashing green.
2.2 Turning the Headset On and Off
Locate the Volume Control (Fig. 1 [c]) on the headset's right cup: this is also the headset's on-off switch.
Turn the knob clockwise to turn on the headset.
Immediately after being turned on, the headset will beep one-to-three times, indicating its battery charge level:
One beep:
-
Two beeps:
-
Three beeps:
-
The headset will link to the Base Station very quickly. Within about five seconds, the headset will beep three times, low-to-
high, indicating that it is linked.
To turn off the headset, turn the Volume Control counter-clockwise until it clicks.
3019 Alvin DeVane Boulevard, Suite 560 • Austin, Texas 78741 USA
Low battery/ charging required
Moderate charge remaining
Fully charged
Ph (650) 965-8020
User Guide
Fax (650) 965-1193
Advertisement
Table of Contents

Related Manuals for Setcom 900 series


Summary of Contents for Setcom 900 series
- Page 1 Confirm that the headset is fully charged (See 2.1 below) and that the Base Station is powered. Note: these instructions cover Setcom’s third generation of 900 Series wireless headsets. If you received your headset prior to April 2012, you have Setcom’s second generation wireless headset, which functions identically to the third generation, only without the Cell Phone Button (Fig.
- Page 2 2.4 Keying the Portable Radio Install the Portable Radio Adapter Cable (part number: PRAC-W__ [where the underscore is Setcom’s portable radio designator]; sold separately). Connect the PRAC’s radio adapter to your portable radio. Then plug the round connector (5- pin, mini-XLR) into the Portable Radio Interface Connector (Fig.
- Page 3 LED will flash green faster than it normally would when linked to the Base Station. Set your cell phone to Search mode. In short order, it should find or “see” a device labeled “SETCOM”. Accept this connection, and set your cell phone to pair with it.
- Page 4 Reattach the over the head strap (removed in step one) to the cup ring. 6.0 SUPPORT For technical support, please contact Setcom at the number below. Please have your sales or purchase order number when you call. 650.965.8020 x603 or tech@setcomcorp.com 7.0 WARRANTY...
- Page 5 (g) Headset Antenna Figure 1 (b) LED Indicator 900 Series Wireless Headset Third Generation (rear view) (h) Cell Phone Button (c) Volume Control Also Power On/ Off CSB-900W3 SN: SXXXXXXXXX (a) Charging Jack DC input power (7 to 24Vdc) (d) Mobile Radio...
- Page 6 Figure 2 900 Series Wireless Base Station Third Generation (side view) (e) Base Station Antenna (side one) (side two) (a) LED Indicator (a) LED Indicator 900W3-BASE SN: Sxxxxxxxxx (c) Power Cable Connector (b) Pairing Button DC input power (7 to 24Vdc)
- Page 7 Headset Support Sling Remove the headset support sling from the cup ring. Headset Cup Ring Stretch and pull to remove the cup ring from the headset cup. Retaining Lip Starting at the top, insert as much the gel pad’s retaining lip as possible into the cup’s groove.
- Page 8 While holding the gel pad where its retaining lip was inserted in step two, work the rest of the retaining lip into the groove around the cup. Using this tab for leverage, lift and stretch the cup ring over the gel pad. The cup ring should rest in the cup groove on top of the gel pad, helping...
Need help?
Do you have a question about the 900 series and is the answer not in the manual?
Questions and answers